

Antrea FeatureGates #
In this post, I will highlight a couple of Antrea features that I’d like to discuss. I will explain how to configure them, why they are useful, and how to use them. Below is some of the features I will cover
- Egress using VLAN
- AntreaProxy
- ServiceExternalIP
- L7FLowExporter
- NodeNetwork Policy
- ExternalNode Policy
As usual, head over to the official Antrea documentation and Antrea Github repo for more information. This post will focus on the upstream version v1.15.1 of Antrea available on Github, my Kubernetes clusters will also be using upstream Kubernetes version 1.28.5+ running on Ubuntu nodes.
Antrea FeatureGates is enabled/disabled using your Helm value file, or editing the Antrea ConfigMap. To quickly get a status over the feature gates, use the antctl cli tool:
andreasm@linuxmgmt01:~$ antctl get featuregates
Antrea Agent Feature Gates
FEATUREGATE                     STATUS       VERSION
AntreaIPAM                      Disabled     ALPHA
AntreaPolicy                    Enabled      BETA
AntreaProxy                     Enabled      GA
CleanupStaleUDPSvcConntrack     Disabled     ALPHA
Egress                          Enabled      BETA
EgressSeparateSubnet            Enabled      ALPHA
EgressTrafficShaping            Disabled     ALPHA
EndpointSlice                   Enabled      GA
ExternalNode                    Disabled     ALPHA
FlowExporter                    Disabled     ALPHA
IPsecCertAuth                   Disabled     ALPHA
L7FlowExporter                  Disabled     ALPHA
L7NetworkPolicy                 Disabled     ALPHA
LoadBalancerModeDSR             Disabled     ALPHA
Multicast                       Enabled      BETA
Multicluster                    Disabled     ALPHA
NetworkPolicyStats              Enabled      BETA
NodeNetworkPolicy               Disabled     ALPHA
NodePortLocal                   Enabled      GA
SecondaryNetwork                Disabled     ALPHA
ServiceExternalIP               Enabled      ALPHA
SupportBundleCollection         Disabled     ALPHA
TopologyAwareHints              Enabled      BETA
Traceflow                       Enabled      BETA
TrafficControl                  Disabled     ALPHA

Antrea Controller Feature Gates
FEATUREGATE                 STATUS       VERSION
AdminNetworkPolicy          Disabled     ALPHA
AntreaIPAM                  Disabled     ALPHA
AntreaPolicy                Enabled      BETA
Egress                      Enabled      BETA
IPsecCertAuth               Disabled     ALPHA
L7NetworkPolicy             Disabled     ALPHA
Multicast                   Enabled      BETA
Multicluster                Disabled     ALPHA
NetworkPolicyStats          Enabled      BETA
NodeIPAM                    Enabled      BETA
ServiceExternalIP           Enabled      ALPHA
SupportBundleCollection     Disabled     ALPHA
Traceflow                   Enabled      BETA
Antrea Egress using VLAN - new in Antrea v.1.15.0 #
I have already covered Antrea Egress in another post here, where I use Daemonset to install FRR on the worker nodes. This allowed me to advertise the Egress addresses using BGP using a different subnet than the nodes themselves. Back then Antrea did not have support for Egress subnets in different network than the nodes. Now, in Antrea v1.15.0 there is support in Antrea Egress to use different subnets. This is a welcome update in Antrea.
Before configuring Antrea Egress, the default behaviour for a pod when “egressing” or communicating externally outside its Kubernetes cluster is that its source address (POD CIDR) is translated using SNAT to the Kubernetes node the pod is currently running on. See below diagram:
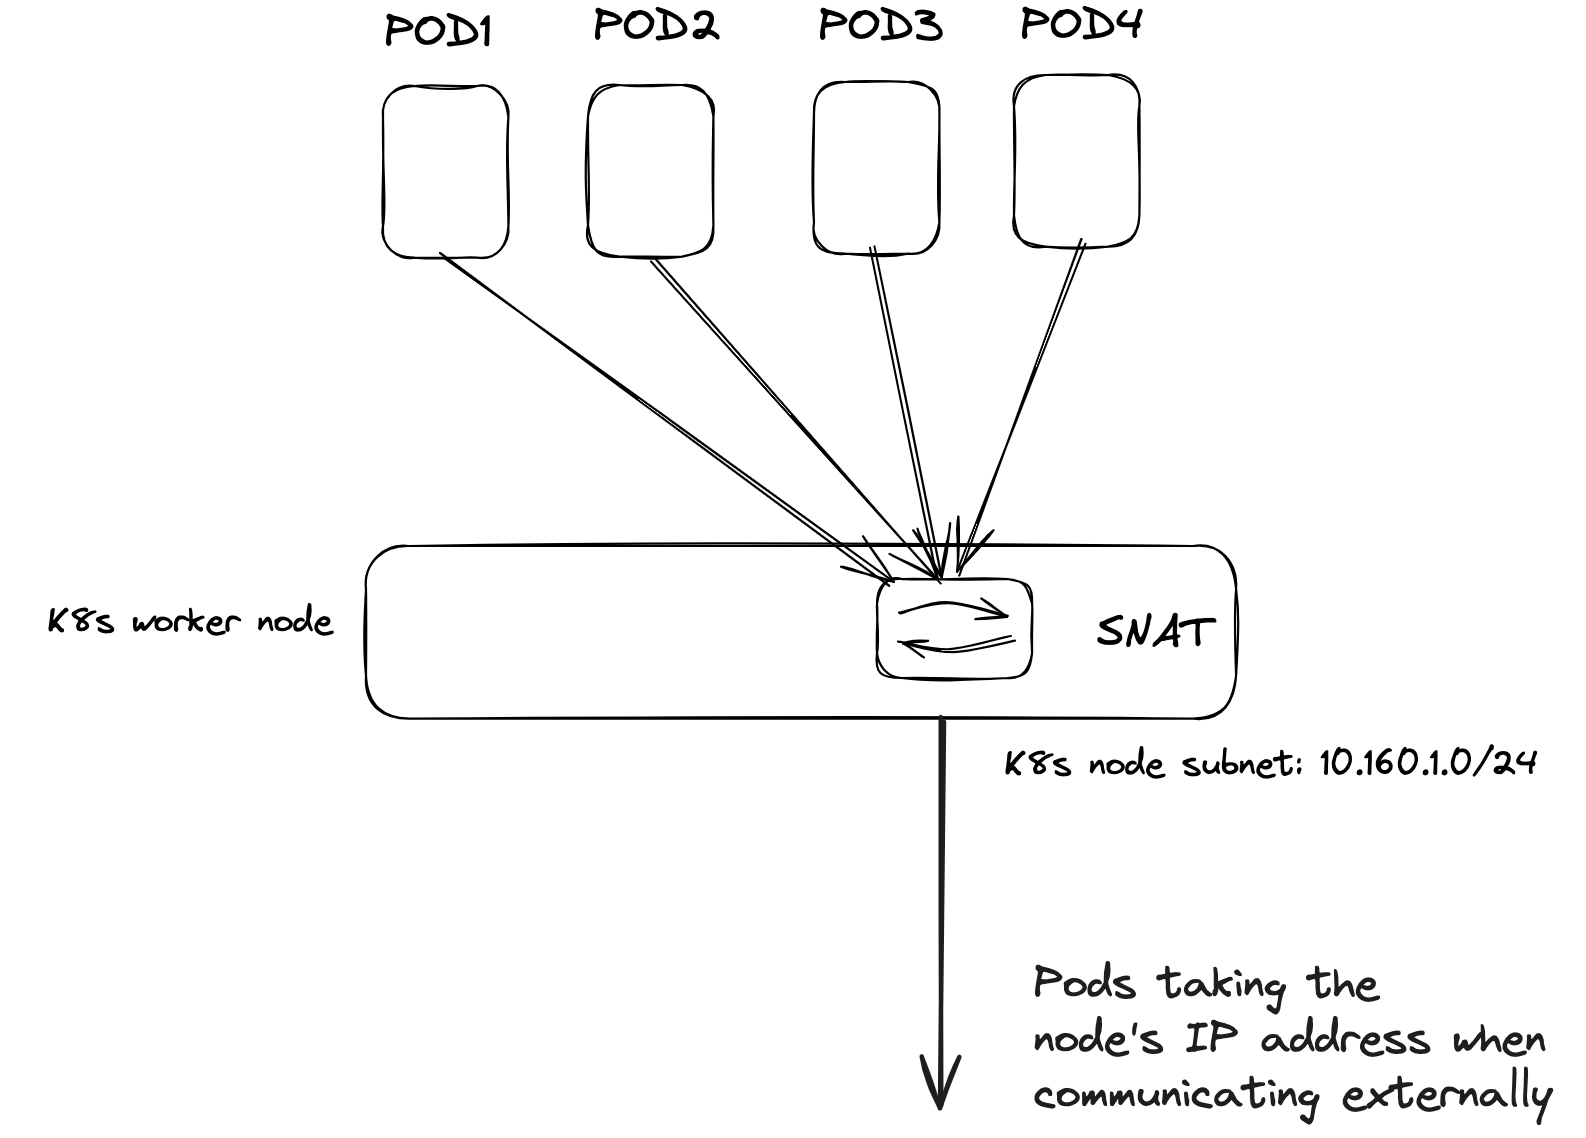
Each time a pod needs to communicate outside its k8s node it will get the IP address from the node it is currently residing on.
With Antrea Egress I can specify a specific IP address from a pool (ExternalIPPool) I confgure for the pods to use (for the ones I need Egress configured on). Before Antrea v1.15.0 I could only use the same subnet as the Kubernetes nodes were using, meaning I had to reserve a range in that subnet for Egress usage to avoid IP overlap, unless I did some DIY stuff like static routes or as in my post here. Now with Antrea v1.15.0 Antrea supports Egress on a different subnet, it even supports using a optional VLAN tag like this:
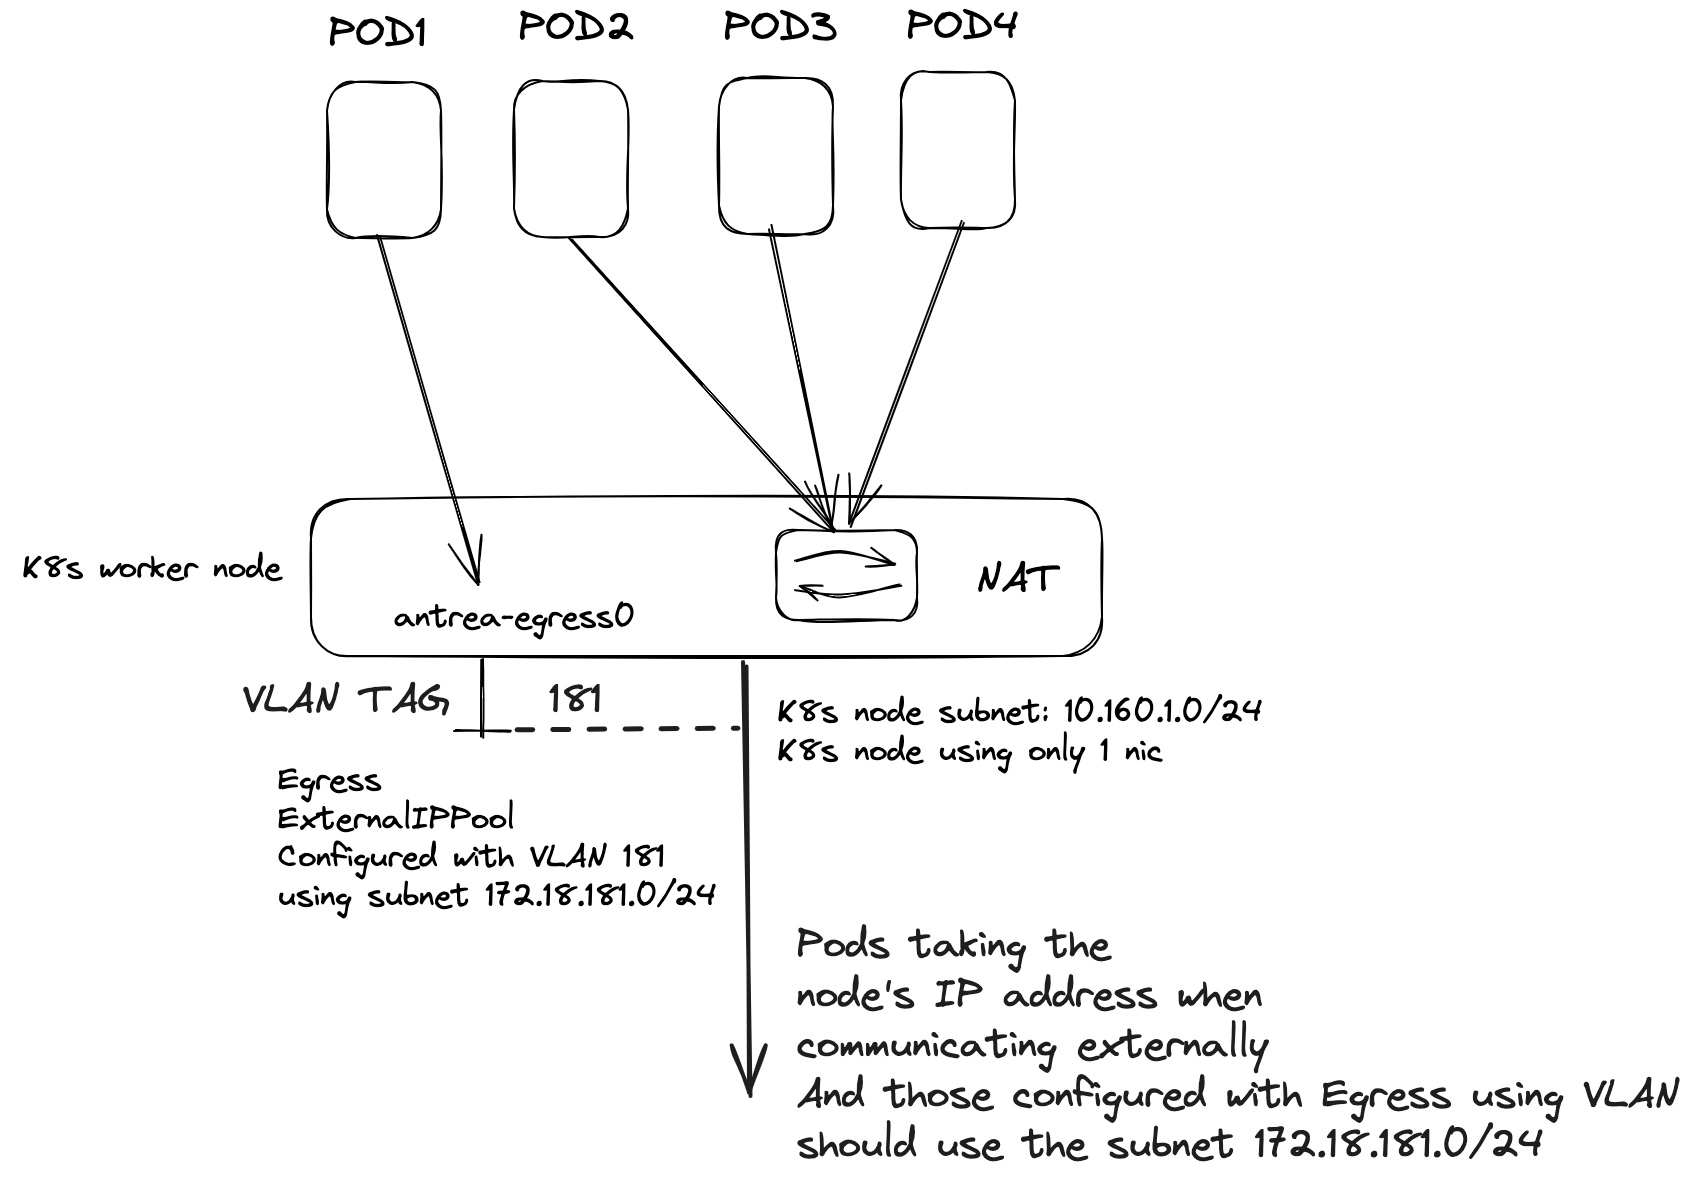
I assign a VLAN tag in the ExternalIPPool which uses the same physical interface as the node itself is configured with, like eth0/ens18 etc). This require my node to be placed on a network that allows vlan trunks/in guest tagging, and allows me to easily separate the Egress subnets from the node subnet and specifying different subnets for my Egresses. In simple terms, what it does is creating a vlan interface on the nodes I decide to use as Egress nodes. Like this:
11: antrea-ext.181@eth0: <BROADCAST,MULTICAST,UP,LOWER_UP> mtu 1500 qdisc noqueue state UP mode DEFAULT group default
    link/ether bc:24:11:1d:82:f5 brd ff:ff:ff:ff:ff:ff
This then gives me the option create Antrea Egress IP Pools with different subnets, separating them using VLAN, for my pods to use when in need of reaching out externally. **This means I can have my nodes residing on its own VLAN, and my Antrea Egress pools separated on completely different VLANs than my nodes. **
In the diagram below I have configured Antrea Egress with an ExternalIPPool using VLAN and a subnet defined to be 172.18.181.0/24. The nodes themselves reside on the subnet 10.160.1.0/24. So when I apply the Egress resource on a pod (using label selectors) it will grab a free IP from the ExternalIPPool and use an address from that subnet (172.18.181.0/24) when exiting the node. The other pods not configured with Egress resources will still use SNAT and translate their IP into the residing pods ip address (10.160.1.0/24). This gives me great flexibility not only to control which pods needs to use Egress, but also the flexibility to specify dedicated IP addresses for certain pods to use when egressing, and I can even specify multiple different subnets (see note [here]((which may incur additional management overhead))) using several Antrea Egress IP pools and achieve additional separation to meet different requirements. Controlling access via my firewall makes life much easier as I can allow a specific pod/IP to reach certain services in one part of my environment, where another pod with another subnet defined reach other parts of my environment. Using VLAN also eliminate the need of configuring BGP from my worker nodes to my BGP routers (which may incur additional management overhead), a VLAN is often simpler to create and manage.
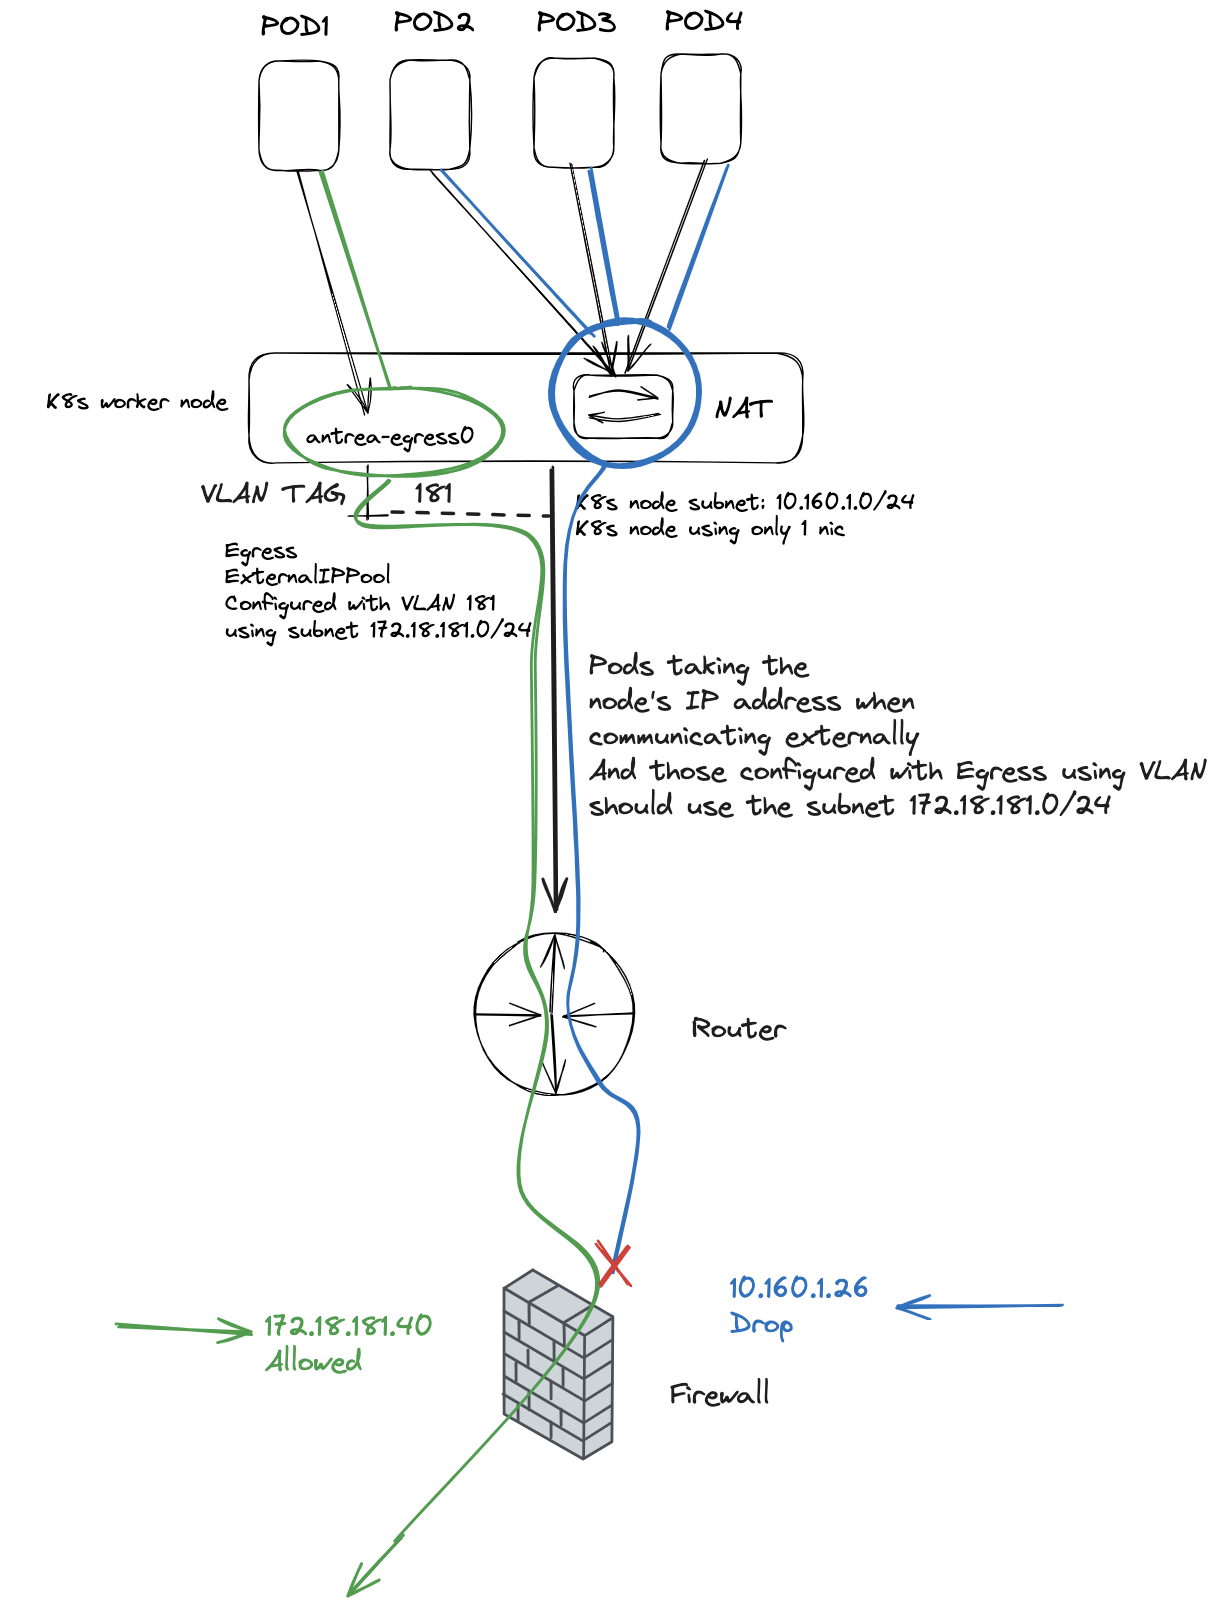
A very simple illustration on how my network is configured, for better context.
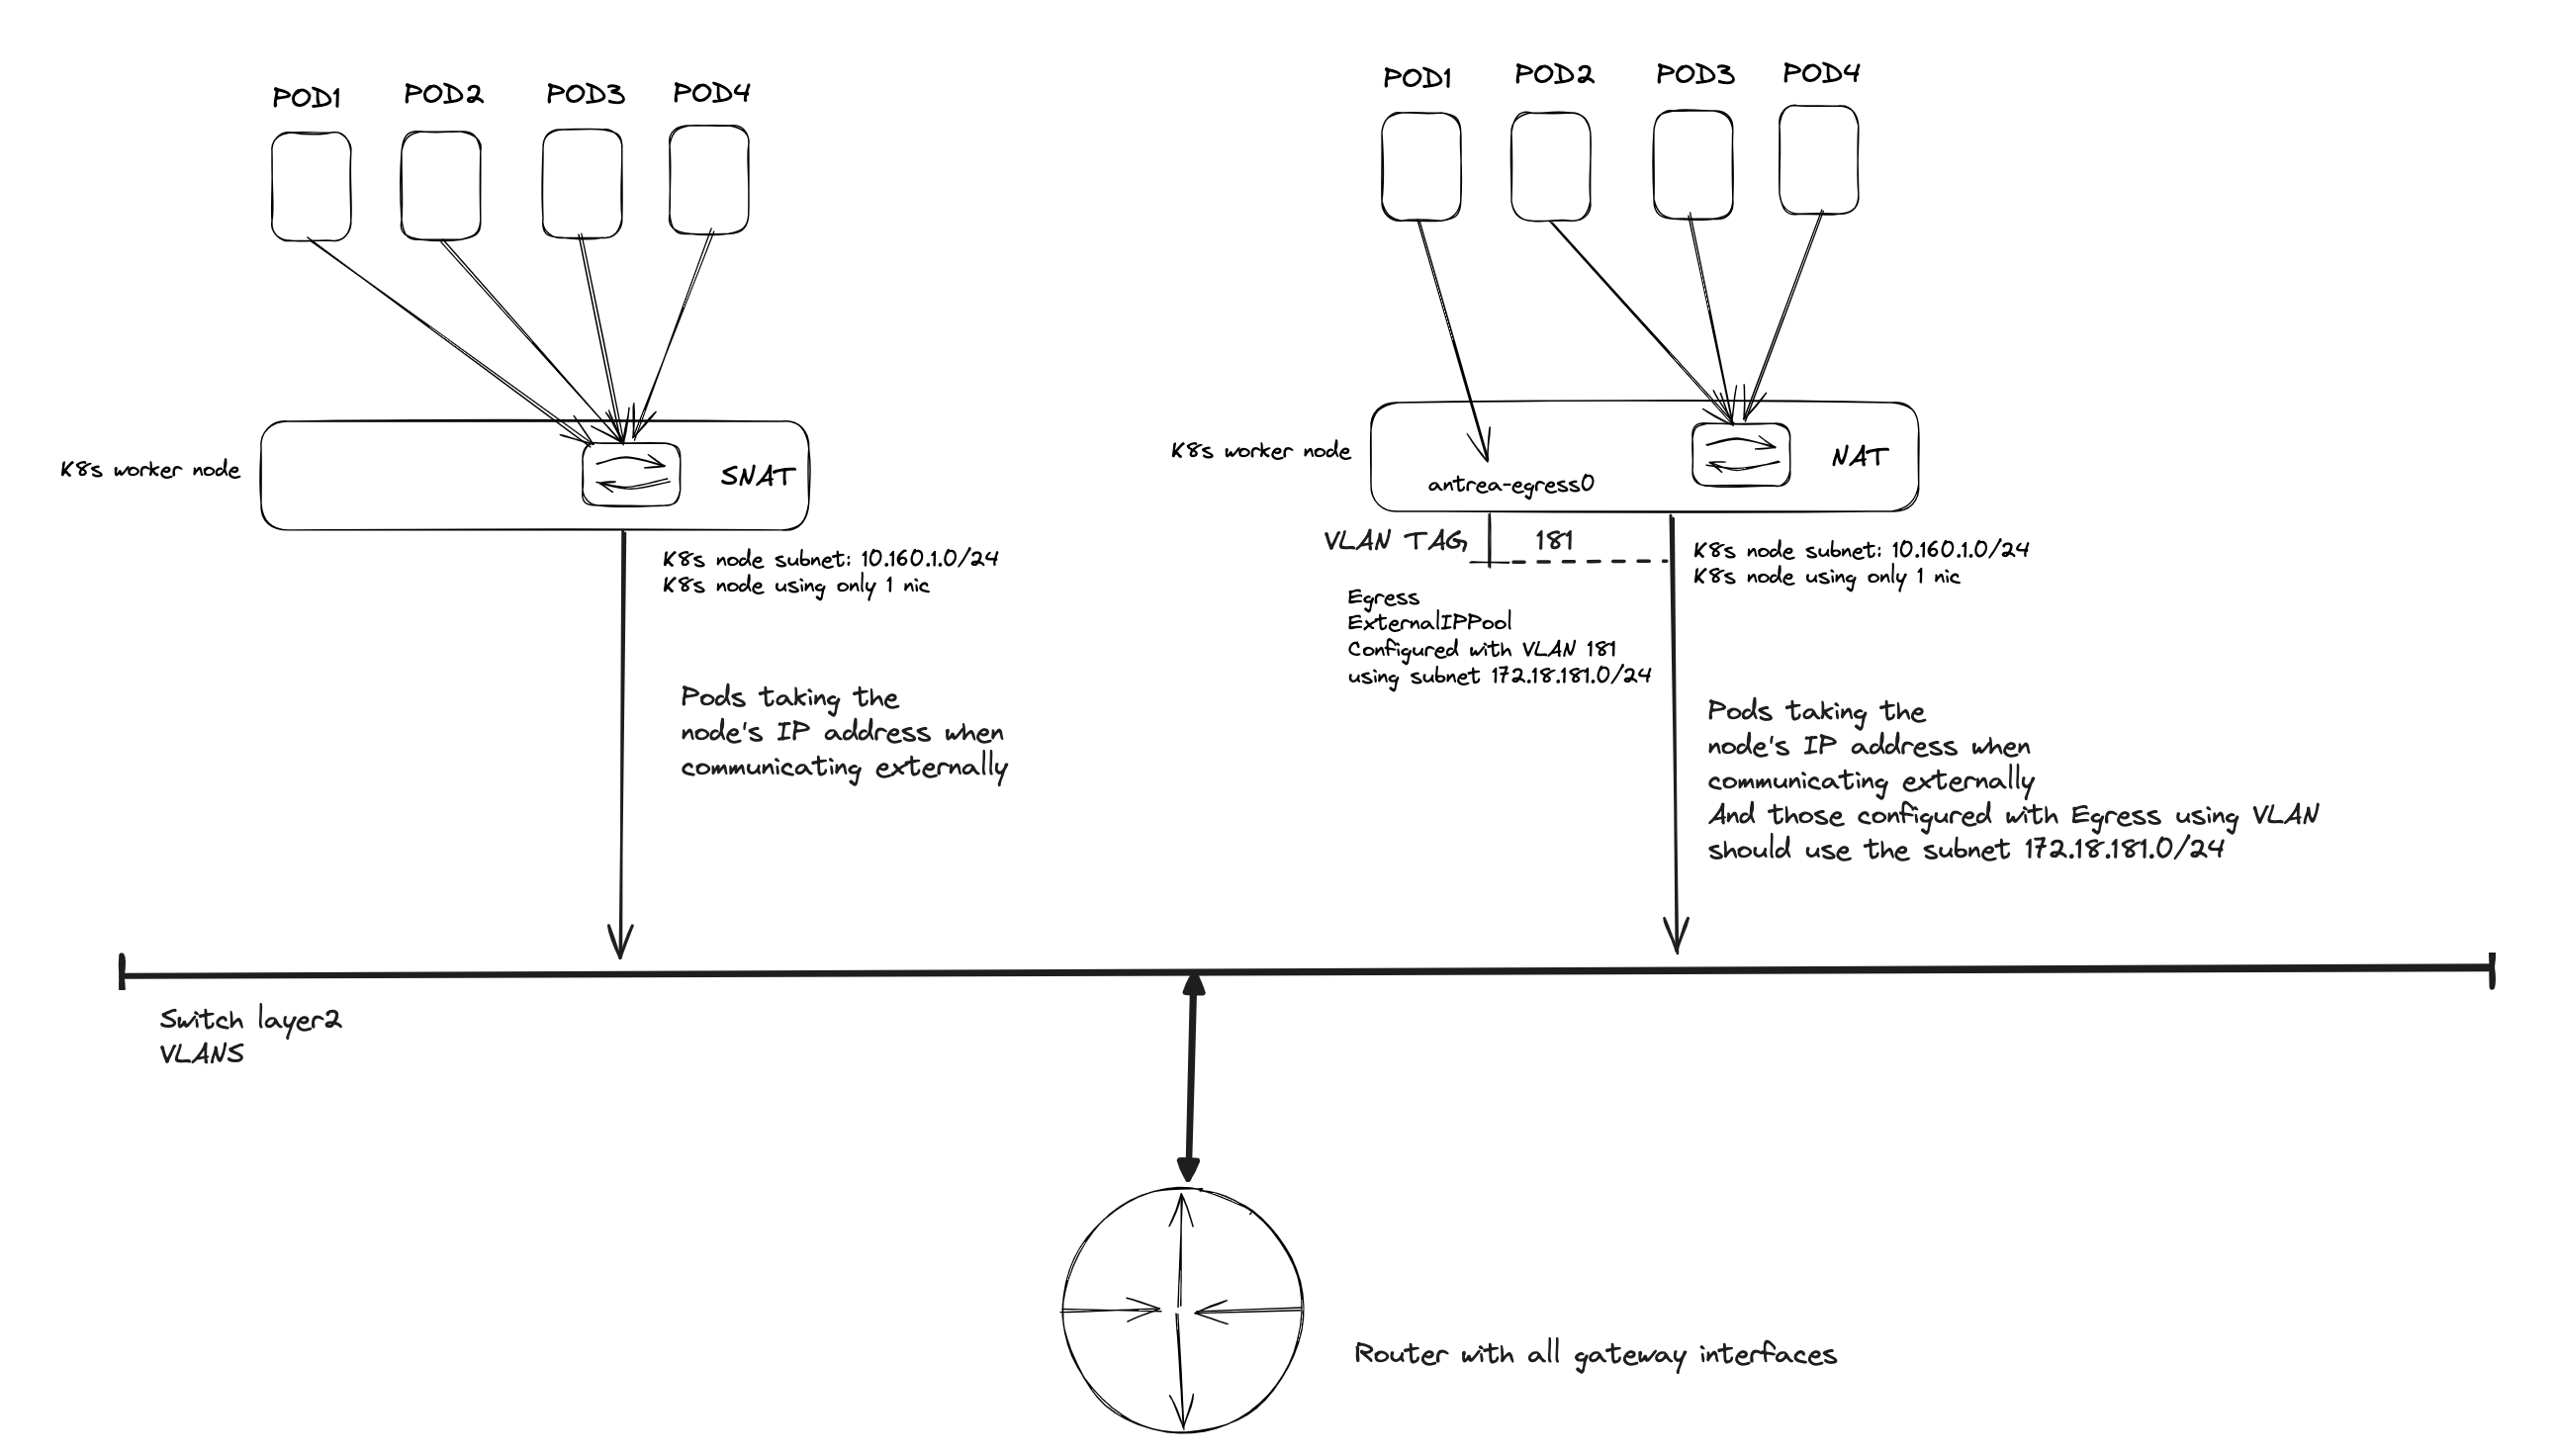
All my nodes are configured on a virtual port group using VLAN 216, using subnet 10.160.1.0/24 and my Egress pool is configured using VLAN 181. My switch is both L2 and L3, its configured with gateway interfaces for some of my networks and routes between the networks configured on the switch. All networks outside the switch is routed to my firewall using BGP.
How to configure Antrea Egress using VLAN #
Now that I have explained how this new Antrea Egress works, its time to show how to configure it in my Kubernetes cluster.
The first requirement is that Antrea is on version 1.15.x. To check that execute the following command:
andreasm@linuxmgmt01:~$ k exec -it -n kube-system antrea-controller-c47585dbf-6vdsl antctl version
kubectl exec [POD] [COMMAND] is DEPRECATED and will be removed in a future version. Use kubectl exec [POD] -- [COMMAND] instead.
antctlVersion: v1.15.1
controllerVersion: v1.15.1
Then make sure you have configured the following feature gates in the Antrea configMap:
apiVersion: v1
kind: ConfigMap
metadata:
  name: antrea-config
  namespace: kube-system
data:
  antrea-agent.conf: |
    featureGates:
      Egress: true
      EgressSeparateSubnet: true
  antrea-controller.conf: |
    featureGates:
      Egress: true
After editing the Antrea configMap, restart the Antrea controller and agents so they can fetch the updated configMap:
k rollout restart -n kube-system deployment/antrea-controller
k delete pods -n kube-system -l component=antrea-agent
Now I need to create and apply an ExternalIPPool:
apiVersion: crd.antrea.io/v1beta1
kind: ExternalIPPool
metadata:
  name: egress-vlan-external-ip-pool
spec:
  ipRanges:
  - start: 172.18.181.40
    end: 172.18.181.50
  subnetInfo:
    gateway: 172.18.181.1
    prefixLength: 24
    vlan: 181 # notice the VLAN setting here - this is a different VLAN than my nodes are using.
  nodeSelector:
    matchLabels:
      egress-role: egress-node
I am using a nodeSelector matching on the label egress-role=egress-node. So I will need to label the nodes I want to be used as Egress nodes, or all of them. The Egress object will failover to the next available node if the active one fails and if I have more than one node labeled accordingly. I can quickly showcase that a bit later.
If I check for any ExternalIPPools I should have one applied now:
andreasm@linuxmgmt01:~/prod-cluster-2$ k get externalippools.crd.antrea.io
NAME                           TOTAL   USED   AGE
egress-vlan-external-ip-pool   11      0      23h
Then I will label my nodes:
k label nodes k8s-node-vm-1-cl-02 egress-role=egress-node
k label nodes k8s-node-vm-2-cl-02 egress-role=egress-node
k label nodes k8s-node-vm-3-cl-02 egress-role=egress-node
Now my three control plane nodes can be used as Egress nodes.
I can now apply the Egress resource itself, refering to my ExternalIPPool above, where I will select an Ubuntu pod I already have running:
apiVersion: crd.antrea.io/v1beta1
kind: Egress
metadata:
  name: egress-vlan
spec:
  appliedTo:
    podSelector:
      matchLabels:
        app: egress-1
  externalIPPool: egress-vlan-external-ip-pool
status:
  egressNode: k8s-node-vm-2-cl-02
In the appliedTo field I am using podSelector without namespace, so it is a clusterwide selection for any pods using the label app=egress-1. Then I select which ExternalIPPool to use. I am also specifying the preferred node as the Egress node, but as we will see later, if that one becomes unavailable it will failover to next available node.
andreasm@linuxmgmt01:~/prod-cluster-2$ k get egress
NAME          EGRESSIP        AGE   NODE
egress-vlan   172.18.181.40   23h   k8s-node-vm-2-cl-02
And the ExternalIPPool now shows me:
andreasm@linuxmgmt01:~/prod-cluster-2$ k get externalippools.crd.antrea.io
NAME                           TOTAL   USED   AGE
egress-vlan-external-ip-pool   11      1      23h
If I enter bash of my Ubuntu pod now and ping an external vm, it will use the IP address above (172.18.181.40).
Lets see:

And just to show that my nodes are using subnet 10.160.1.0/24:
andreasm@linuxmgmt01:~/prod-cluster-2$ k get nodes -o wide
NAME                  STATUS   ROLES           AGE   VERSION   INTERNAL-IP   EXTERNAL-IP   OS-IMAGE             KERNEL-VERSION       CONTAINER-RUNTIME
k8s-cp-vm-1-cl-02     Ready    control-plane   66d   v1.28.5   10.160.1.21   <none>        Ubuntu 22.04.3 LTS   5.15.0-102-generic   containerd://1.7.13
k8s-cp-vm-2-cl-02     Ready    control-plane   66d   v1.28.5   10.160.1.22   <none>        Ubuntu 22.04.3 LTS   5.15.0-102-generic   containerd://1.7.13
k8s-cp-vm-3-cl-02     Ready    control-plane   66d   v1.28.5   10.160.1.23   <none>        Ubuntu 22.04.3 LTS   5.15.0-102-generic   containerd://1.7.13
k8s-node-vm-1-cl-02   Ready    <none>          66d   v1.28.5   10.160.1.25   <none>        Ubuntu 22.04.3 LTS   5.15.0-102-generic   containerd://1.7.13
k8s-node-vm-2-cl-02   Ready    <none>          66d   v1.28.5   10.160.1.26   <none>        Ubuntu 22.04.3 LTS   5.15.0-102-generic   containerd://1.7.13
k8s-node-vm-3-cl-02   Ready    <none>          66d   v1.28.5   10.160.1.27   <none>        Ubuntu 22.04.3 LTS   5.15.0-102-generic   containerd://1.7.13

andreasm@linuxmgmt01:~/prod-cluster-2$ k get pod -n egress -owide
NAME                            READY   STATUS    RESTARTS   AGE   IP           NODE                  NOMINATED NODE   READINESS GATES
ubuntu-20-04-59d474f9df-dv9ms   1/1     Running   0          28h   10.30.67.5   k8s-node-vm-1-cl-02   <none>           <none>
Thats it. Works beautifully.
On the node that is currently my Egress node, I will now have a interface called antrea-ext.181@eth0:
ubuntu@k8s-node-vm-2-cl-02:~$ ip link
1: lo: <LOOPBACK,UP,LOWER_UP> mtu 65536 qdisc noqueue state UNKNOWN mode DEFAULT group default qlen 1000
    link/loopback 00:00:00:00:00:00 brd 00:00:00:00:00:00
2: eth0: <BROADCAST,MULTICAST,UP,LOWER_UP> mtu 1500 qdisc fq_codel state UP mode DEFAULT group default qlen 1000
    link/ether bc:24:11:1d:82:f5 brd ff:ff:ff:ff:ff:ff
    altname enp0s18
3: kube-ipvs0: <BROADCAST,NOARP> mtu 1500 qdisc noop state DOWN mode DEFAULT group default
    link/ether d6:a1:1d:13:12:8e brd ff:ff:ff:ff:ff:ff
4: ovs-system: <BROADCAST,MULTICAST> mtu 1500 qdisc noop state DOWN mode DEFAULT group default qlen 1000
    link/ether 6a:31:ff:05:ab:b1 brd ff:ff:ff:ff:ff:ff
5: genev_sys_6081: <BROADCAST,MULTICAST,UP,LOWER_UP> mtu 65000 qdisc noqueue master ovs-system state UNKNOWN mode DEFAULT group default qlen 1000
    link/ether 1a:53:a9:d8:ba:e2 brd ff:ff:ff:ff:ff:ff
6: antrea-gw0: <BROADCAST,MULTICAST,UP,LOWER_UP> mtu 1450 qdisc noqueue state UNKNOWN mode DEFAULT group default qlen 1000
    link/ether 62:d1:4b:2d:7b:4d brd ff:ff:ff:ff:ff:ff
7: antrea-egress0: <BROADCAST,NOARP> mtu 1500 qdisc noop state DOWN mode DEFAULT group default
    link/ether 72:a2:89:52:08:32 brd ff:ff:ff:ff:ff:ff
9: yelb-db--81d702@if2: <BROADCAST,MULTICAST,UP,LOWER_UP> mtu 1450 qdisc noqueue master ovs-system state UP mode DEFAULT group default
    link/ether e6:8d:cb:ac:21:66 brd ff:ff:ff:ff:ff:ff link-netns cni-28ac3a0f-cfd6-4823-286a-2334edb7a11c
10: yelb-app-1534fc@if2: <BROADCAST,MULTICAST,UP,LOWER_UP> mtu 1450 qdisc noqueue master ovs-system state UP mode DEFAULT group default
    link/ether c6:97:db:c1:97:dd brd ff:ff:ff:ff:ff:ff link-netns cni-3fd6788c-d5e8-8a41-4a2b-e9d622c43a9e
11: antrea-ext.181@eth0: <BROADCAST,MULTICAST,UP,LOWER_UP> mtu 1500 qdisc noqueue state UP mode DEFAULT group default
    link/ether bc:24:11:1d:82:f5 brd ff:ff:ff:ff:ff:ff
ubuntu@k8s-node-vm-2-cl-02:~$ ip addr
1: lo: <LOOPBACK,UP,LOWER_UP> mtu 65536 qdisc noqueue state UNKNOWN group default qlen 1000
    link/loopback 00:00:00:00:00:00 brd 00:00:00:00:00:00
    inet 127.0.0.1/8 scope host lo
       valid_lft forever preferred_lft forever
    inet6 ::1/128 scope host
       valid_lft forever preferred_lft forever
2: eth0: <BROADCAST,MULTICAST,UP,LOWER_UP> mtu 1500 qdisc fq_codel state UP group default qlen 1000
    link/ether bc:24:11:1d:82:f5 brd ff:ff:ff:ff:ff:ff
    altname enp0s18
    inet 10.160.1.26/24 brd 10.160.1.255 scope global eth0
       valid_lft forever preferred_lft forever
    inet6 fe80::be24:11ff:fe1d:82f5/64 scope link
       valid_lft forever preferred_lft forever
8: antrea-ext.181@eth0: <BROADCAST,MULTICAST,UP,LOWER_UP> mtu 1500 qdisc noqueue state UP group default
    link/ether bc:24:11:1d:82:f5 brd ff:ff:ff:ff:ff:ff
    inet 172.18.181.40/24 brd 172.18.181.255 scope global antrea-ext.181
       valid_lft forever preferred_lft forever
    inet6 fe80::be24:11ff:fe1d:82f5/64 scope link
       valid_lft forever preferred_lft forever
This interface uses a real VLAN tag. So the port group and the underlaying switch this node is connected to must allow VLAN tags.
Just a comment to the above. In my environment I am using Proxmox to host my Kubernetes nodes. I am tagging the “port-group” the actual VM is residing on, but I am also allowing certain other VLANs as trunks on the same port. So if I do “guest” tagging, aka tagging inside the VM the port group needs to respect and forward that tag. The way I solved this with Proxmox was to edit the VM config adding the “trunks=181;216” in the line below:
net0: virtio=BC:24:11:1D:82:F5,bridge=vmbr0,firewall=0,tag=216,trunks=181;216
The VM needs to be powercycled for this to take effect.
Antrea Egress failover #
As mentioned above, if my current Egress node fails the Egress gateway will move over to next available node. Let me poweroff the current Egress node and see what happens:
# Before powering off
andreasm@linuxmgmt01:~/prod-cluster-2$ k get egress
NAME          EGRESSIP        AGE   NODE
egress-vlan   172.18.181.40   23h   k8s-node-vm-2-cl-02
# After powered off
andreasm@linuxmgmt01:~/prod-cluster-2$ k get egress
NAME          EGRESSIP        AGE   NODE
egress-vlan   172.18.181.40   23h   k8s-node-vm-3-cl-02

# Node status
andreasm@linuxmgmt01:~/prod-cluster-2$ k get nodes
NAME                  STATUS     ROLES           AGE   VERSION
k8s-cp-vm-1-cl-02     Ready      control-plane   66d   v1.28.5
k8s-cp-vm-2-cl-02     Ready      control-plane   66d   v1.28.5
k8s-cp-vm-3-cl-02     Ready      control-plane   66d   v1.28.5
k8s-node-vm-1-cl-02   Ready      <none>          66d   v1.28.5
k8s-node-vm-2-cl-02   NotReady   <none>          66d   v1.28.5
k8s-node-vm-3-cl-02   Ready      <none>          66d   v1.28.5
The failover is pretty quick too.
As soon as the node-2 is back online again the Egress will revert back again, because I have declared it to be on the node-2 in my ExternalIPPool config:
andreasm@linuxmgmt01:~/prod-cluster-2$ k get egress -w
NAME          EGRESSIP        AGE   NODE
egress-vlan   172.18.181.40   23h   k8s-node-vm-3-cl-02
egress-vlan   172.18.181.40   23h   k8s-node-vm-2-cl-02
Kube-Proxy vs Antrea Proxy #
This chapter is kind of important to cover before I continue with the next Antrea features as this may have impact on how some of these features operate, and can operate. One should have some understanding of Kube-Proxy and Antrea-Proxy
Comparing kube-proxy and AntreaProxy involves looking at how each handles service traffic management within a Kubernetes cluster.
Kube-Proxy
- Kube-proxy is running in the Kubernetes cluster as Daemonsets - Kube-Proxy runs in Userspace
-
Kube-proxy is a default component in Kubernetes responsible for IP address translation and load balancing services within the cluster.
-
It can use iptables or IPVS (nftables alpha in k8s 1.29), each with different performance characteristics.
-
The iptables mode is commonly used due to its reliability and moderate performance, managing rules that route traffic to backend pods. IPtables runs in userspace.
-
IPVS mode is known for better performance in large-scale environments because it handles traffic at the kernel level with less overhead than iptables. IPVS runs in Kernelspace
-
While kube-proxy is suitable for many Kubernetes environments, its performance can degrade as the number of services and endpoints increases, especially in iptables mode.
-
Deeply integrated into Kubernetes, kube-proxy watches the Kubernetes API for changes to services and endpoints and updates its rules accordingly.
AntreaProxy
-
AntreaProxy is part of the Antrea CNI, designed to handle all Kubernetes service traffic using Open vSwitch (OVS) for more efficient packet processing.
-
When enabled, it can completely replace kube-proxy by managing service traffic routing directly at the data plane level within each node.
-
Handles traffic using OVS, which can be more efficient in packet processing compared to traditional iptables. This is beneficial for high-throughput and low-latency network environments.
-
Designed to offer better scalability and performance in large-scale Kubernetes deployments due to its efficient handling of traffic at the OVS level.
-
Integrates with Kubernetes but requires Antrea as the CNI. It monitors the Kubernetes API for changes to services and endpoints, similar to kube-proxy, but uses OVS flow rules instead of IPVS or iptables.
Key Differences
- Traffic Handling: Kube-proxy can use iptables or IPVS to manage traffic, which involves modifying Linux networking rules. AntreaProxy uses OVS to direct traffic, which can bypass some of the overhead associated with iptables or IPVS.
- Dependency: Kube-proxy is a standalone component within Kubernetes, while AntreaProxy is part of the Antrea CNI and requires its installation.
- Performance and Scalability: AntreaProxy generally offers better performance and scalability due to its use of OVS, particularly in environments with high numbers of services and endpoints.
The choice between kube-proxy and AntreaProxy often comes down to the specific requirements of a Kubernetes deployment, such as scale, performance, and the preferred networking approach.
AntreaProxy AND Kube-Proxy together #
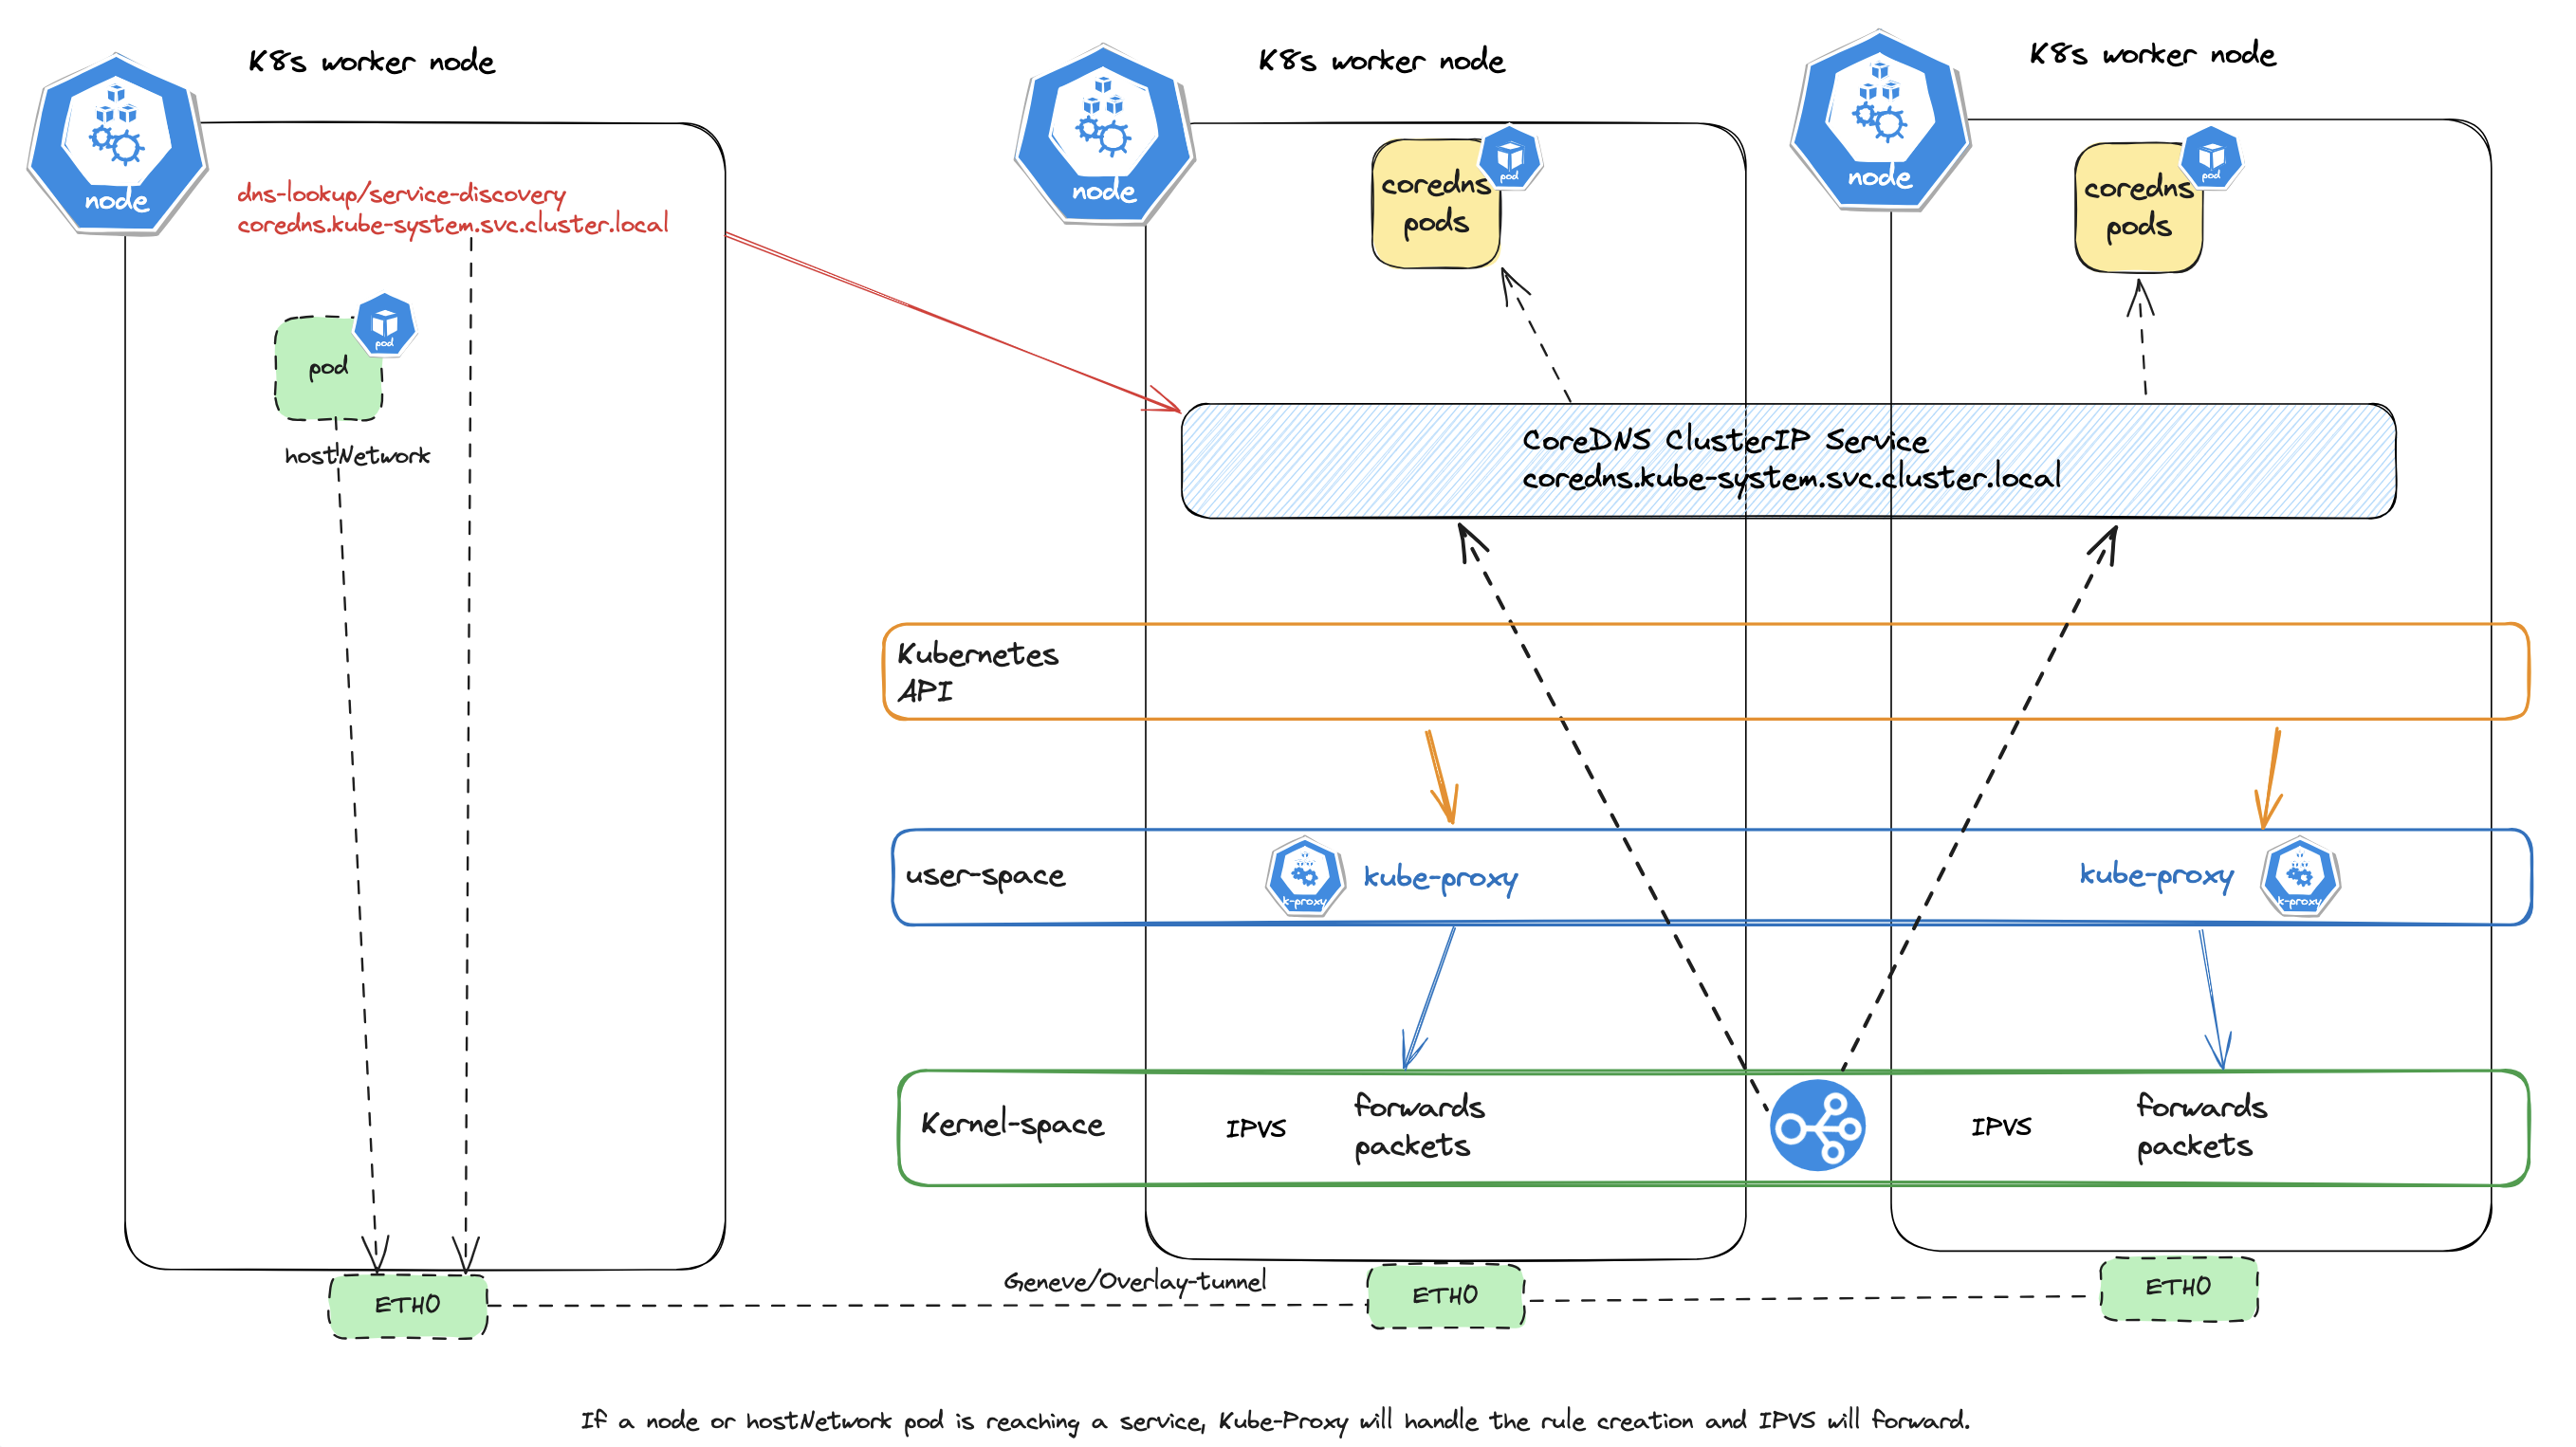
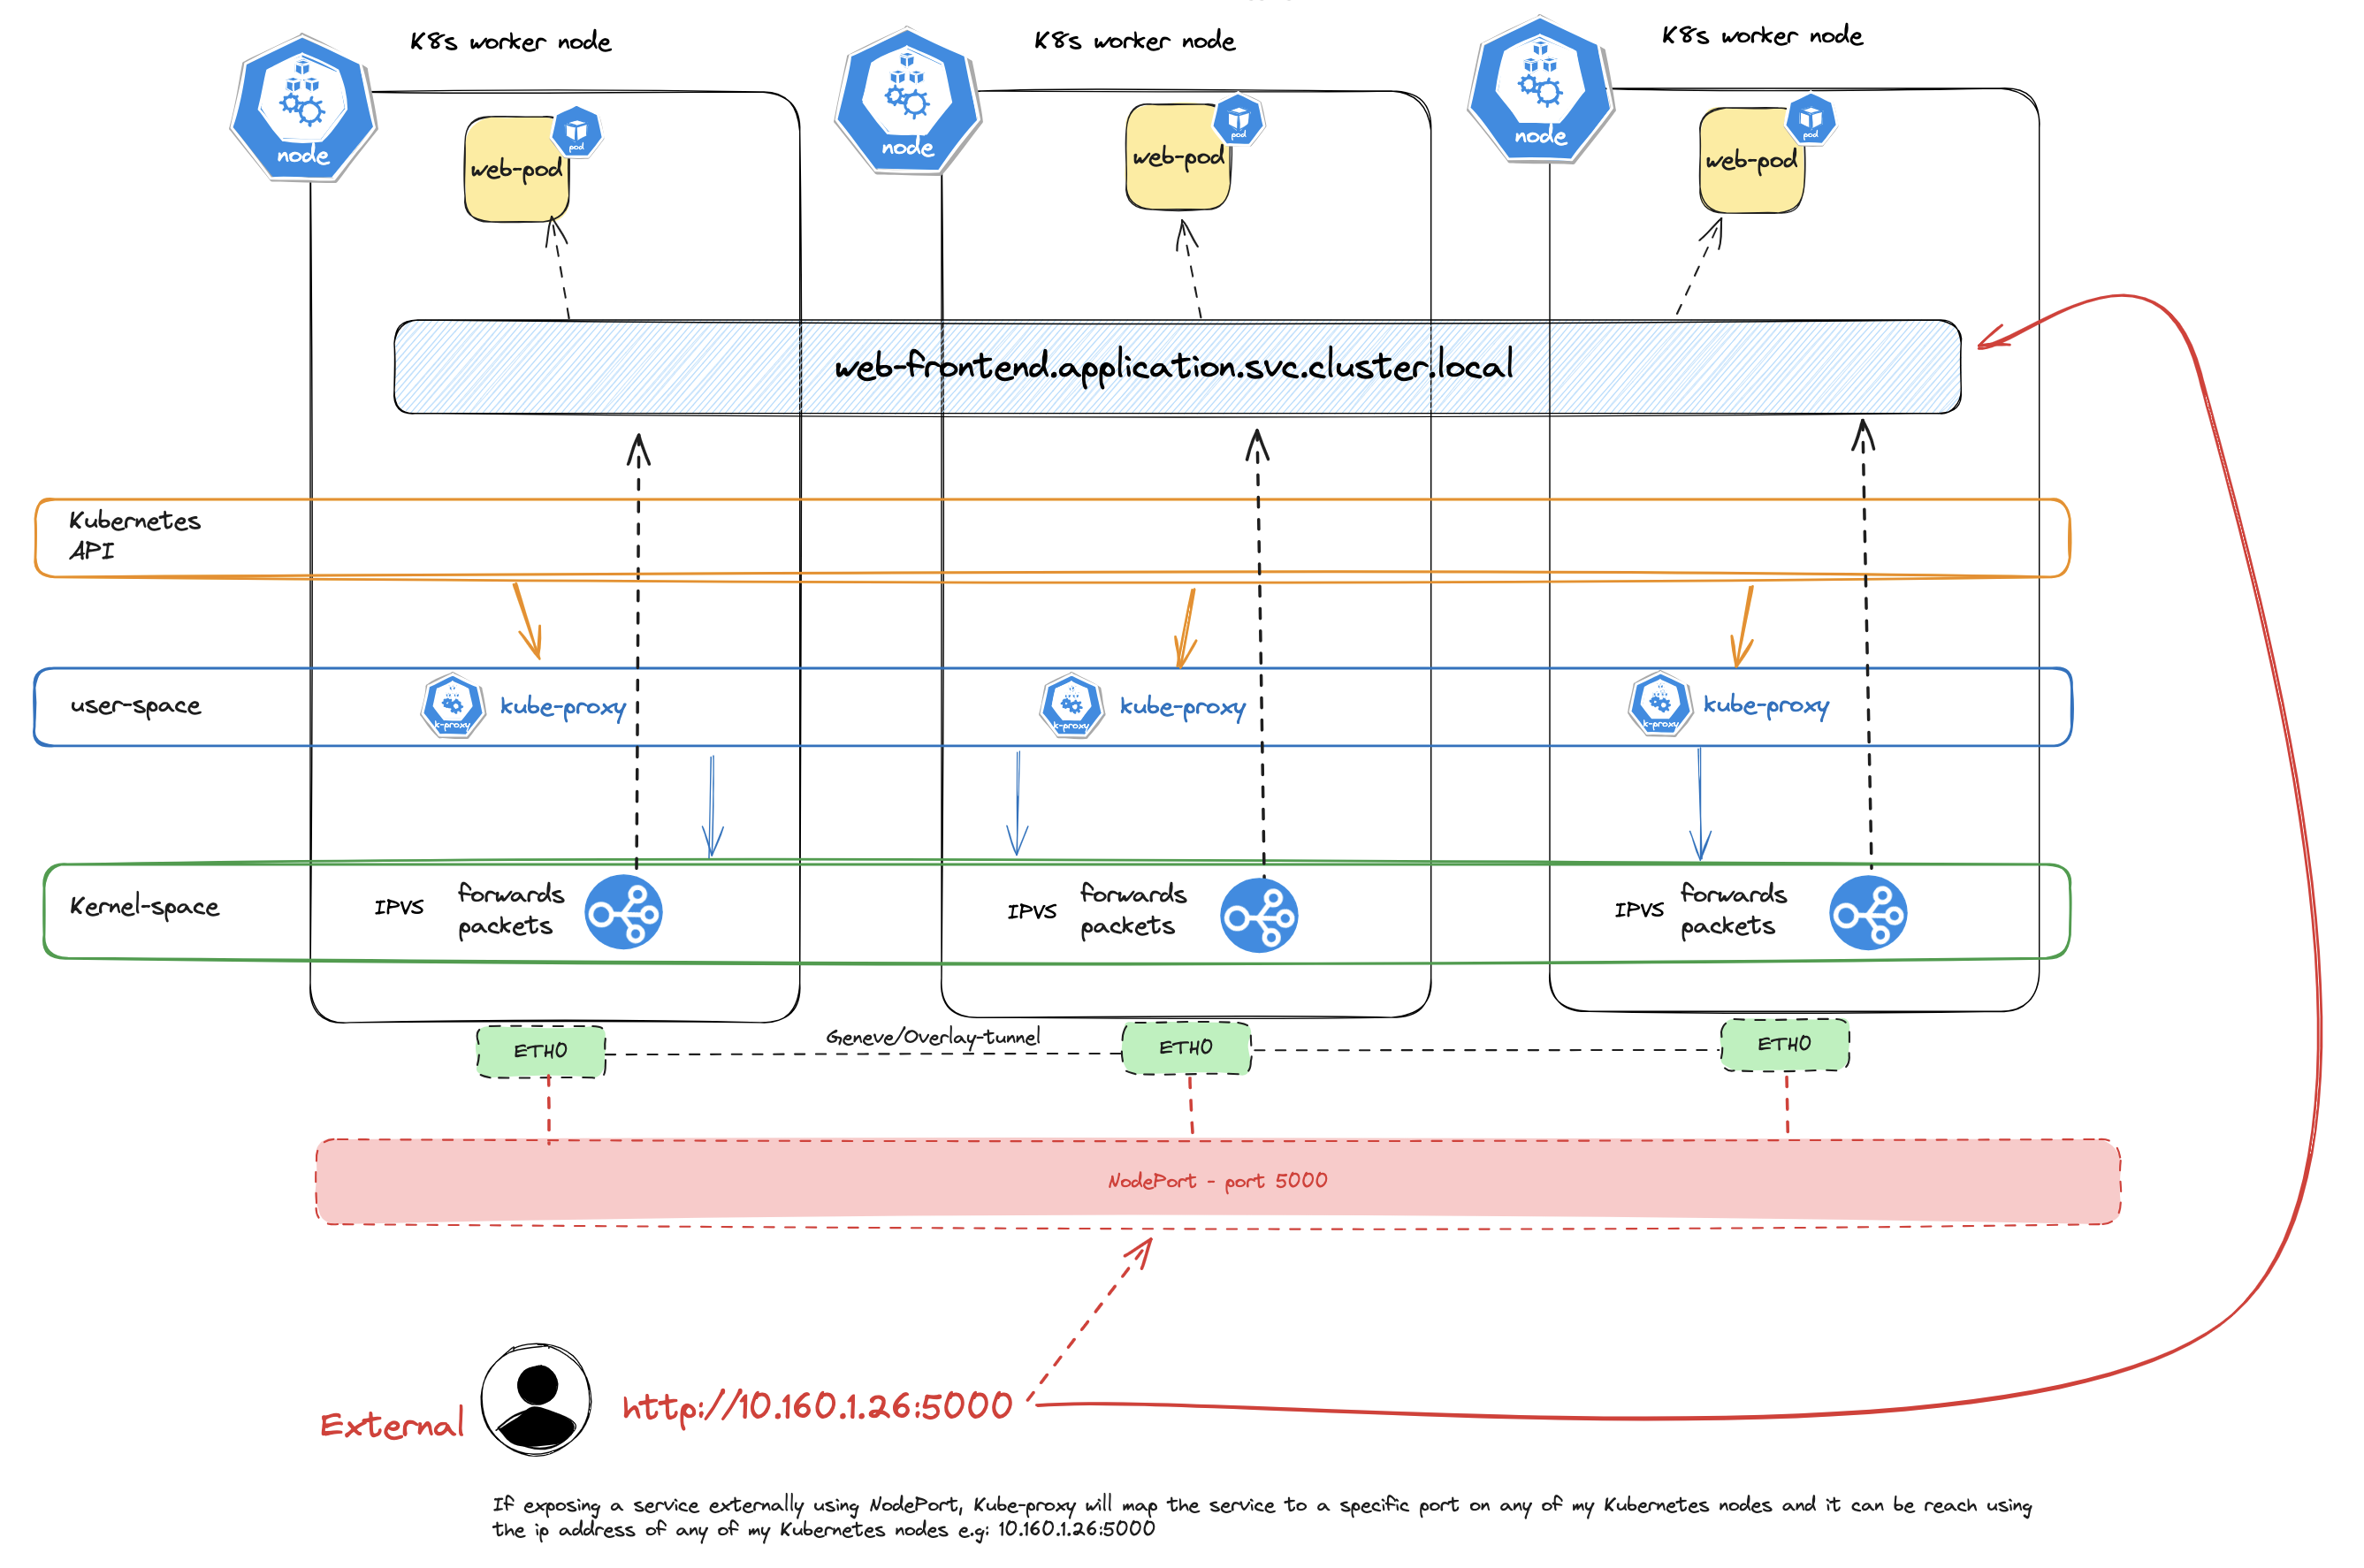
AntreaProxy is enabled by default since Antrea version v0.11. When the Antrea feature gate antreaProxy is set to true Antrea will provide service loadbalancing for ClusterIP services in OVS instead of using kube-proxy and only applies to traffic coming from pods to ClusterIP services. This means we still need to have Kube-Proxy for other services, such as NodePort (external to cluster service) and node to all cluster services (including hostNetwork pods). This is a default setup. Antrea can also act as the only proxy in a Kubernetes cluster, more on that in a chapter later.
When traffic enters the Kubernetes cluster, eg serviceType Loadbalancer or NodePort, or node to service it will be handled by kube-proxy. Traffic originating from a pod to a cluster-service will be handled by AntreaProxy.
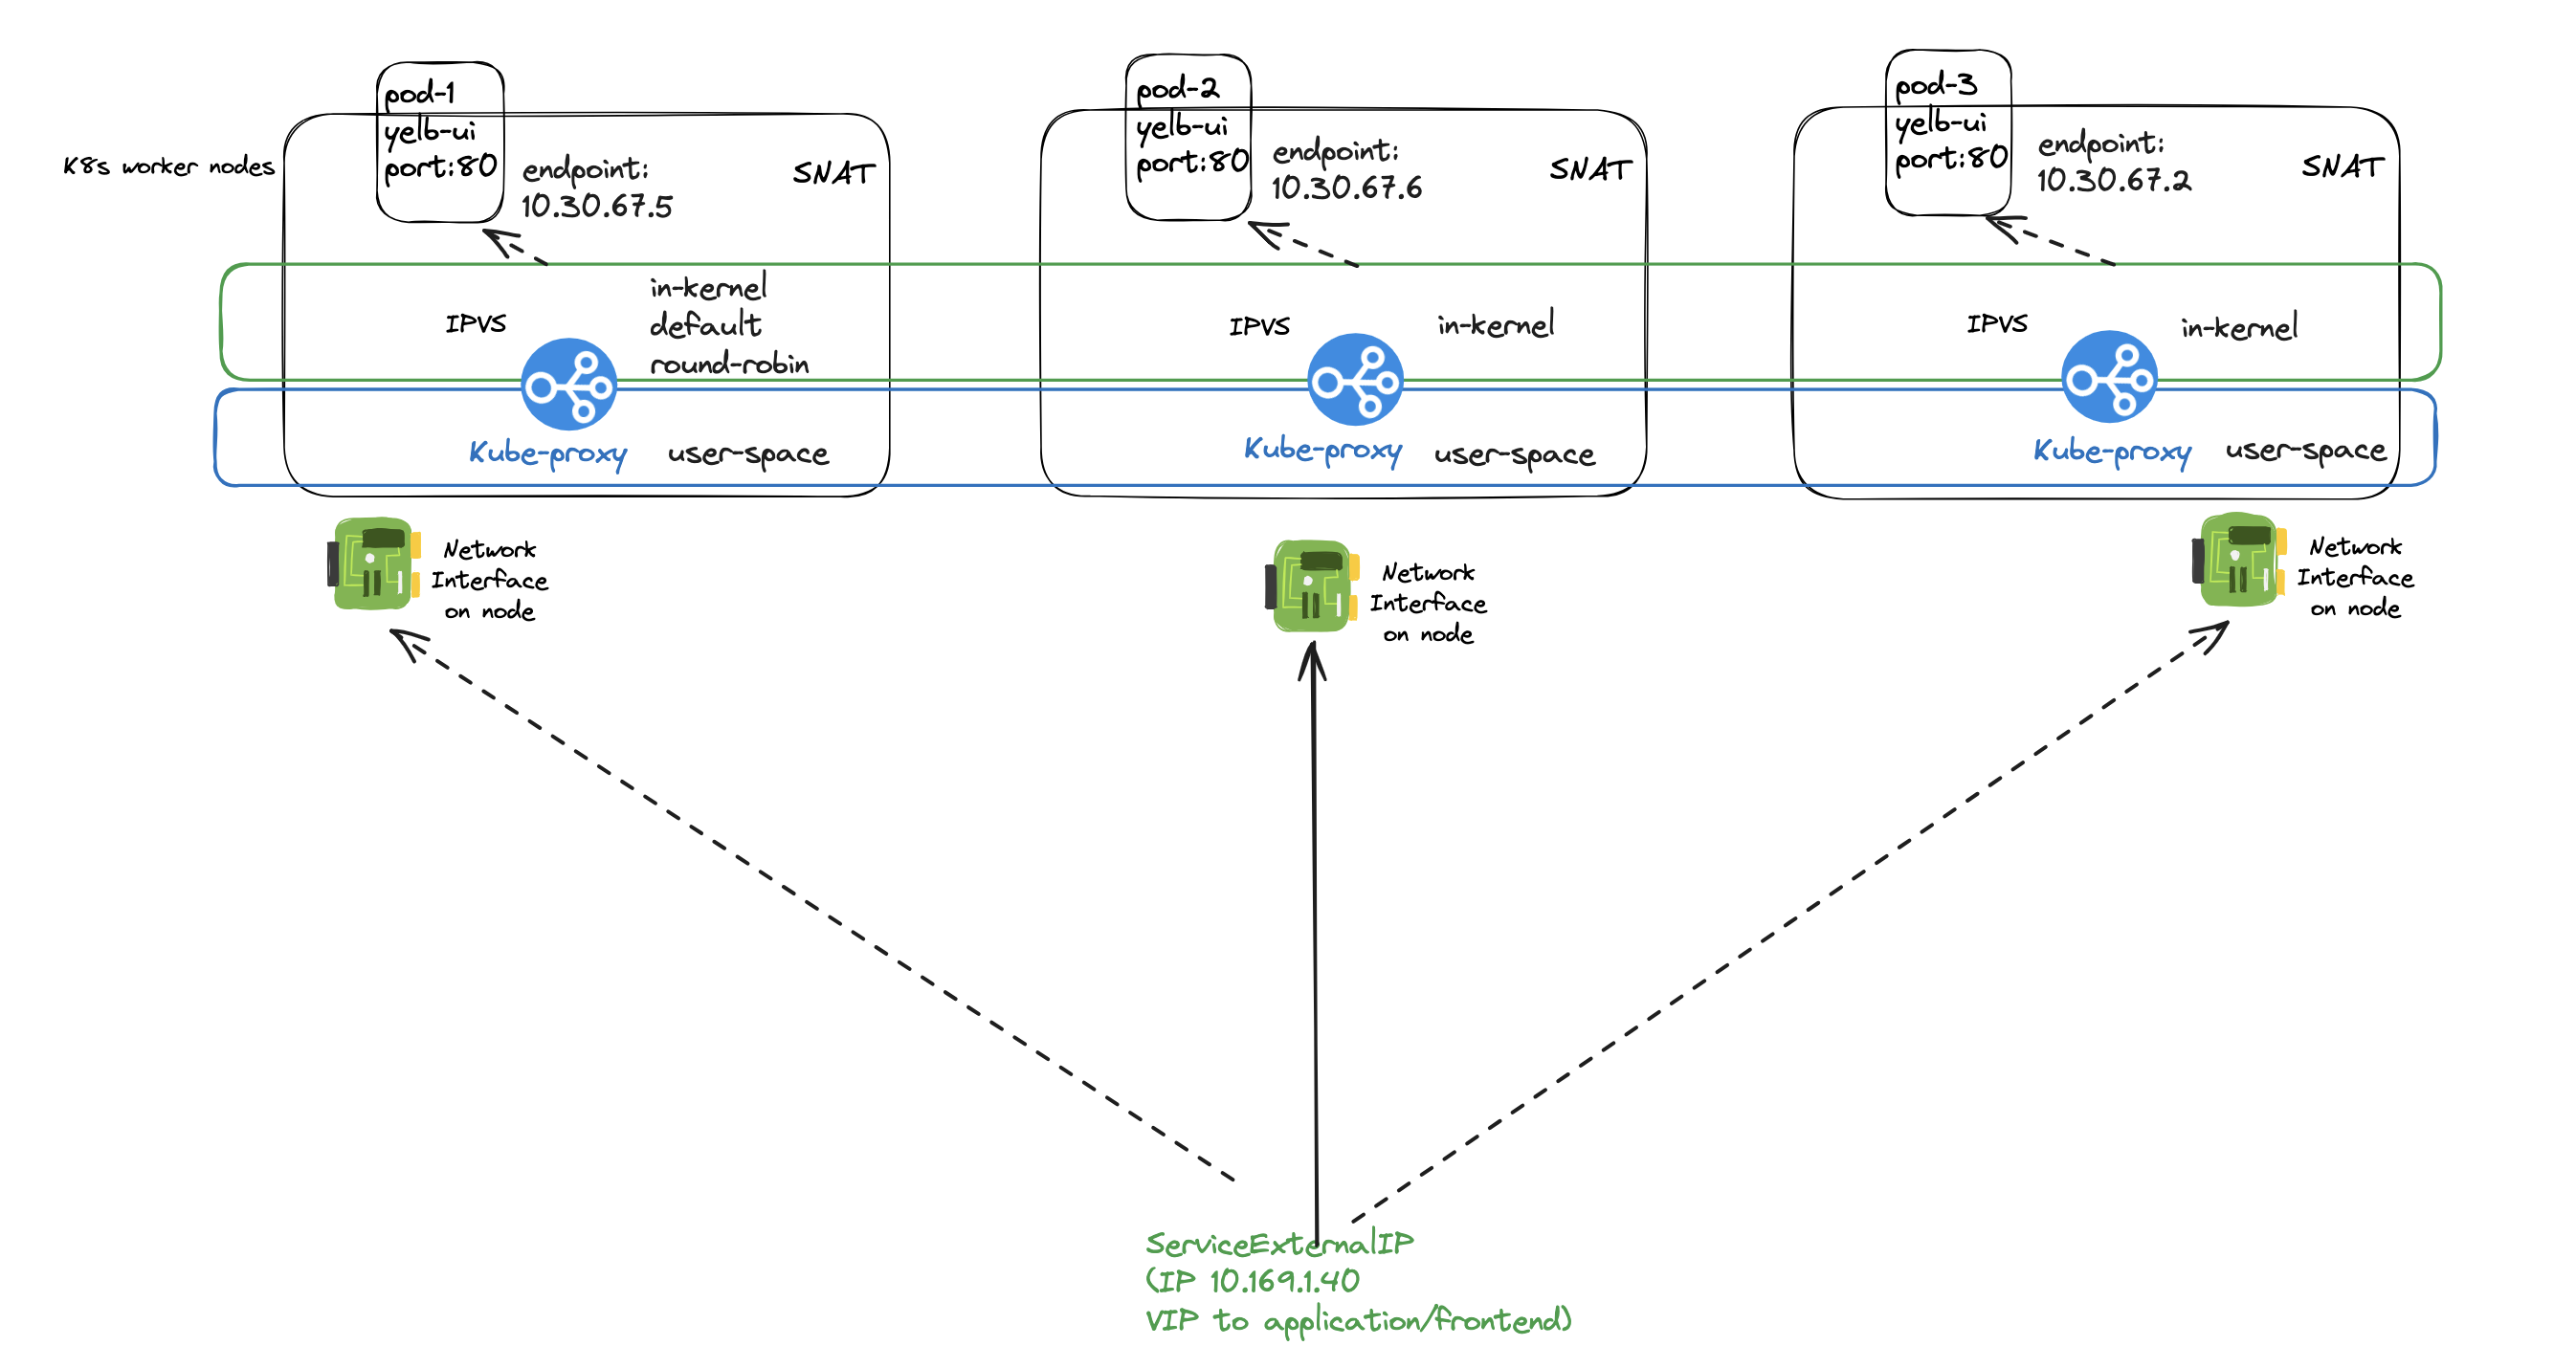
An illustration of what AntreaProxy handles when the feature gate AntreaProxy is set to true:
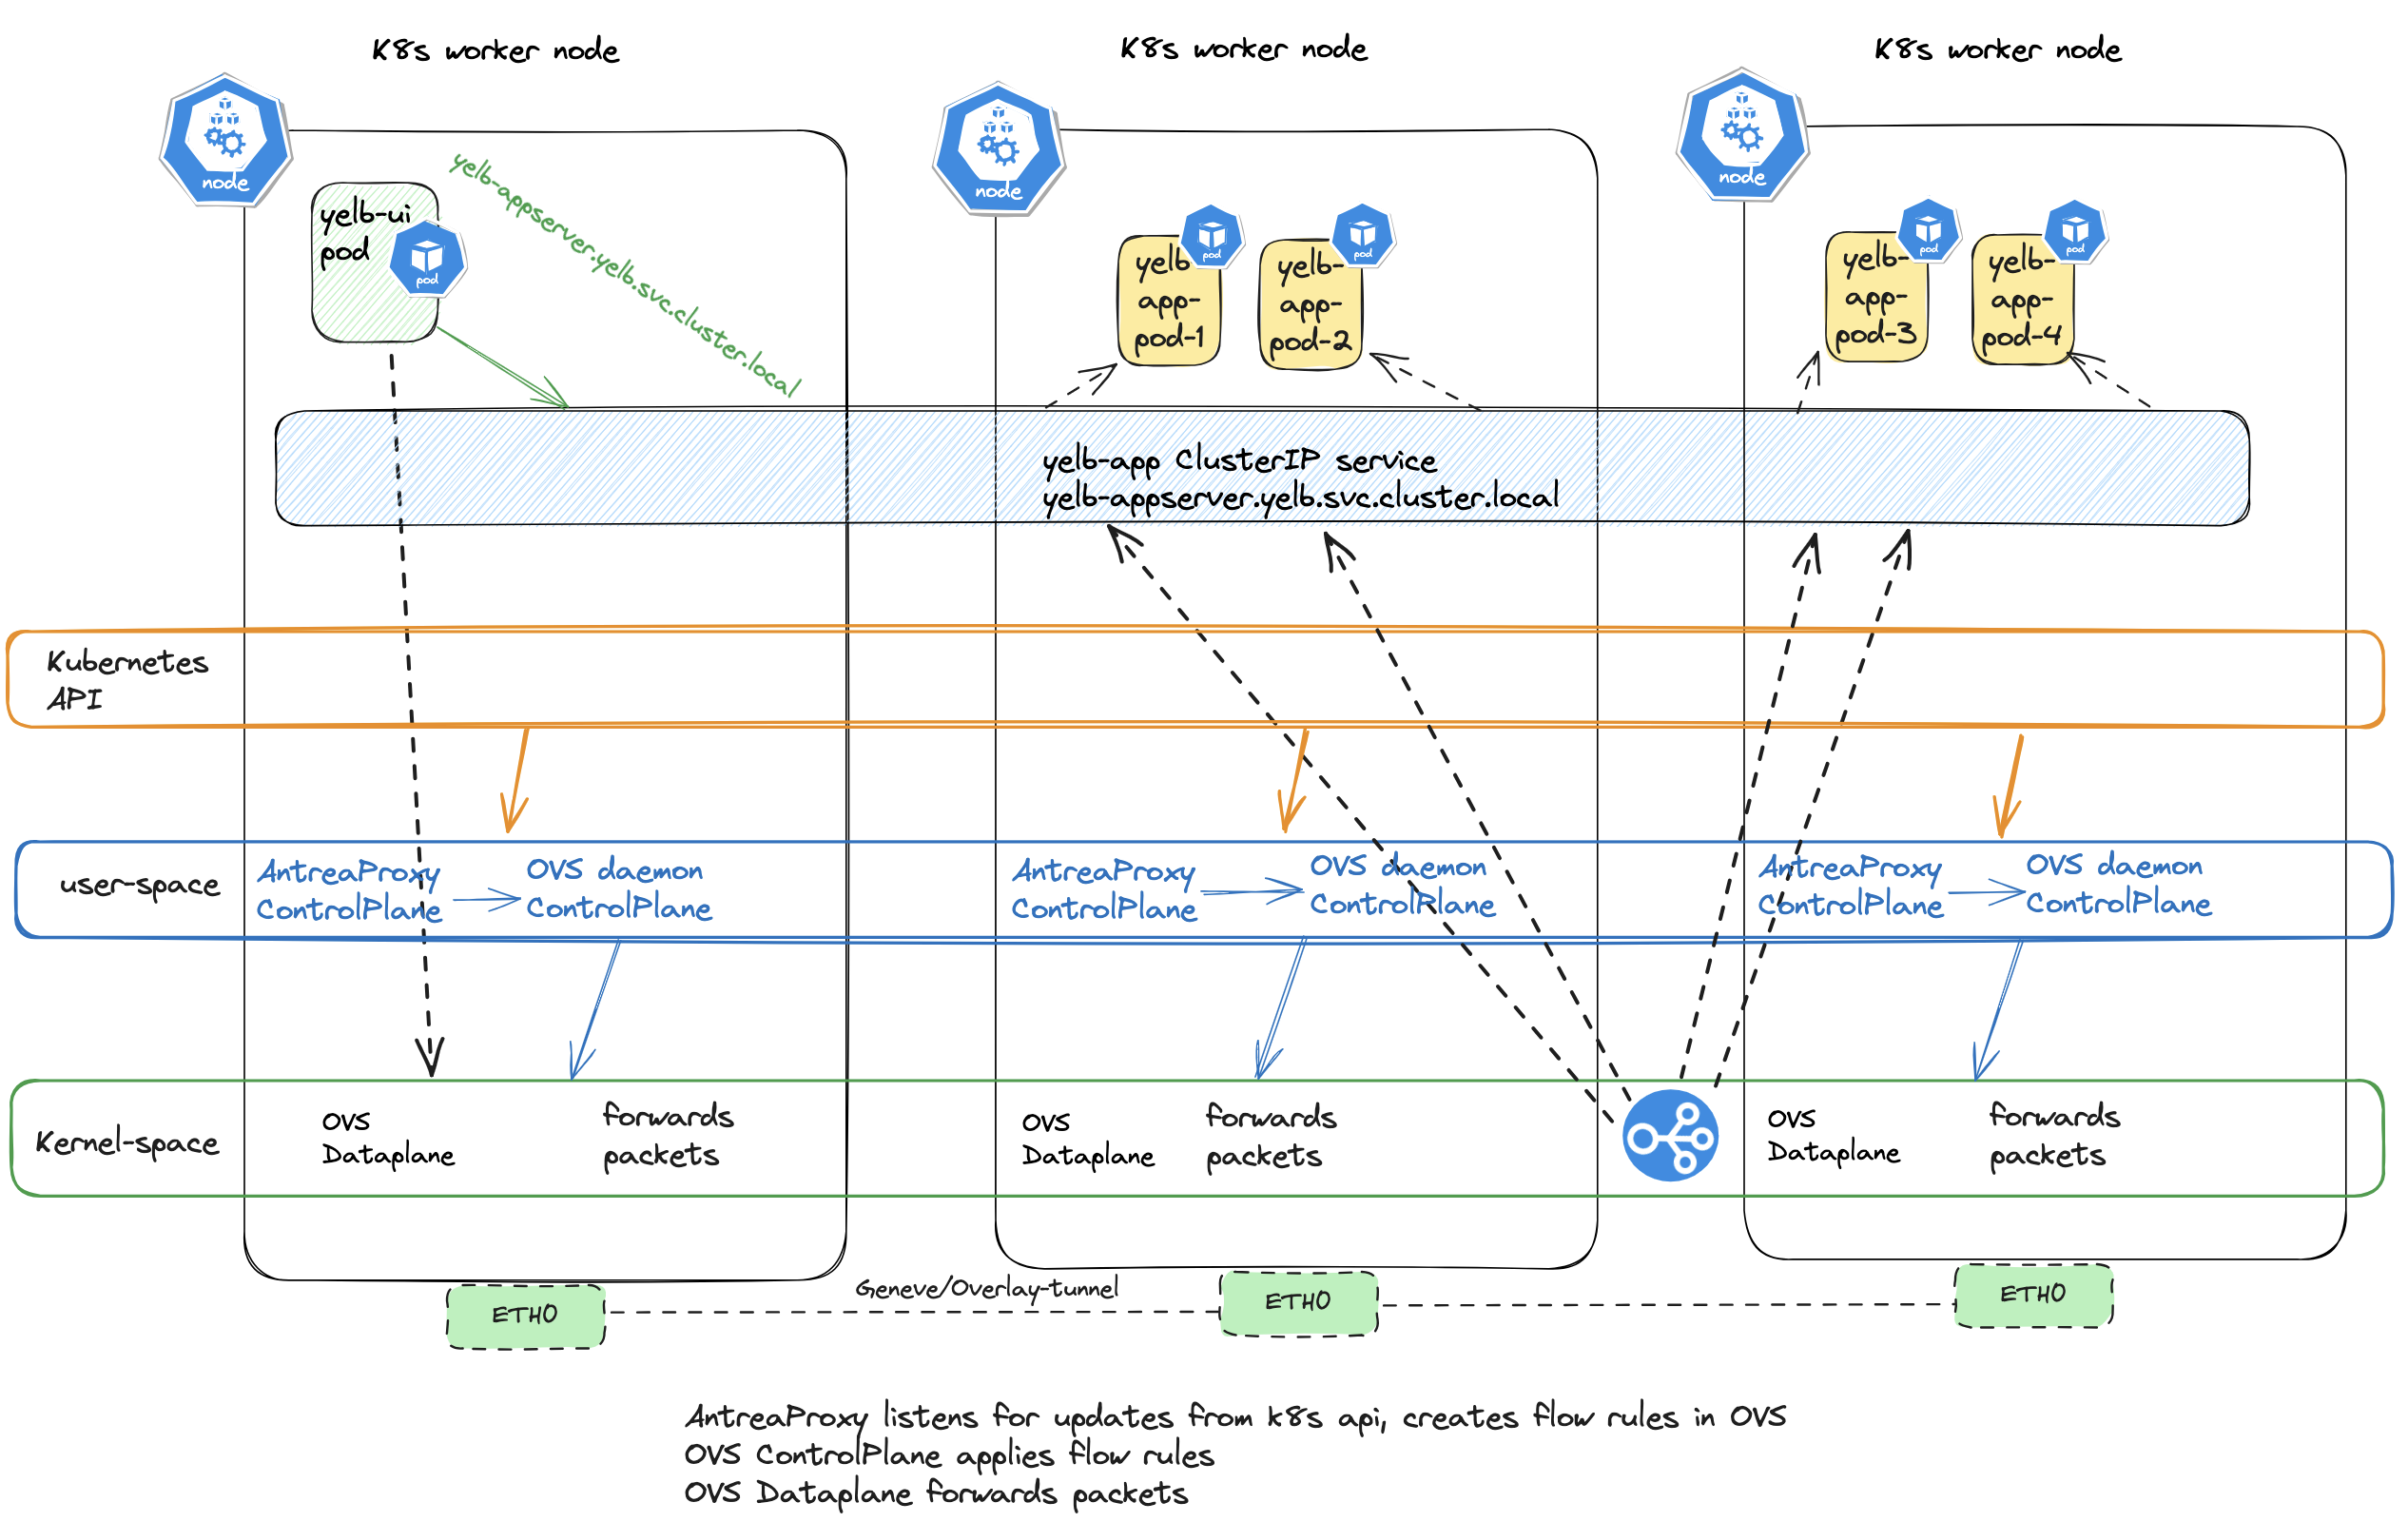
Stipulated lines illustrates the actual packet-flow, while the non-stipulated lines indicate which component being involved in the Kubernetes cluster to “prepare” for the forwarding of the packet from the yelb-ui pod to the yelb-app service.
The below diagrams explains what kube-proxy handles when the AntreaProxy is enabled:
Node to service
External to service
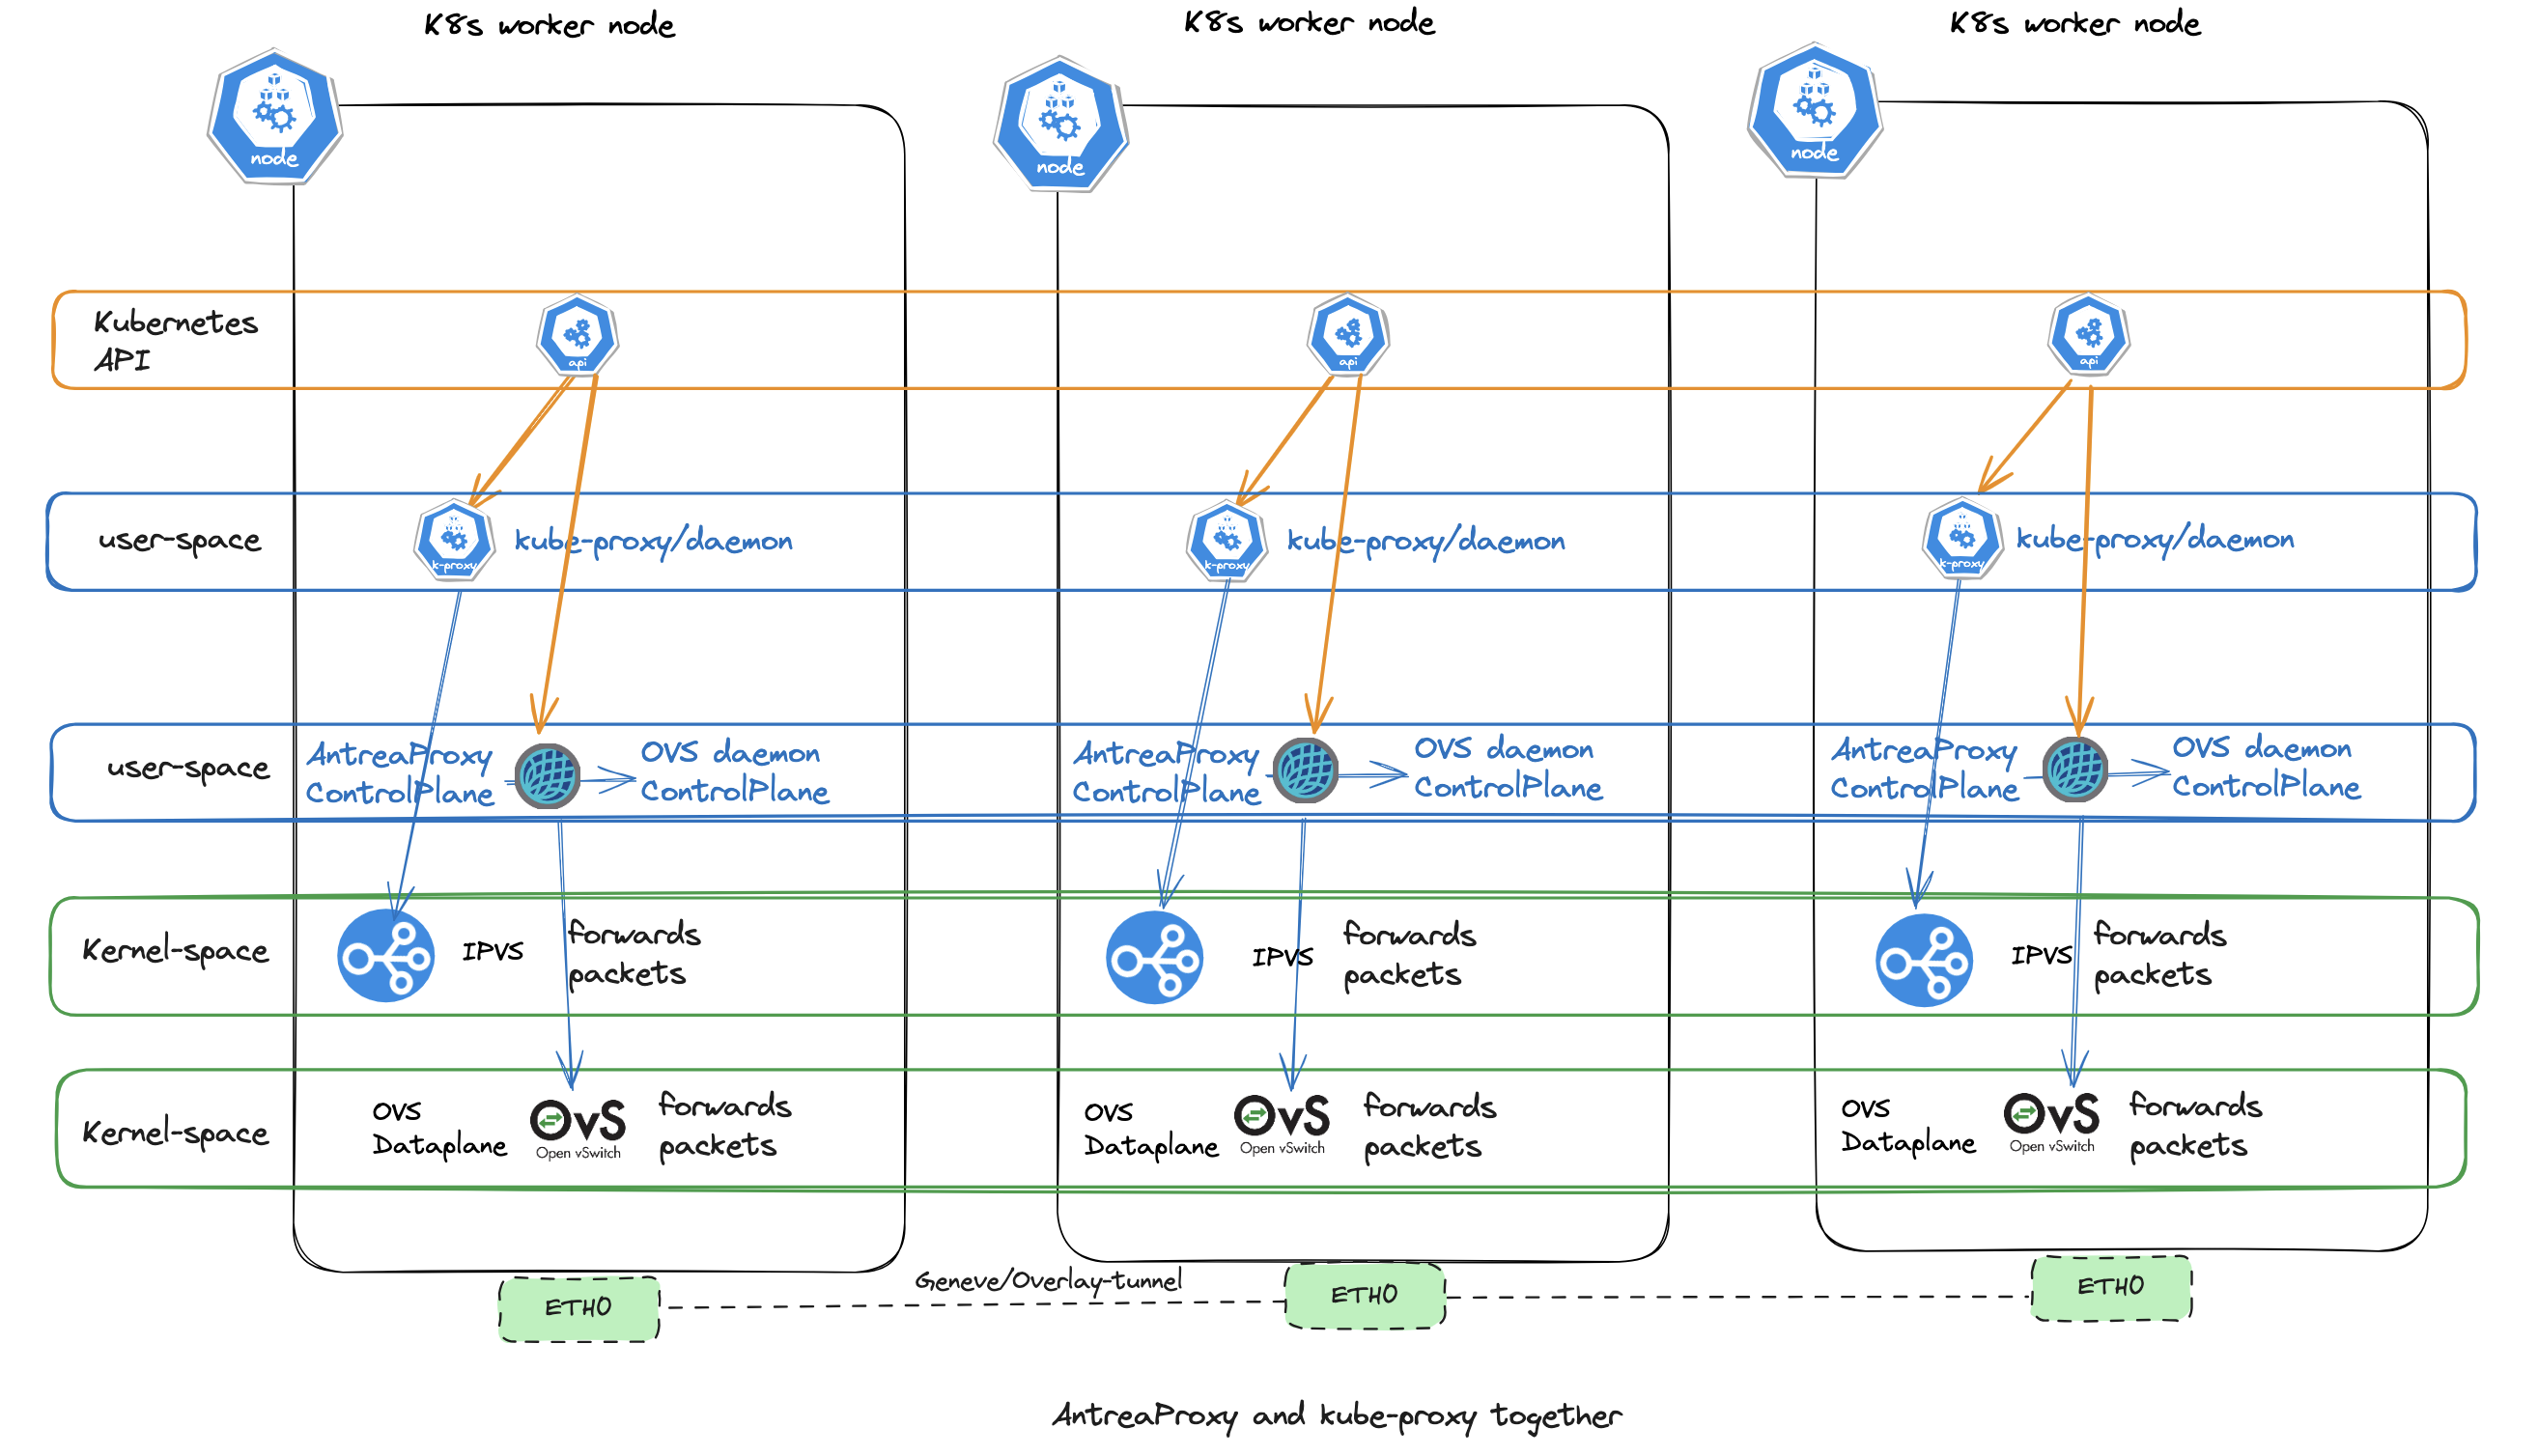
With both AntreaProxy and kube-proxy enabled at the same time we end up having two daemons with each their ruleset to forward traffic inside the Kubernetes cluster like this:
AntreaProxy All #
As mentioned above, there is no need to have both kube-proxy and AntreaProxy. One can remove kube-proxy completely. AntreaProxy can handle all services, external and internal, node to service, external to service, NodePort etc.
To enable AntreaProxy all the following feature-gate needs to be enabled:
kind: ConfigMap
apiVersion: v1
metadata:
  name: antrea-config
  namespace: kube-system
data:
    antreaProxy:
      proxyAll: true
With AntreaProxy all is enabled kube-proxy is not automatically removed (if one have a Kubernetes cluster with kube-proxy deployed). So in a cluster with kube-proxy already running, there is a couple of steps that needs to be done to remove kube-proxy and enable AntreaProxy all.
If one enables AntreaProxy:all and Kube-Proxy is still there, Kube-Proxy will take precedence. There is two ways to delete kube-proxy, during cluster bootstrap (kubeadm init --skip-phases=addon/kube-proxy) or post cluster bootstrap. Below I will go through how to delete kube-proxy on a already running cluster with kube-proxy already deployed.
I will follow the offical documentation from Antrea Github repo [here](kubectl -n kube-system delete ds/kube-proxy):
# Delete the kube-proxy DaemonSet
andreasm@linuxmgmt01:~/prod-cluster-2$ kubectl -n kube-system delete ds/kube-proxy
daemonset.apps "kube-proxy" deleted
# Delete the kube-proxy ConfigMap to prevent kube-proxy from being re-deployed
# by kubeadm during "upgrade apply". This workaround will not take effect for
# kubeadm versions older than v1.19 as the following patch is required:
# https://github.com/kubernetes/kubernetes/pull/89593
andreasm@linuxmgmt01:~/prod-cluster-2$ kubectl -n kube-system delete cm/kube-proxy
configmap "kube-proxy" deleted
# Delete existing kube-proxy rules; there are several options for doing that
# Option 1 (if using kube-proxy in iptables mode), run the following on each Node:
iptables-save | grep -v KUBE | iptables-restore
# This option is not valid for me as I use IPVS
# Option 2 (any mode), restart all Nodes # I chose this option
# Option 3 (any mode), run the following on each Node:
kube-proxy --cleanup
# You can create a DaemonSet to easily run the above command on all Nodes, using
# the kube-proxy container image
After the steps above (icluding the restart of all nodes) I will need to edit the Antrea ConfigMap with the following:
kind: ConfigMap
apiVersion: v1
metadata:
  name: antrea-config
  namespace: kube-system
data:
  antrea-agent.conf: |
    kubeAPIServerOverride: "https://k8s-dev-cluster-3.domain.int"
    antreaProxy:
      proxyAll: true
Last step is to restart the Antrea controller and Antrea agents and see if they come up again.
k rollout restart -n kube-system deployment/antrea-controller
k delete pods -n kube-system -l component=antrea-agent
andreasm@linuxmgmt01:~/prod-cluster-2$ k get pods -A
NAMESPACE     NAME                                        READY   STATUS    RESTARTS        AGE
kube-system   antrea-agent-7pc6r                          2/2     Running   0               37s
kube-system   antrea-agent-b6c58                          2/2     Running   0               37s
kube-system   antrea-agent-pj62z                          2/2     Running   0               37s
kube-system   antrea-agent-rcckh                          2/2     Running   0               37s
kube-system   antrea-agent-tftv5                          2/2     Running   0               37s
kube-system   antrea-agent-twpfs                          2/2     Running   0               38s
kube-system   antrea-controller-6bd6b9569c-vhx7n          1/1     Running   0               50s
No kube-proxy pods:
andreasm@linuxmgmt01:~/prod-cluster-2$ k get pods -A
NAMESPACE     NAME                                        READY   STATUS    RESTARTS        AGE
kube-system   antrea-agent-7pc6r                          2/2     Running   0               72s
kube-system   antrea-agent-b6c58                          2/2     Running   0               72s
kube-system   antrea-agent-pj62z                          2/2     Running   0               72s
kube-system   antrea-agent-rcckh                          2/2     Running   0               72s
kube-system   antrea-agent-tftv5                          2/2     Running   0               72s
kube-system   antrea-agent-twpfs                          2/2     Running   0               73s
kube-system   antrea-controller-6bd6b9569c-vhx7n          1/1     Running   0               85s
kube-system   coredns-77f7cc69db-jnh6m                    1/1     Running   1 (9m36s ago)   21h
kube-system   coredns-77f7cc69db-wb5qs                    1/1     Running   1 (9m3s ago)    21h
kube-system   dns-autoscaler-8576bb9f5b-5n7hv             1/1     Running   1 (9m36s ago)   21h
kube-system   kube-apiserver-k8s-cp-vm-1-cl-03            1/1     Running   3 (8m55s ago)   21h
kube-system   kube-apiserver-k8s-cp-vm-2-cl-03            1/1     Running   2 (9m36s ago)   21h
kube-system   kube-apiserver-k8s-cp-vm-3-cl-03            1/1     Running   2 (9m3s ago)    21h
kube-system   kube-controller-manager-k8s-cp-vm-1-cl-03   1/1     Running   4 (9m16s ago)   21h
kube-system   kube-controller-manager-k8s-cp-vm-2-cl-03   1/1     Running   4 (9m36s ago)   21h
kube-system   kube-controller-manager-k8s-cp-vm-3-cl-03   1/1     Running   4 (9m3s ago)    21h
kube-system   kube-scheduler-k8s-cp-vm-1-cl-03            1/1     Running   3 (8m45s ago)   21h
kube-system   kube-scheduler-k8s-cp-vm-2-cl-03            1/1     Running   2 (9m36s ago)   21h
kube-system   kube-scheduler-k8s-cp-vm-3-cl-03            1/1     Running   3 (9m3s ago)    21h
No “kube-ipvs0” interface:
ubuntu@k8s-node-vm-1-cl-03:~$ ip addr
1: lo: <LOOPBACK,UP,LOWER_UP> mtu 65536 qdisc noqueue state UNKNOWN group default qlen 1000
    link/loopback 00:00:00:00:00:00 brd 00:00:00:00:00:00
    inet 127.0.0.1/8 scope host lo
       valid_lft forever preferred_lft forever
    inet6 ::1/128 scope host
       valid_lft forever preferred_lft forever
2: eth0: <BROADCAST,MULTICAST,UP,LOWER_UP> mtu 1500 qdisc fq_codel state UP group default qlen 1000
    link/ether bc:24:11:f4:ee:ef brd ff:ff:ff:ff:ff:ff
    altname enp0s18
    inet 10.160.1.35/24 brd 10.160.1.255 scope global eth0
       valid_lft forever preferred_lft forever
    inet6 fe80::be24:11ff:fef4:eeef/64 scope link
       valid_lft forever preferred_lft forever
3: ovs-system: <BROADCAST,MULTICAST> mtu 1500 qdisc noop state DOWN group default qlen 1000
    link/ether ee:a3:e7:de:7d:3c brd ff:ff:ff:ff:ff:ff
4: genev_sys_6081: <BROADCAST,MULTICAST,UP,LOWER_UP> mtu 65000 qdisc noqueue master ovs-system state UNKNOWN group default qlen 1000
    link/ether e6:09:e7:ee:1f:fc brd ff:ff:ff:ff:ff:ff
    inet6 fe80::64c1:4aff:fe4d:f8b2/64 scope link
       valid_lft forever preferred_lft forever
5: antrea-gw0: <BROADCAST,MULTICAST,UP,LOWER_UP> mtu 1450 qdisc noqueue state UNKNOWN group default qlen 1000
    link/ether 62:78:99:77:56:60 brd ff:ff:ff:ff:ff:ff
    inet 10.40.68.1/24 brd 10.40.68.255 scope global antrea-gw0
       valid_lft forever preferred_lft forever
    inet6 fe80::6078:99ff:fe77:5660/64 scope link
       valid_lft forever preferred_lft forever
6: antrea-egress0: <BROADCAST,NOARP> mtu 1500 qdisc noop state DOWN group default
    link/ether 3e:77:85:e2:e2:1a brd ff:ff:ff:ff:ff:ff
With that out of the way, lets continue on the Antrea features.
Antrea ServiceExternalIP #
ServiceExternalIP is a feature in Antrea to provide external IP addresses for serviceType LoadBalancer. This feature is useful when there is no external/cloud/3rd party loadbalancer available to provide these external IP addresses.
Today ServiceExternalIP supports ip addresses allocated from the same subnet (L2) as the Kubernetes nodes, by reserving a range of addresses for this use. It also supports a different subnet (L3) than the Kubernetes nodes themselves but one have to define static routes (host routes x.x.x.x/32) in the underlaying router/gateway to one or several of the nodes in your Kubernetes Cluster. After I apply a service using ServiceExternalIP all nodes will be aware of this IP address and handle requests to the service regardless of which host receives them.
# worker node 2
ubuntu@k8s-node-vm-2-cl-02:~$ ip addr
3: kube-ipvs0: <BROADCAST,NOARP> mtu 1500 qdisc noop state DOWN group default
    link/ether d6:a1:1d:13:12:8e brd ff:ff:ff:ff:ff:ff
    inet 10.169.1.40/32 scope global kube-ipvs0 # IP from my ExternalIPPool
       valid_lft forever preferred_lft forever
# worker node 1
ubuntu@k8s-node-vm-1-cl-02:~$ ip addr
3: kube-ipvs0: <BROADCAST,NOARP> mtu 1500 qdisc noop state DOWN group default
    link/ether a6:bf:87:cc:53:cc brd ff:ff:ff:ff:ff:ff
    inet 10.169.1.40/32 scope global kube-ipvs0
       valid_lft forever preferred_lft forever # IP from my ExternalIPPool
And here one can see IPVS is handling this IP and is available on all nodes (if using kube-proxy with IPVS). So creating a static route and pointing to any of my Kubernetes nodes will get me to the service.
When it comes to failure of a node and this happens to be the node you defined as the nexthop you will ofcourse loose access. One could add several routes using cost/distance, but this will not always solve the issue as the router/switch does not really know that the node is gone. It will be kept in the ARP table, and as long as its there (it may be drained after a while), the switch will continue forward traffic to it. This may ofcourse depend on router/switch also which features are implemented and can be used using static routes. There is no BFD, and a VM is not actually disconnecting anything if it goes down.
ServiceExternalIP will work with Kube-Proxy using IPVS or IPTables and AntreaProxy where there is no Kube-Proxy. If using Kube-Proxy with IPVS strictARP must be enabled in the kube-proxy config:
# configMap kube-proxy
apiVersion: v1
data:
  config.conf: |-
    apiVersion: kubeproxy.config.k8s.io/v1alpha1
    ipvs:
      excludeCIDRs: []
      minSyncPeriod: 0s
      scheduler: rr
      strictARP: true # set to true
      syncPeriod: 30s
      tcpFinTimeout: 0s
      tcpTimeout: 0s
      udpTimeout: 0s
Below I will go through ServiceExternalIP using kube-proxy and only AntreaProxy
ServiceExternalIP using Kube-Proxy and IPVS (IP Virtual Server) #
When using kube-proxy with IPVS kube-proxy sets up and manage the IPVS rules. IPVS residing in the Linux Kernel is then responsible for directing incoming traffic to backend pods, as in my digram below the Yelb-UI pods.
Kube-proxy listens on incoming traffic, IPVS forwards the traffic to the corresponding backend-pods.
The service and corresponding endpoints:
andreasm@linuxmgmt01:~/prod-cluster-2$ k describe svc -n yelb yelb-ui
Name:                     yelb-ui
Namespace:                yelb
Labels:                   app=yelb-ui
                          tier=frontend
Annotations:              service.antrea.io/external-ip-pool: service-external-ip-pool
Selector:                 app=yelb-ui,tier=frontend
Type:                     LoadBalancer
IP Family Policy:         SingleStack
IP Families:              IPv4
IP:                       10.30.48.237
IPs:                      10.30.48.237
LoadBalancer Ingress:     10.169.1.40
Port:                     <unset>  80/TCP
TargetPort:               80/TCP
NodePort:                 <unset>  32611/TCP
Endpoints:                10.30.67.5:80,10.30.68.6:80,10.30.69.2:80
Session Affinity:         None
External Traffic Policy:  Cluster
Events:                   <none>
The pods, representing the endpoints:
andreasm@linuxmgmt01:~/prod-cluster-2$ k get pods -n yelb -owide
NAME                            READY   STATUS    RESTARTS      AGE     IP           NODE                  NOMINATED NODE   READINESS GATES
yelb-ui-f544fc74f-mb5m6         1/1     Running   0             41m     10.30.68.6   k8s-node-vm-2-cl-02   <none>           <none>
yelb-ui-f544fc74f-pztht         1/1     Running   0             2m37s   10.30.67.5   k8s-node-vm-1-cl-02   <none>           <none>
yelb-ui-f544fc74f-r48rx         1/1     Running   0             2m37s   10.30.69.2   k8s-node-vm-3-cl-02   <none>           <none>
The IPVS loadbalancing in action:
ubuntu@k8s-node-vm-1-cl-02:~$ sudo ipvsadm -l
IP Virtual Server version 1.2.1 (size=4096)
Prot LocalAddress:Port Scheduler Flags
  -> RemoteAddress:Port           Forward Weight ActiveConn InActConn
TCP  k8s-node-vm-1-cl-02:32611 rr
  -> 10-30-67-5.yelb-ui.yelb.svc. Masq    1      0          0
  -> 10-30-68-6.yelb-ui.yelb.svc. Masq    1      0          0
  -> 10-30-69-2.yelb-ui.yelb.svc. Masq    1      0          0
TCP  k8s-node-vm-1-cl-02.cluster. rr
  -> 10-30-67-5.yelb-ui.yelb.svc. Masq    1      0          0
  -> 10-30-68-6.yelb-ui.yelb.svc. Masq    1      0          0
  -> 10-30-69-2.yelb-ui.yelb.svc. Masq    1      0          0
TCP  k8s-node-vm-1-cl-02:http rr
  -> 10-30-67-5.yelb-ui.yelb.svc. Masq    1      0          0
  -> 10-30-68-6.yelb-ui.yelb.svc. Masq    1      0          0
  -> 10-30-69-2.yelb-ui.yelb.svc. Masq    1      0          0
# All IPs involved in the yelb-ui service, pod, service etc
ubuntu@k8s-node-vm-3-cl-02:~$ sudo ipvsadm -L -n
IP Virtual Server version 1.2.1 (size=4096)
Prot LocalAddress:Port Scheduler Flags
  -> RemoteAddress:Port           Forward Weight ActiveConn InActConn
TCP  10.30.63.48:80 rr
  -> 10.30.68.3:80                Masq    1      0          0
TCP  10.30.69.1:31925 rr
  -> 10.30.68.3:80                Masq    1      0          0
TCP  10.160.1.27:31925 rr
  -> 10.30.68.3:80                Masq    1      0          0
TCP  10.169.1.40:80 rr
  -> 10.30.68.3:80                Masq    1      0          0
UDP  10.30.0.3:53 rr
  -> 10.30.65.3:53                Masq    1      0          1
  -> 10.30.66.2:53                Masq    1      0          1
andreasm@linuxmgmt01:~/prod-cluster-2$ k get pods -n yelb -owide
NAME                            READY   STATUS    RESTARTS      AGE    IP           NODE                  NOMINATED NODE   READINESS GATES
redis-server-84f4bf49b5-lstpm   1/1     Running   2 (4d ago)    71d    10.30.67.4   k8s-node-vm-1-cl-02   <none>           <none>
yelb-appserver-6dc7cd98-4c6s5   1/1     Running   5 (98m ago)   71d    10.30.68.4   k8s-node-vm-2-cl-02   <none>           <none>
yelb-db-84d6f6fc6c-dlp68        1/1     Running   5 (98m ago)   71d    10.30.68.2   k8s-node-vm-2-cl-02   <none>           <none>
yelb-ui-f544fc74f-vm2b2         1/1     Running   1 (98m ago)   123m   10.30.68.3   k8s-node-vm-2-cl-02   <none>           <none>
Next chapter will cover how this looks with AntreaProxy all.
ServiceExternalIP using only AntreaProxy. #
Using ServiceExternalIP with only AntreaProxy there will be no IPVS, no kube-proxy involved. All rules will be configured in OVS. If there is no kube-proxy configured in the cluster there is no pre-reqs (as above) that needs to be done. To get some insight in how that looks I will dump some output below.
The service and the corresponding endpoints:
andreasm@linuxmgmt01:~$ k describe svc -n yelb yelb-ui
Name:                     yelb-ui
Namespace:                yelb
Labels:                   app=yelb-ui
                          tier=frontend
Annotations:              service.antrea.io/external-ip-pool: service-external-ip-pool
Selector:                 app=yelb-ui,tier=frontend
Type:                     LoadBalancer
IP Family Policy:         SingleStack
IP Families:              IPv4
IP:                       10.40.30.39
IPs:                      10.40.30.39
LoadBalancer Ingress:     10.160.1.40
Port:                     <unset>  80/TCP
TargetPort:               80/TCP
NodePort:                 <unset>  31535/TCP
Endpoints:                10.40.67.4:80,10.40.68.3:80,10.40.69.6:80
Session Affinity:         None
External Traffic Policy:  Cluster
Events:                   <none>
The pods representing the endpoints:
andreasm@linuxmgmt01:~$ k get pods -n yelb -owide
NAME                            READY   STATUS    RESTARTS   AGE     IP           NODE                  NOMINATED NODE   READINESS GATES
redis-server-84f4bf49b5-j6g8x   1/1     Running   0          5d22h   10.40.69.3   k8s-node-vm-3-cl-03   <none>           <none>
yelb-appserver-6dc7cd98-wlflx   1/1     Running   0          5d22h   10.40.69.2   k8s-node-vm-3-cl-03   <none>           <none>
yelb-db-84d6f6fc6c-qr2kv        1/1     Running   0          5d22h   10.40.67.2   k8s-node-vm-2-cl-03   <none>           <none>
yelb-ui-f544fc74f-d84gd         1/1     Running   0          56s     10.40.69.6   k8s-node-vm-3-cl-03   <none>           <none>
yelb-ui-f544fc74f-kvvht         1/1     Running   0          5d22h   10.40.67.4   k8s-node-vm-2-cl-03   <none>           <none>
yelb-ui-f544fc74f-xqhrk         1/1     Running   0          56s     10.40.68.3   k8s-node-vm-1-cl-03   <none>           <none>
Output from IPVS:
ubuntu@k8s-node-vm-1-cl-03:~$ sudo ipvsadm -l
IP Virtual Server version 1.2.1 (size=4096)
Prot LocalAddress:Port Scheduler Flags
  -> RemoteAddress:Port           Forward Weight ActiveConn InActConn
So much empty..
How does the OVS tables look like:
# endpoint pod 1:
root@k8s-node-vm-1-cl-03:/# ovs-ofctl dump-flows br-int | grep 10.40.68.3
 cookie=0x1010000000000, duration=433.630s, table=1, n_packets=4, n_bytes=168, idle_age=428, priority=200,arp,in_port=4,arp_spa=10.40.68.3,arp_sha=6e:4d:5b:e4:99:c9 actions=resubmit(,2)
 cookie=0x1010000000000, duration=433.630s, table=4, n_packets=25, n_bytes=4443, idle_age=2, priority=200,ip,in_port=4,dl_src=6e:4d:5b:e4:99:c9,nw_src=10.40.68.3 actions=resubmit(,5)
 cookie=0x1030000000000, duration=427.300s, table=12, n_packets=1, n_bytes=78, idle_age=10, priority=200,tcp,reg3=0xa284403,reg4=0x20050/0x7ffff actions=ct(commit,table=13,zone=65520,nat(dst=10.40.68.3:80),exec(load:0x1->NXM_NX_CT_MARK[4],move:NXM_NX_REG0[0..3]->NXM_NX_CT_MARK[0..3]))
 cookie=0x1010000000000, duration=433.630s, table=17, n_packets=28, n_bytes=5264, idle_age=2, priority=200,ip,reg0=0x200/0x200,nw_dst=10.40.68.3 actions=mod_dl_src:62:78:99:77:56:60,mod_dl_dst:6e:4d:5b:e4:99:c9,resubmit(,19)
 cookie=0x1030000000000, duration=427.300s, table=20, n_packets=0, n_bytes=0, idle_age=427, priority=190,ct_state=+new+trk,ip,nw_src=10.40.68.3,nw_dst=10.40.68.3 actions=ct(commit,table=21,zone=65520,exec(load:0x1->NXM_NX_CT_MARK[5],load:0x1->NXM_NX_CT_MARK[6]))
# endpoint pod 2:
root@k8s-node-vm-1-cl-03:/# ovs-ofctl dump-flows br-int | grep 10.40.67.4
 cookie=0x1030000000000, duration=512942.550s, table=12, n_packets=18, n_bytes=1404, idle_age=65534, hard_age=65534, priority=200,tcp,reg3=0xa284304,reg4=0x20050/0x7ffff actions=ct(commit,table=13,zone=65520,nat(dst=10.40.67.4:80),exec(load:0x1->NXM_NX_CT_MARK[4],move:NXM_NX_REG0[0..3]->NXM_NX_CT_MARK[0..3]))
L7FlowExporter - new in Antrea v.1.15.0 #
FlowExport in Antrea is something I have covered previously here, but this time I would like to have a look at the new Layer7 FlowExport. Lets configure it and see some flows with Layer7 information.
To be able to use the L7FlowExporter and get the additional L7 flow information I need to enable the L7FlowExporter feature gate. So in my Antrea configMap:
apiVersion: v1
data:
  antrea-agent.conf: |
      L7FlowExporter: true
Restart Antrea controller and agents:
andreasm@linuxmgmt01:~$ k edit configmaps -n kube-system antrea-config
configmap/antrea-config edited
andreasm@linuxmgmt01:~$ k rollout restart -n kube-system deployment/antrea-controller
deployment.apps/antrea-controller restarted
andreasm@linuxmgmt01:~$ k delete pods -n kube-system -l component=antrea-agent
pod "antrea-agent-4wtgw" deleted
pod "antrea-agent-8gjvw" deleted
pod "antrea-agent-h72qd" deleted
pod "antrea-agent-lg52n" deleted
pod "antrea-agent-z8knw" deleted
pod "antrea-agent-zf9l6" deleted
To further enable the L7 flow information I need to annotate either my pods or a whole namespace with the following key: visibility.antrea.io/l7-export=X the values can be ìngress, egress or both as it depends on which direction I want the L7 flow information. In the example below I will annotate my Ubuntu pod using the value both
apiVersion: apps/v1
kind: Deployment
metadata:
  annotations:
    visibility.antrea.io/l7-export: both
  name: ubuntu-20-04

# or just annotate the pod directly
k annotate pod -n egress ubuntu-20-04-59d474f9df-dv9ms visibility.antrea.io/l7-export=both
Let see what kind of information I get when I try to access a web page using HTTP from the Ubuntu pod itself.
I will use Theia as my tool to receive and visualize my IPFIX flows, I have already covered Theia here.
When enabling the L7FlowExport the current Theia installation does not have the correct columns in place in the Clickhouse DB leading to FlowAggregator pod failing. It will complain about the missing columns. The following tables default.flows and default.flows_local needs to add the following columns:
- appProtocolName
- httpVals
- egressNodeName
Inside the chi-clickhouse-clickhouse-0-0-0 pod execute the following:
root@chi-clickhouse-clickhouse-0-0-0:/# clickhouse-client
chi-clickhouse-clickhouse-0-0-0.chi-clickhouse-clickhouse-0-0.flow-visibility.svc.cluster.local :) ALTER TABLE default.flows ADD COLUMN appProtocolName String;
Repeat for the other two columns, in both tables
Screenshot from the Grafana dashboard:
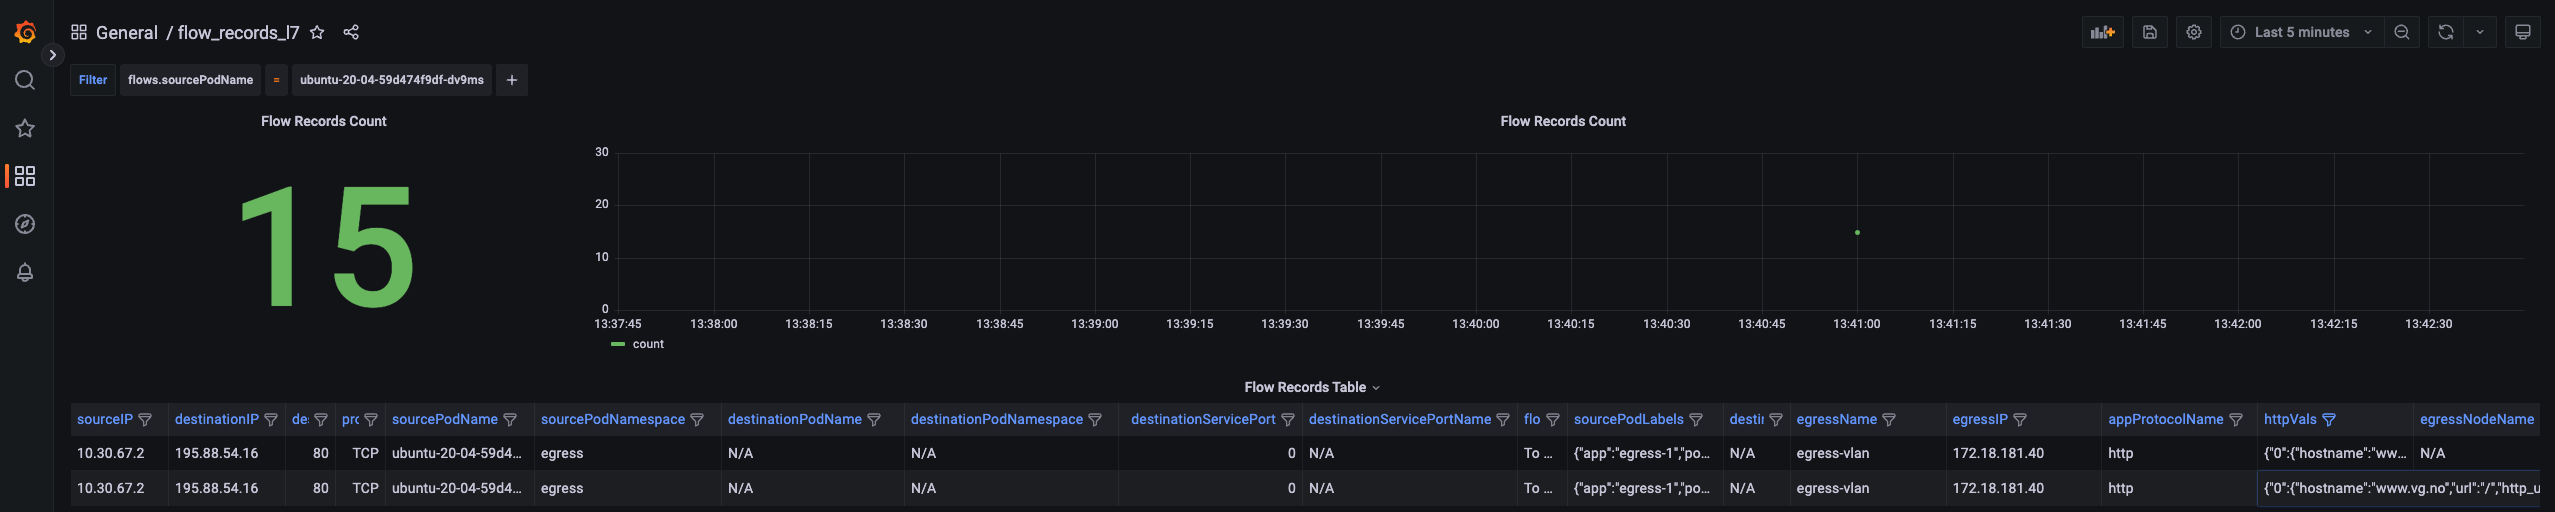
I can see the HTTP protocol and the httpVals column is displaying this information:
{"0":{"hostname":"www.vg.no","url":"/","http_user_agent":"curl/7.68.0","http_content_type":"","http_method":"GET","protocol":"HTTP/1.1","status":301,"length":0}}
I have remove a lot of columns in the screenshot above for clarity. For more information on Flow-Export head over here and here.
Node NetworkPolicy and ExternalNode Policy #
In this section I will have a look at two features that makes it possible to secure the Kubernetes nodes themselves using Antrea and external nodes, not being a Kubernetes node but a VM outside of the Kubernetes cluster. There can be many usecases for such a feature. If there is no physical firewall in between the segments or the nodes, still we need to enforce some kind of security to restrict certain lateral movement between nodes and or other VMs or bare-metal servers in the environment. Being able to do microsegmentation is important.
Node NetworkPolicy - new in Antrea v1.15 #
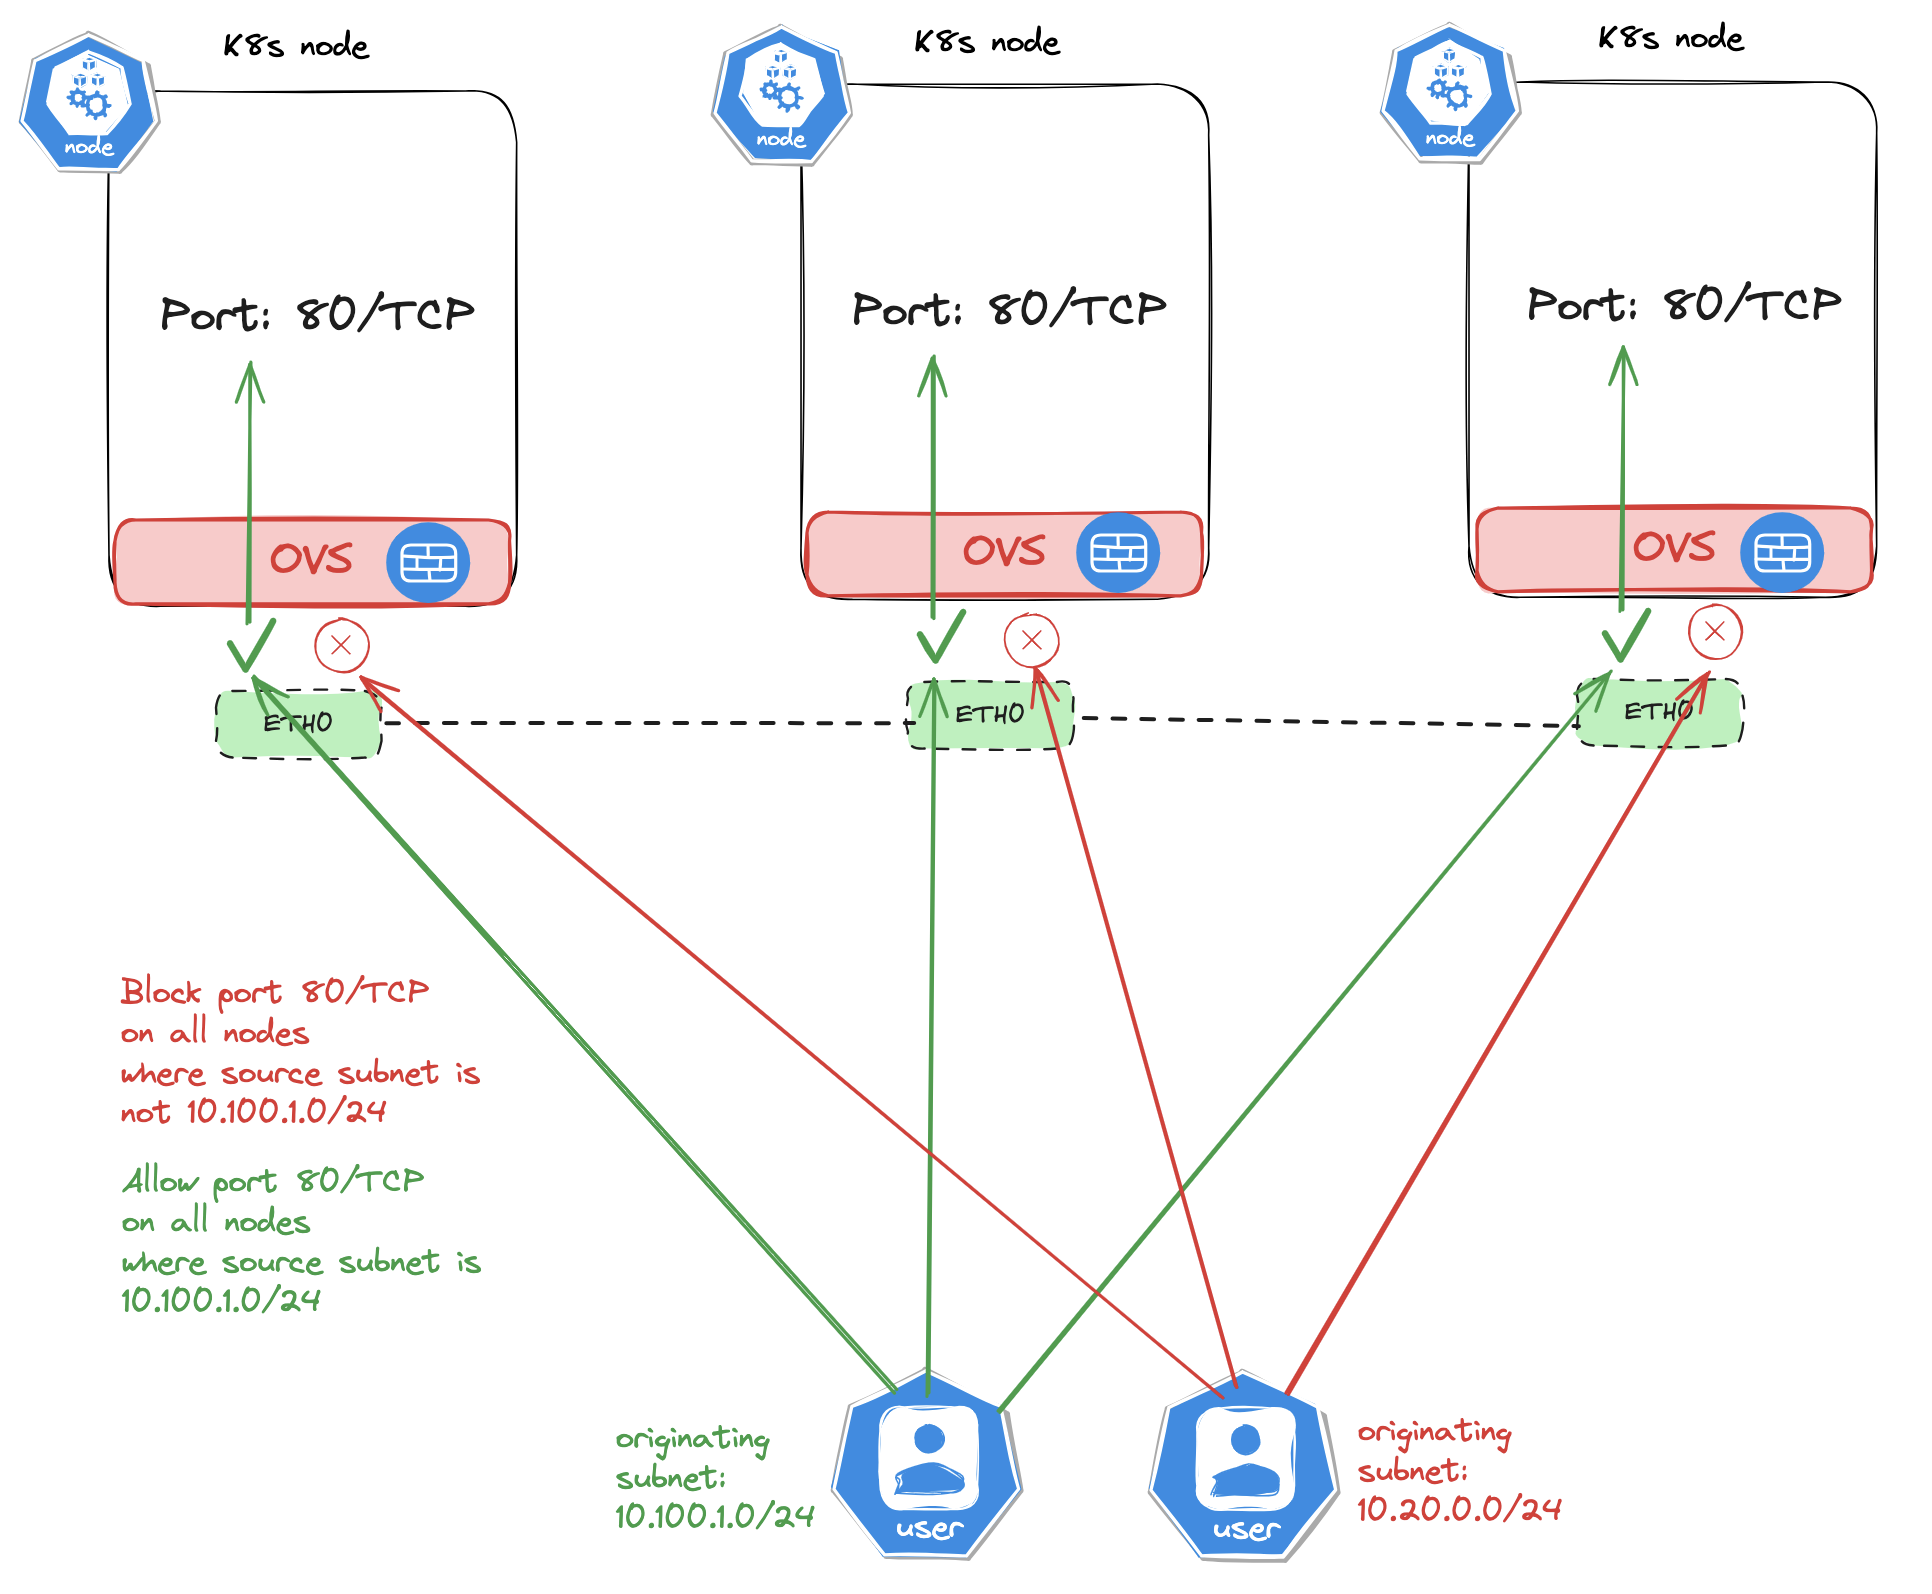
The diagram above tries to illustrate a communication pattern where the Kubernetes nodes is hosting a service running on port 80/TCP and some external resources is trying to reach those services. I will define a policy that will only allow access originating from certain subnets and drop all else. If I am exposing the service using an external LoadBalancer I could potentially restrict access to this service coming only from the LoadBalancer itself, nothing else. Lets have a look at the rule itself and apply it in i a real Kubernetes cluster.
The example rule I am using in this case is taken from the official Antrea documentation here with some modifications by me.
The rule (notice the kind, it is a ClusterNetworkPolicy):
apiVersion: crd.antrea.io/v1beta1
kind: ClusterNetworkPolicy
metadata:
  name: restrict-http-to-node
spec:
  priority: 5
  tier: application
  appliedTo:
    - nodeSelector:
        matchExpressions:
        - key: "kubernetes.io/hostname"
          operator: "In"
          values: ["k8s-node-vm-1-cl-02", "k8s-node-vm-2-cl-02", "k8s-node-vm-3-cl-02"]
  ingress:
    - name: allow-cidr
      action: Allow
      from:
        - ipBlock:
            cidr: 10.100.5.0/24
        - ipBlock:
            cidr: 172.18.6.0/24
      ports:
        - protocol: TCP
          port: 80
    - name: drop-other
      action: Drop
      ports:
        - protocol: TCP
          port: 80
The policy above will be applied to all nodes having the key/value label kubernetes.io/hostname: k8s-worker-nodeallowing port 80/TCP from 10.100.5.0/24 and 172.18.6.0/24 and block all else trying to reach port 80/TCP.
Now before I can go ahead and apply this policy and I need to enable the feature gate NodeNetworkPolicy:
apiVersion: v1
kind: ConfigMap
metadata:
  name: antrea-config
  namespace: kube-system
data:
  antrea-agent.conf: |
    featureGates:
      NodeNetworkPolicy: true
Restart all Antrea pods:
andreasm@linuxmgmt01:~$ k delete pods -n kube-system -l app=antrea
pod "antrea-agent-gz9nt" deleted
pod "antrea-agent-mcck5" deleted
pod "antrea-agent-qqr6l" deleted
pod "antrea-agent-spmz8" deleted
pod "antrea-agent-vnll7" deleted
pod "antrea-agent-xrr2p" deleted
pod "antrea-controller-576fdb765-h7tbc" deleted
After the policy has been applied I can check easily if it is in effect by using the command below:
andreasm@linuxmgmt01:~/prod-cluster-2/antrea-policies$ k get acnp
NAME                    TIER          PRIORITY   DESIRED NODES   CURRENT NODES   AGE
restrict-http-to-node   application   5          3               3               16m
My cluster consists of 3 control plane nodes and 3 worker nodes. I can see my policy as been applied to at least 3, which I assume is my worker nodes. Lets dig into that deeper a bit later. But lets see if the policy is being enforced.
From my laptop or from my linux vm, from both subnets that should be allowed:
andreasm@linuxmgmt01:~$ curl http://10.169.1.40
<!doctype html>
<html>
<head>
    <meta charset="utf-8">
    <title>Yelb</title>
    <base href="/">
    <meta name="viewport" content="width=device-width, initial-scale=1">
    <link rel="icon" type="image/x-icon" href="favicon.ico?v=2">
</head>
<body>
<yelb>Loading...</yelb>
<script type="text/javascript" src="inline.bundle.js"></script><script type="text/javascript" src="styles.bundle.js"></script><script type="text/javascript" src="scripts.bundle.js"></script><script type="text/javascript" src="vendor.bundle.js"></script><script type="text/javascript" src="main.bundle.js"></script></body>
</html>

# From my laptop
andreasm@laptop:~$ curl http://10.169.1.40
<!doctype html>
<html>
<head>
    <meta charset="utf-8">
    <title>Yelb</title>
    <base href="/">
    <meta name="viewport" content="width=device-width, initial-scale=1">
    <link rel="icon" type="image/x-icon" href="favicon.ico?v=2">
</head>
<body>
<yelb>Loading...</yelb>
<script type="text/javascript" src="inline.bundle.js"></script><script type="text/javascript" src="styles.bundle.js"></script><script type="text/javascript" src="scripts.bundle.js"></script><script type="text/javascript" src="vendor.bundle.js"></script><script type="text/javascript" src="main.bundle.js"></script></body>
</html>
From any other subnet (other machines) from any other subnet not defined as allowed:
andreasm@linuxmgmt02:~$ ip addr
2: ens18: <BROADCAST,MULTICAST,UP,LOWER_UP> mtu 1500 qdisc fq_codel state UP group default qlen 1000
    link/ether f6:97:82:3b:9a:9e brd ff:ff:ff:ff:ff:ff
    inet 172.18.5.40/24 brd 172.18.5.255 scope global ens18
       valid_lft forever preferred_lft forever

andreasm@linuxmgmt02:~$ curl http://10.169.1.40
curl: (28) Failed to connect to 10.169.1.40 port 80: Connection timed out
Another example can be to drop certain ports between the nodes in a Kubernetes cluster itself with an example policy like this:
apiVersion: crd.antrea.io/v1beta1
kind: ClusterNetworkPolicy
metadata:
  name: egress-drop-node-to-node
spec:
  priority: 5
  tier: application
  appliedTo:
    - nodeSelector:
        matchExpressions:
        - key: "kubernetes.io/hostname"
          operator: "In"
          values: ["k8s-node-vm-1-cl-02", "k8s-node-vm-2-cl-02", "k8s-node-vm-3-cl-02"]
  egress:
    - name: drop-22
      action: Drop
      to:
        - nodeSelector:
            matchExpressions:
            - key: "kubernetes.io/hostname"
              operator: "In"
              values: ["k8s-node-vm-1-cl-02", "k8s-node-vm-2-cl-02", "k8s-node-vm-3-cl-02"]
      ports:
        - protocol: TCP
          port: 22
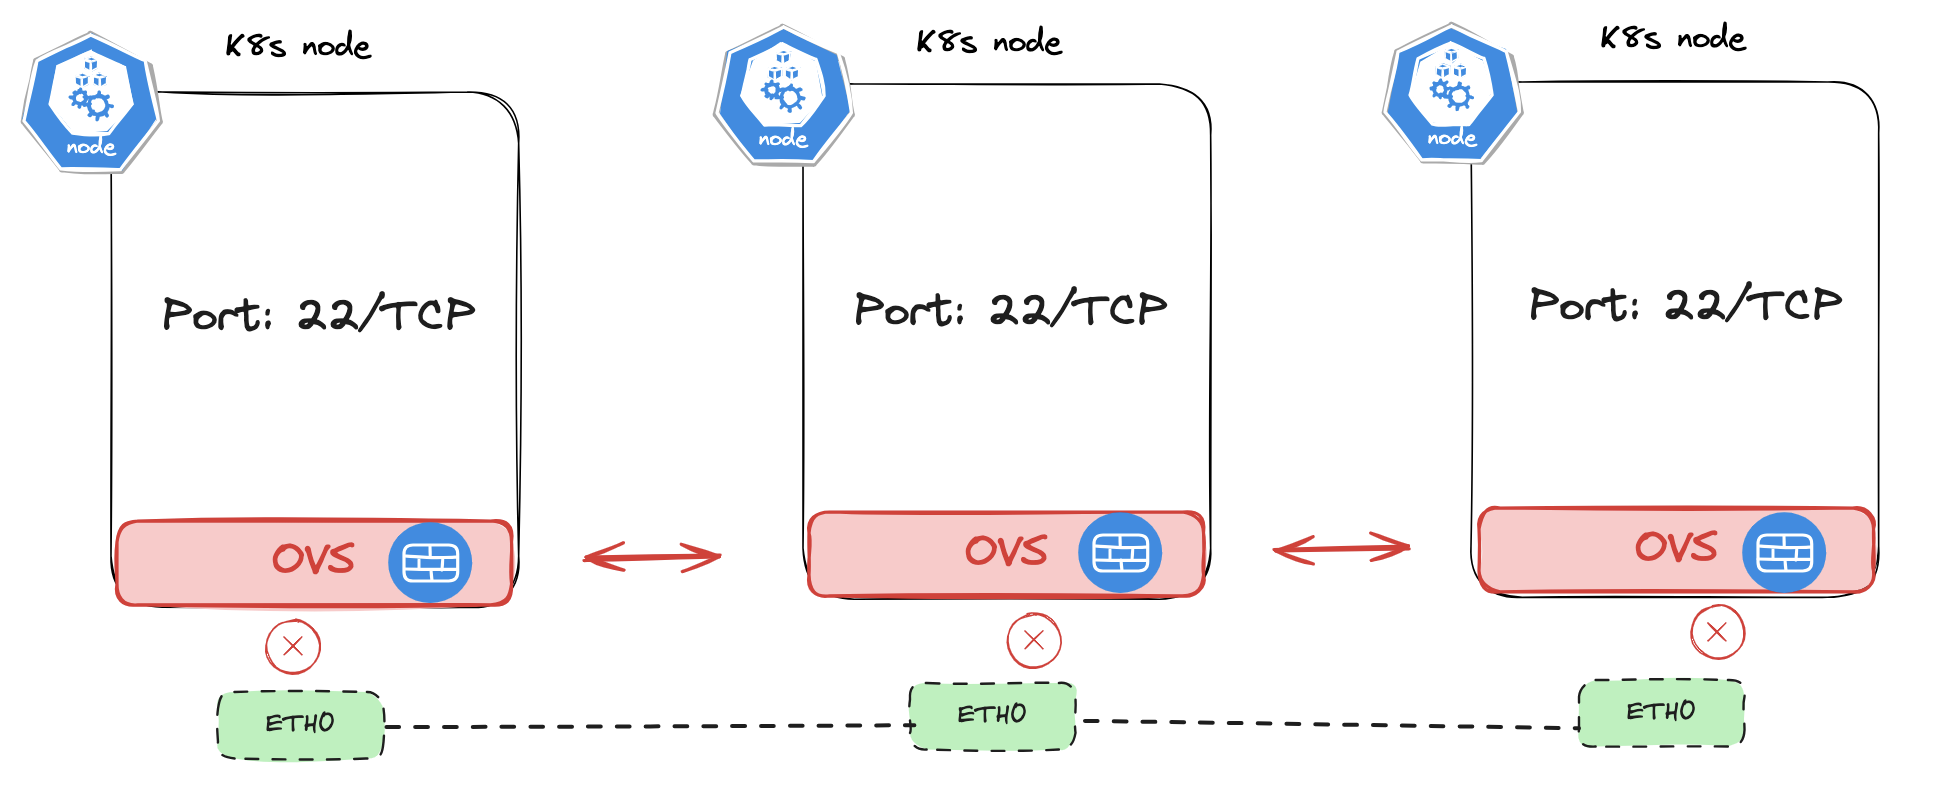
Now if I try to reach the any of my Kubernetes worker nodes from any of my Kubernetes nodes using SSH:
# node 1 to node 2 over SSH
ubuntu@k8s-node-vm-1-cl-02:~$ ssh ubuntu@10.160.1.26
ssh: connect to host 10.160.1.26 port 22: Connection timed out
# node 1 to any other machine over SSH
ubuntu@k8s-node-vm-1-cl-02:~$ ssh andreasm@10.100.5.10
The authenticity of host '10.100.5.10 (10.100.5.10)' can't be established.
ED25519 key fingerprint is SHA256:Ue0UyrCk679JwN8QbaRLviCdEfxg7lnu+3RXVryujA8.
This key is not known by any other names
Are you sure you want to continue connecting (yes/no/[fingerprint])?
Play around with this new feature making it possible to also apply and enforce security policies on the nodes themselves opens up for a much more granual and controlled environment if one have these requirements. On edge usecases this can also be very valuable.
ExternalNode Policy #
I just want to highlight this feature in its own chapter as I feel it is relevant, and may be a very good combination with the NodePolicy feature. A Kubernetes cluster with its running workload is often depending on external backend services, like external DB/DNS/NTP services hosted somewhere else in the datacenter.
With Antrea ExternalNode policy it is possible to manage security policies on non Kubernetes workload, like any regular virtual machine or bare-metal server using Antrea NetworkPolicy from your Kubernetes/API. See illustration below:
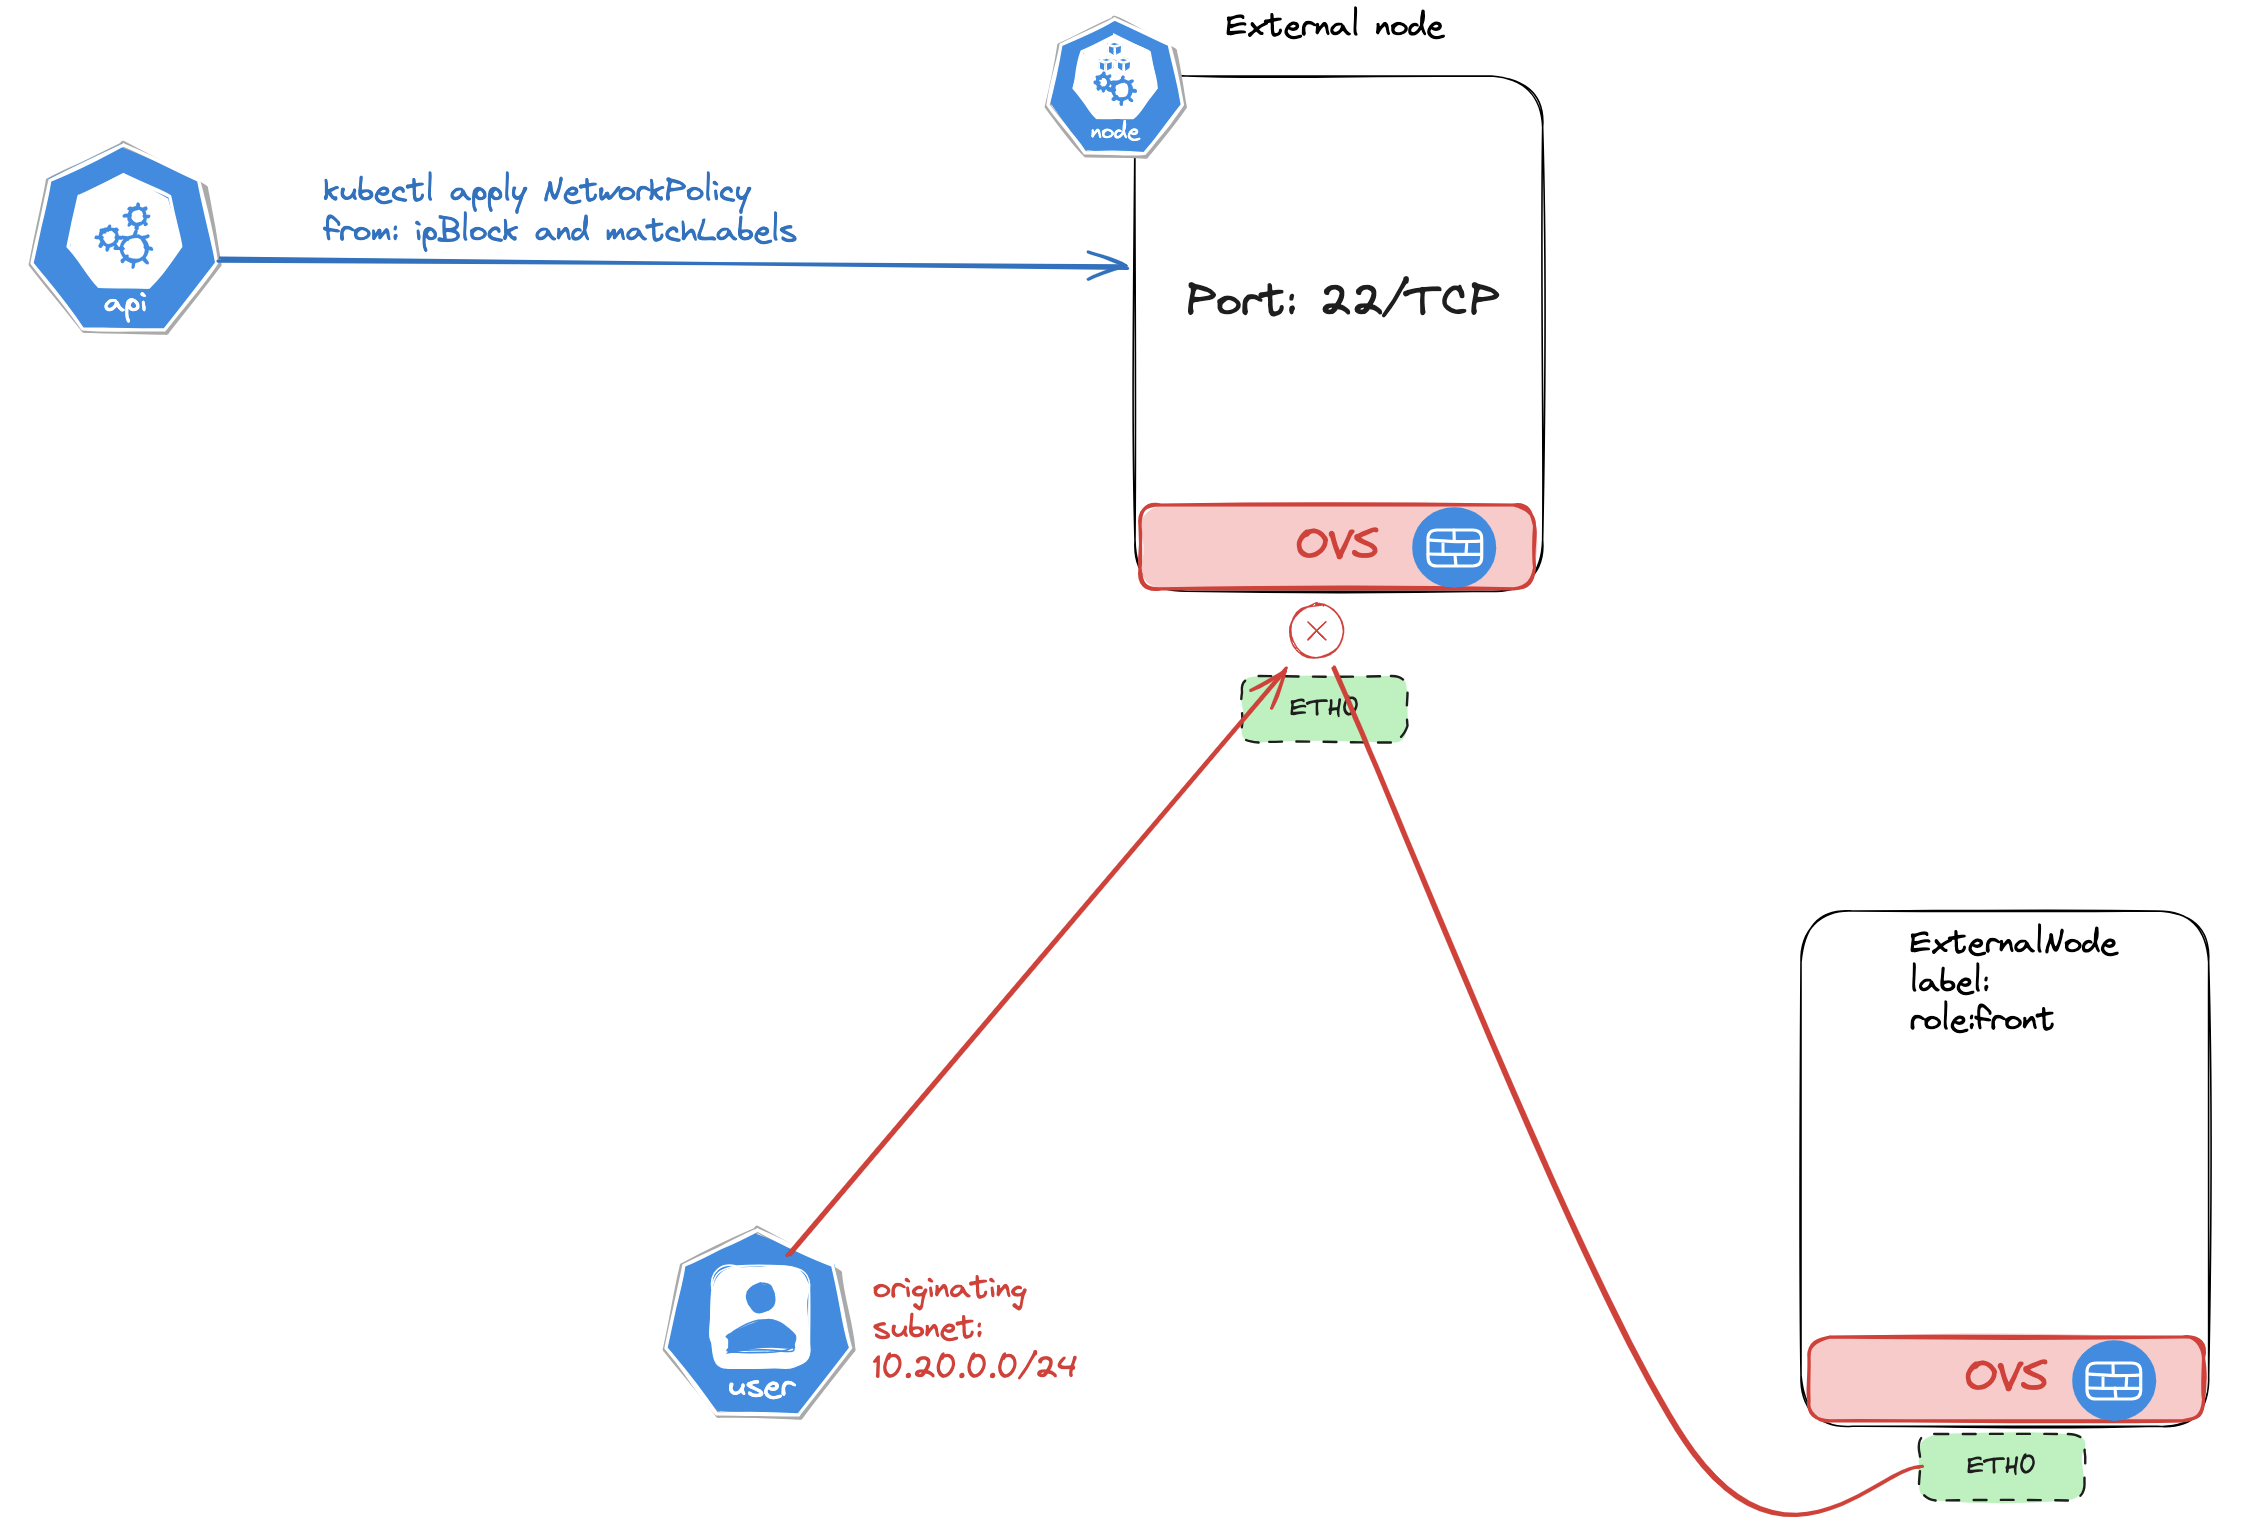
For information on how to configure this, head over to the following pages here and here.
Outro #
Thats it for this time. Some features I find interesting in Antrea, head over to the official Antrea docs page here and Github repo here for always updated and more information. Speaking of updated information, in time of writing this blog post Antrea 2.0 is released! Antrea v2.0