

Deploy Tanzu in vSphere 8 with VDS and Avi Loadbalancer: #
This post will go through how to install Tanzu in vSphere 8 using vSphere VDS networking and Avi as loadbalancer. The goal is to deploy Tanzu by using vSphere Distributed Switch (no NSX this time) and utilize Avi as loadbalancer for Supervisor and workload cluster L4 endpoint (kubernetes API). When that is done I will go through how we also can extend this into L7 (Ingress) by using AKO in our workload clusters.
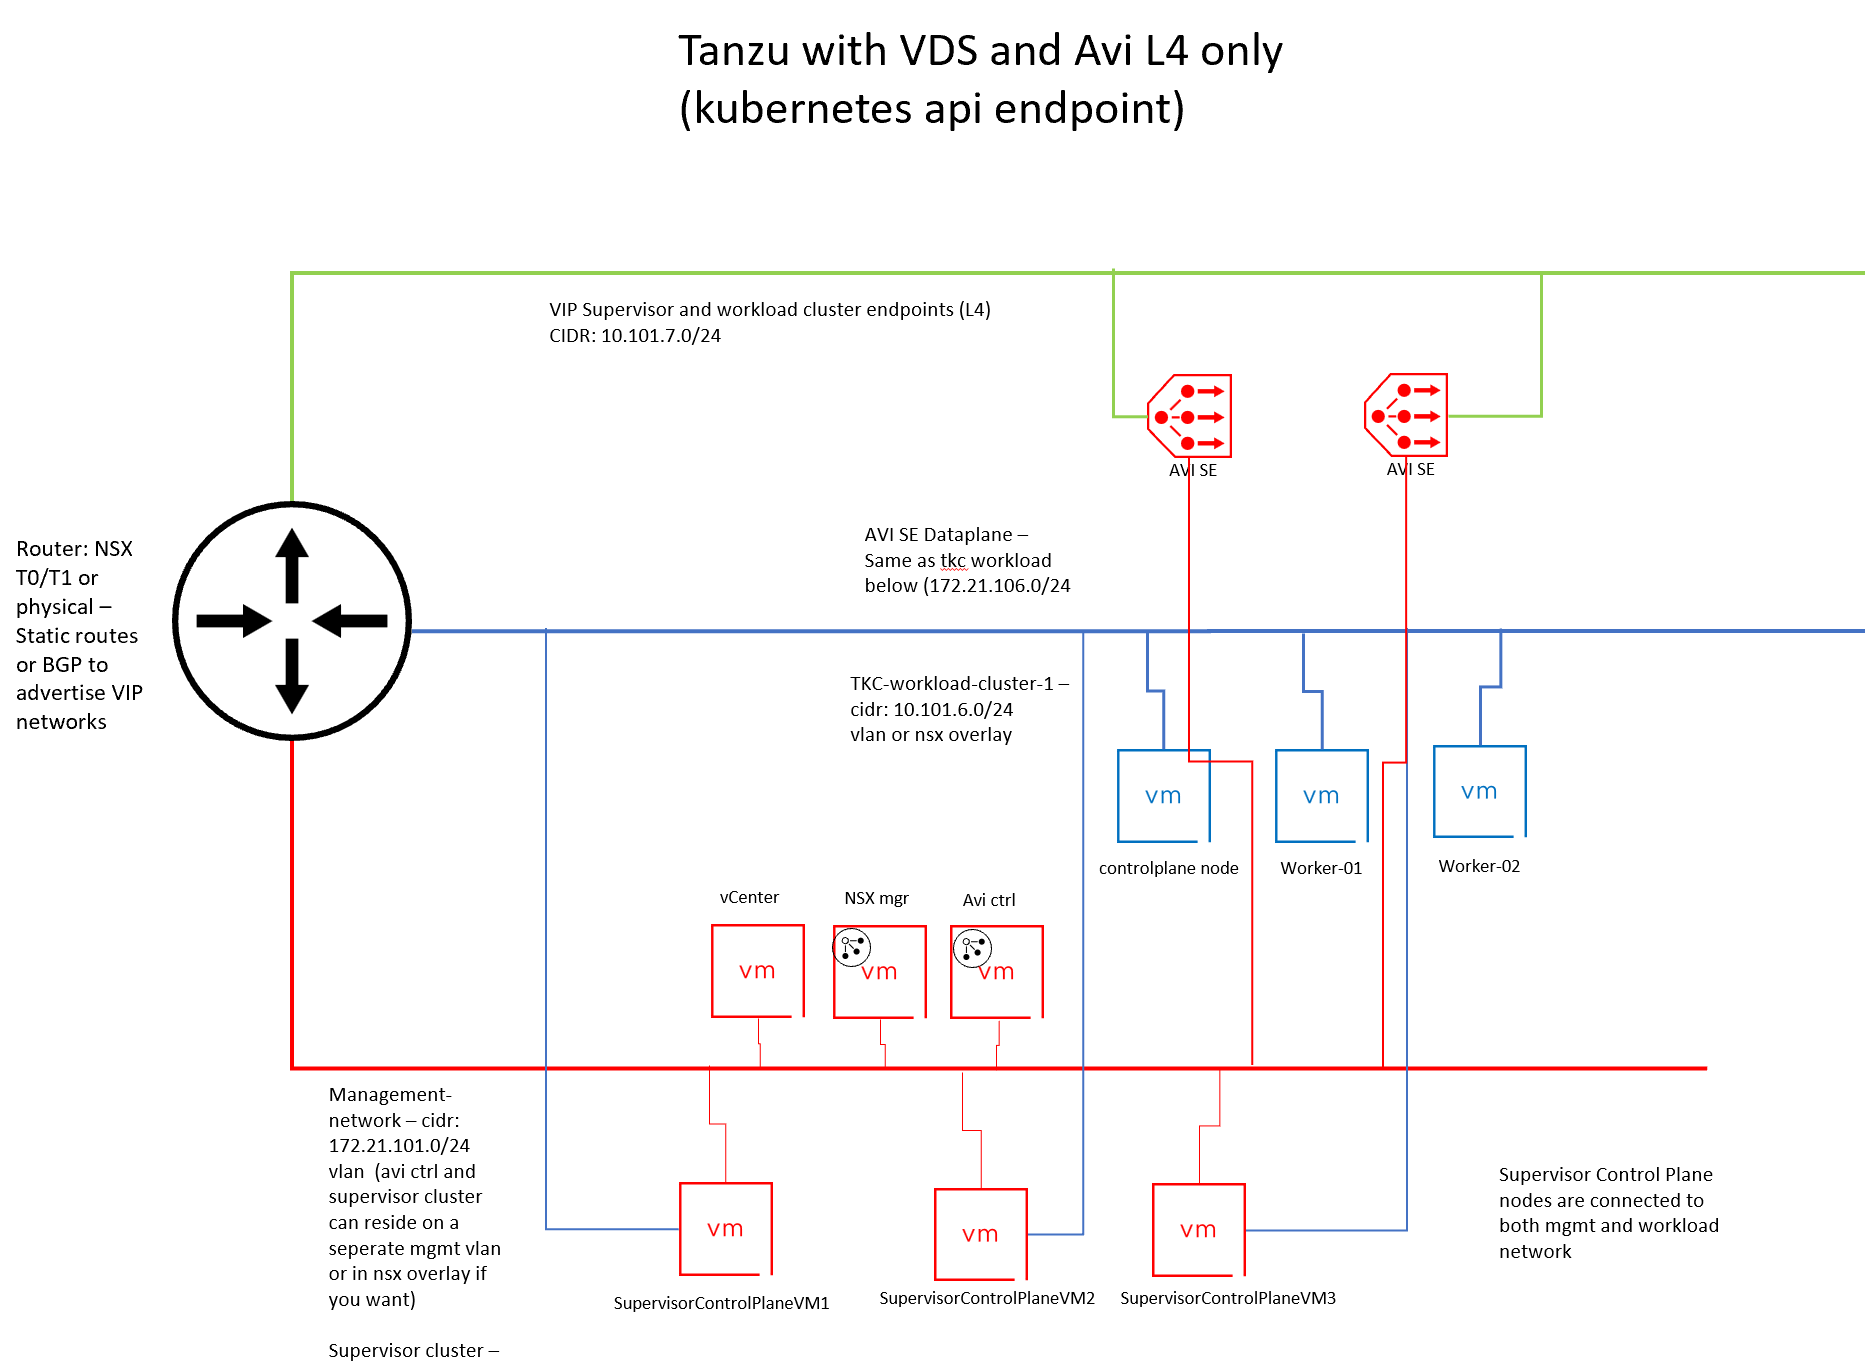
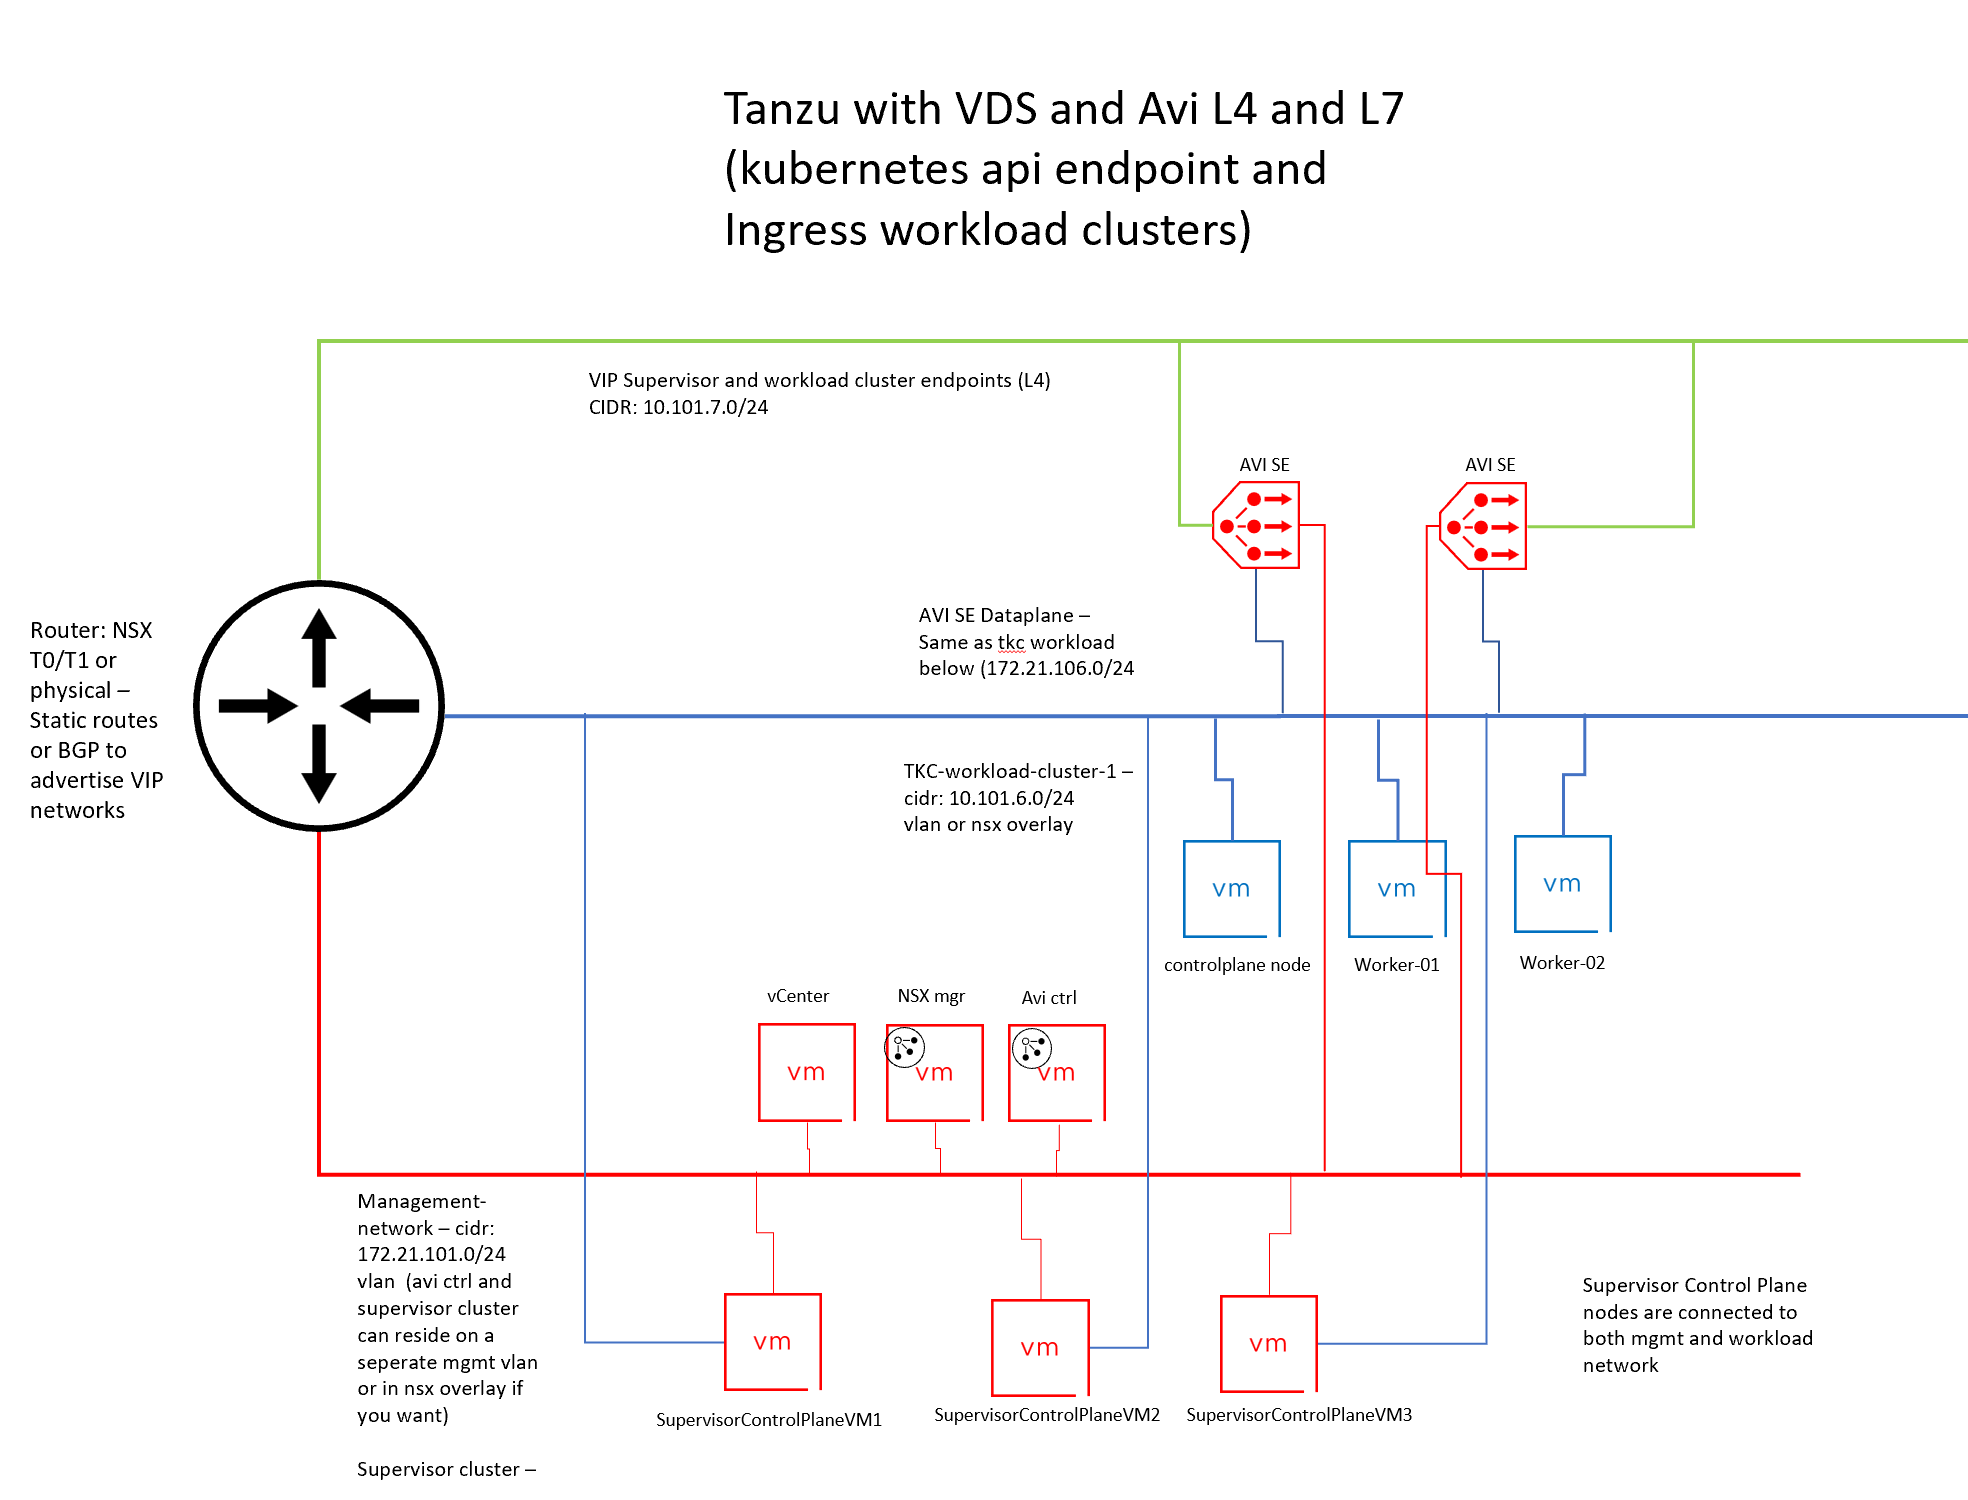
The below diagram is what we should end up with after the basic deployment of Tanzu and Avi:
Assumptions #
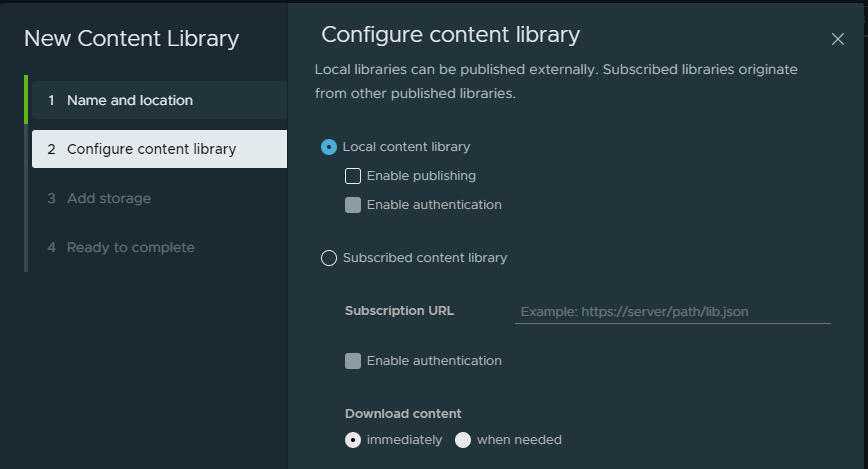
This post assumes we already have a vSphere environment up and running with vCenter, HA and DRS. Required network to support the basic vSphere stuff like vMotion and shared storage. And the hosts networking has been configured with a Distributed Switch with the corresponding vds portgroups for Management, Frontend network (VIP placement for kubernetes API endpoint) and workload network with corresponding VLANs. In vCenter a content library needs to be created, this is just a local library you give a meaningful name no subscriptions etc.
At least one Avi controller is deployed, no cloud added, just deployed and the initial configs done.
Preparations on the Avi side of things #
This part of the guide takes place on the newly configured Avi controller(s) which currently only has the initial configuration done
Avi cloud configurations #
To prepare Avi for this deployment we need to configure the vCenter cloud. This is done here:

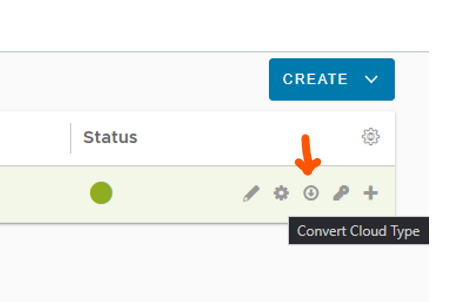
There is a Default-Cloud object there we need to convert to a vCenter cloud. This is done by clicking on this button on the far right side:
This will bring up the following options:
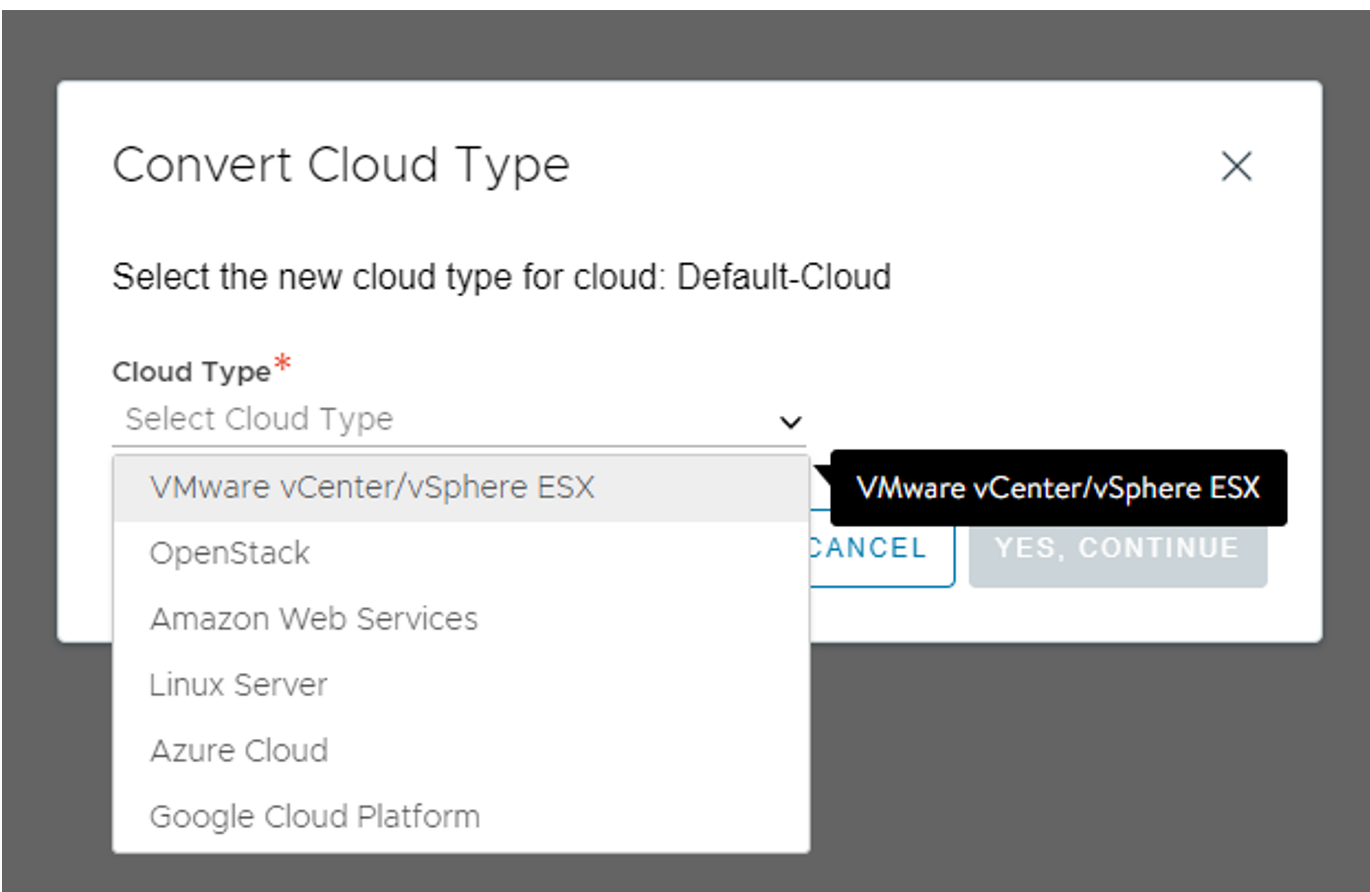
Select VMware vCenter/vSphere NSX
Then start populate the relevant vCenter information for your vCenter:
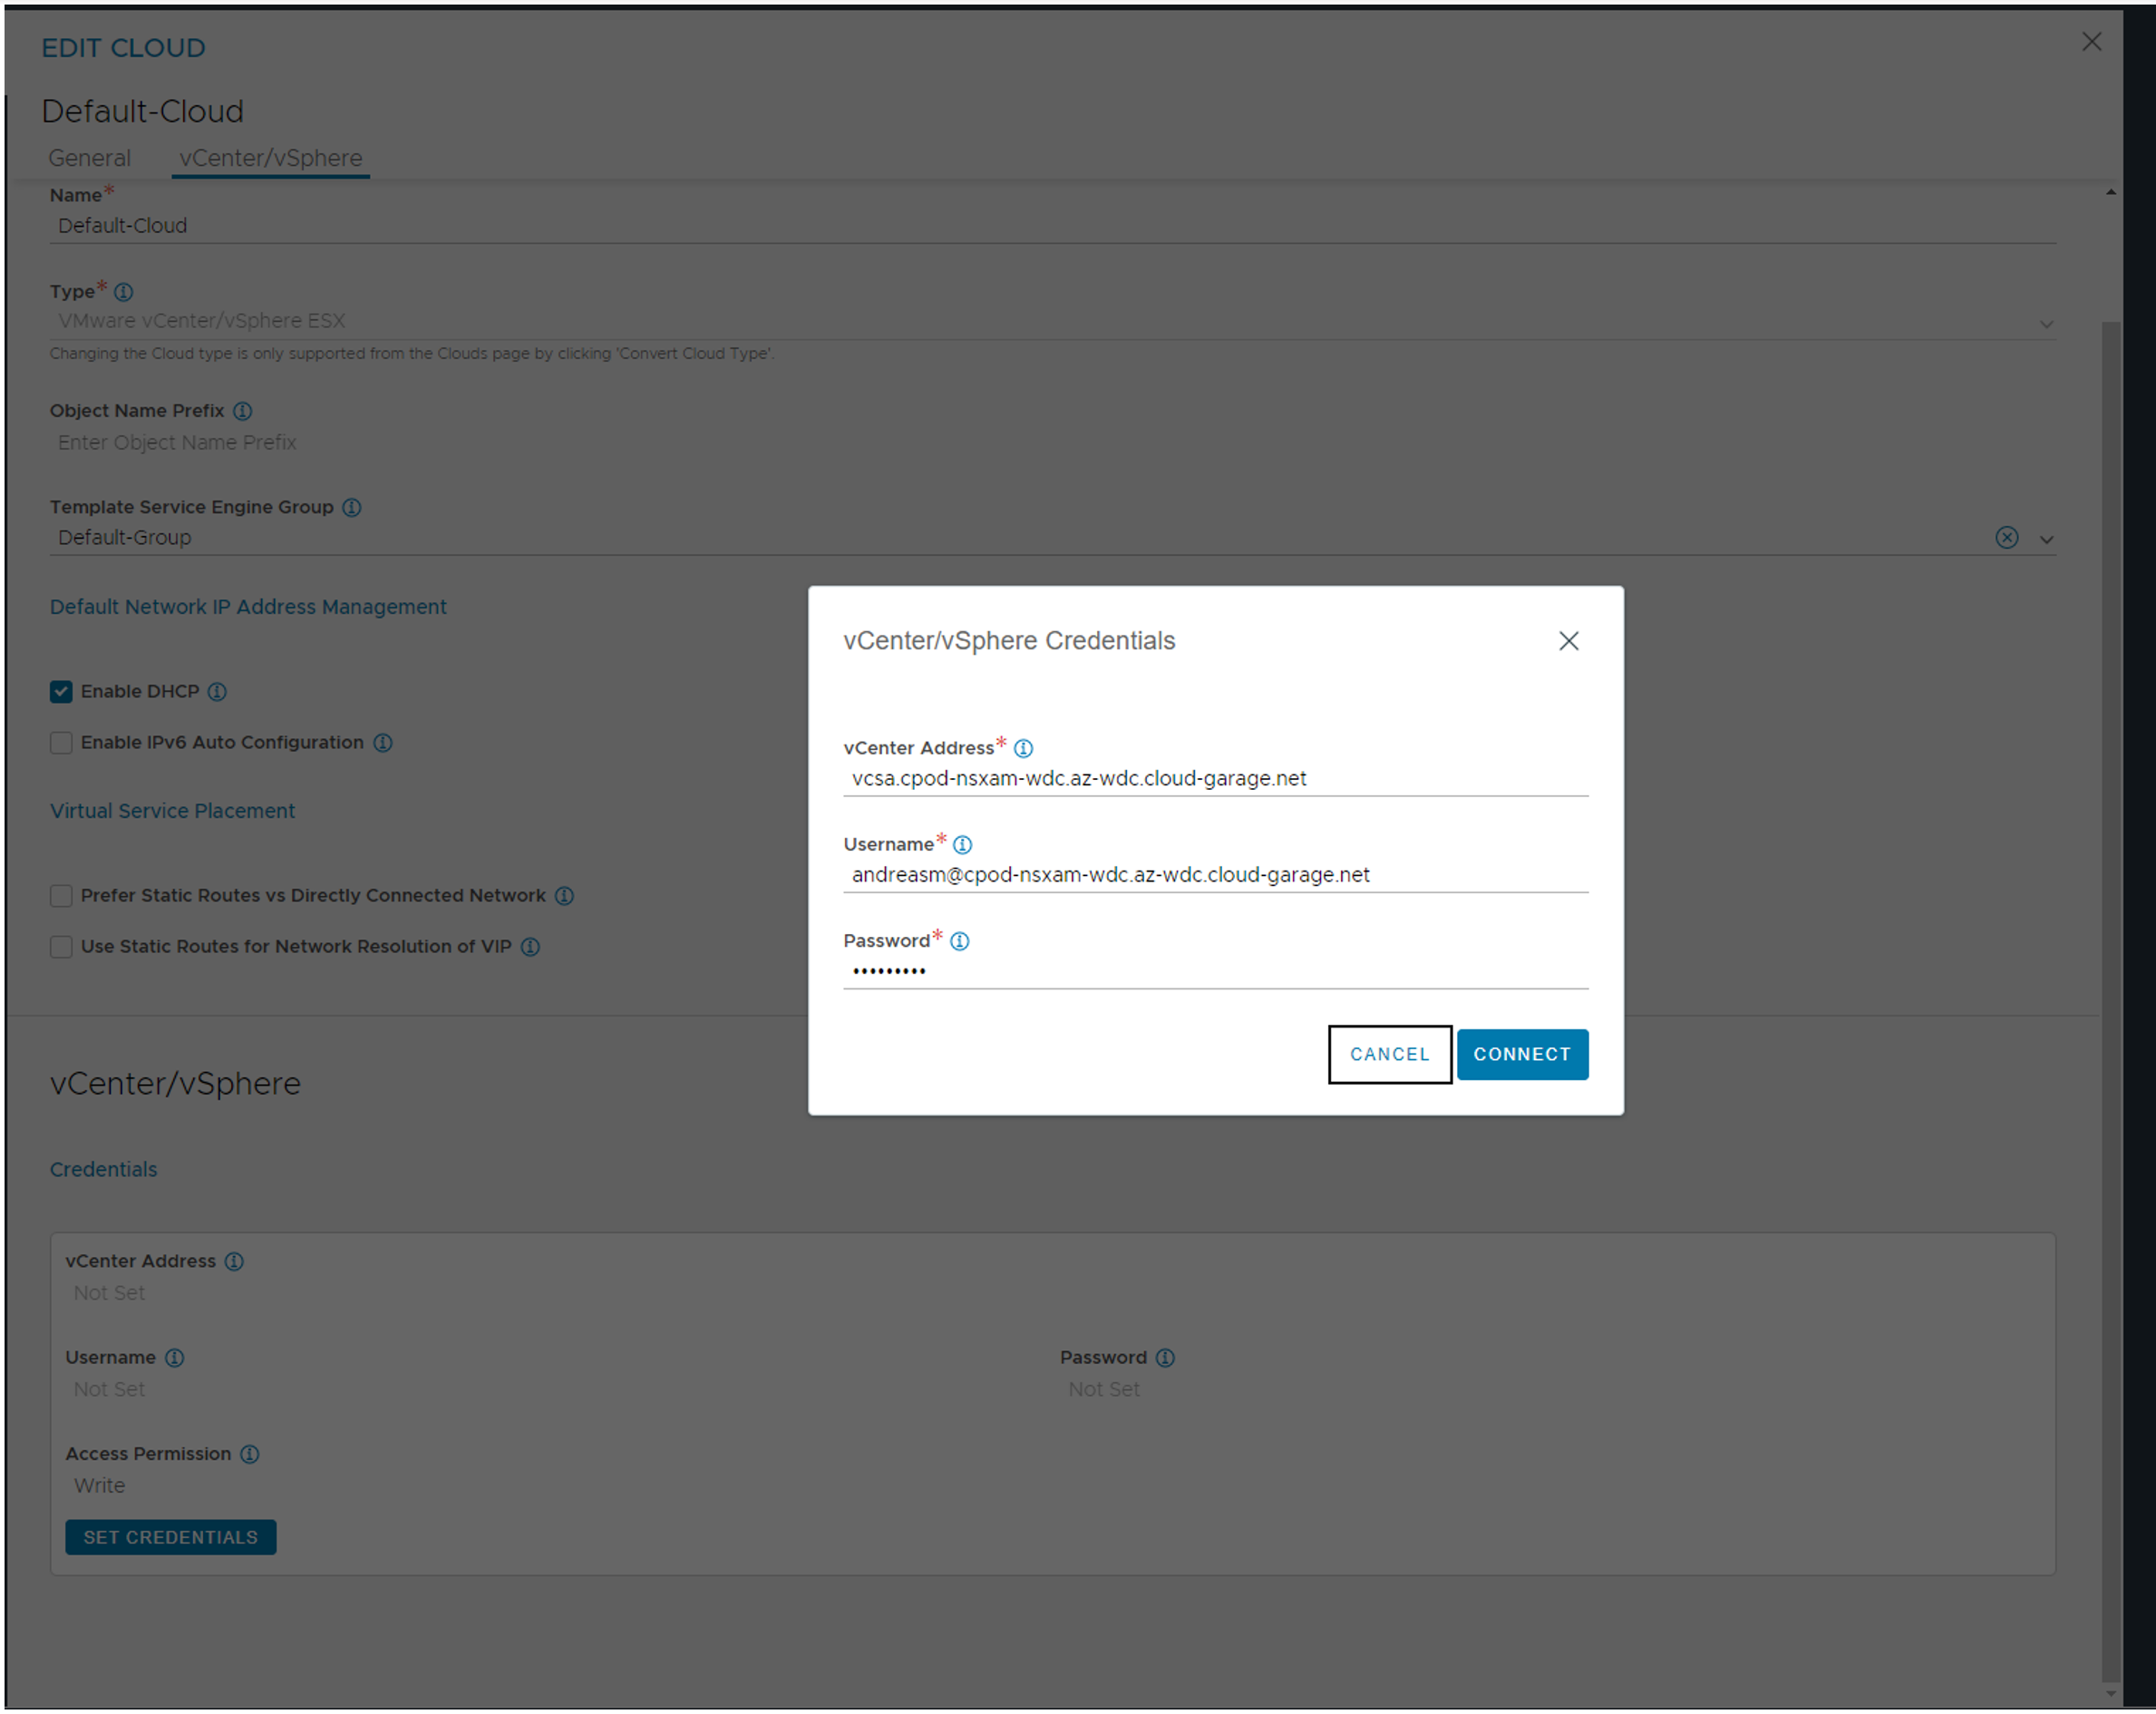
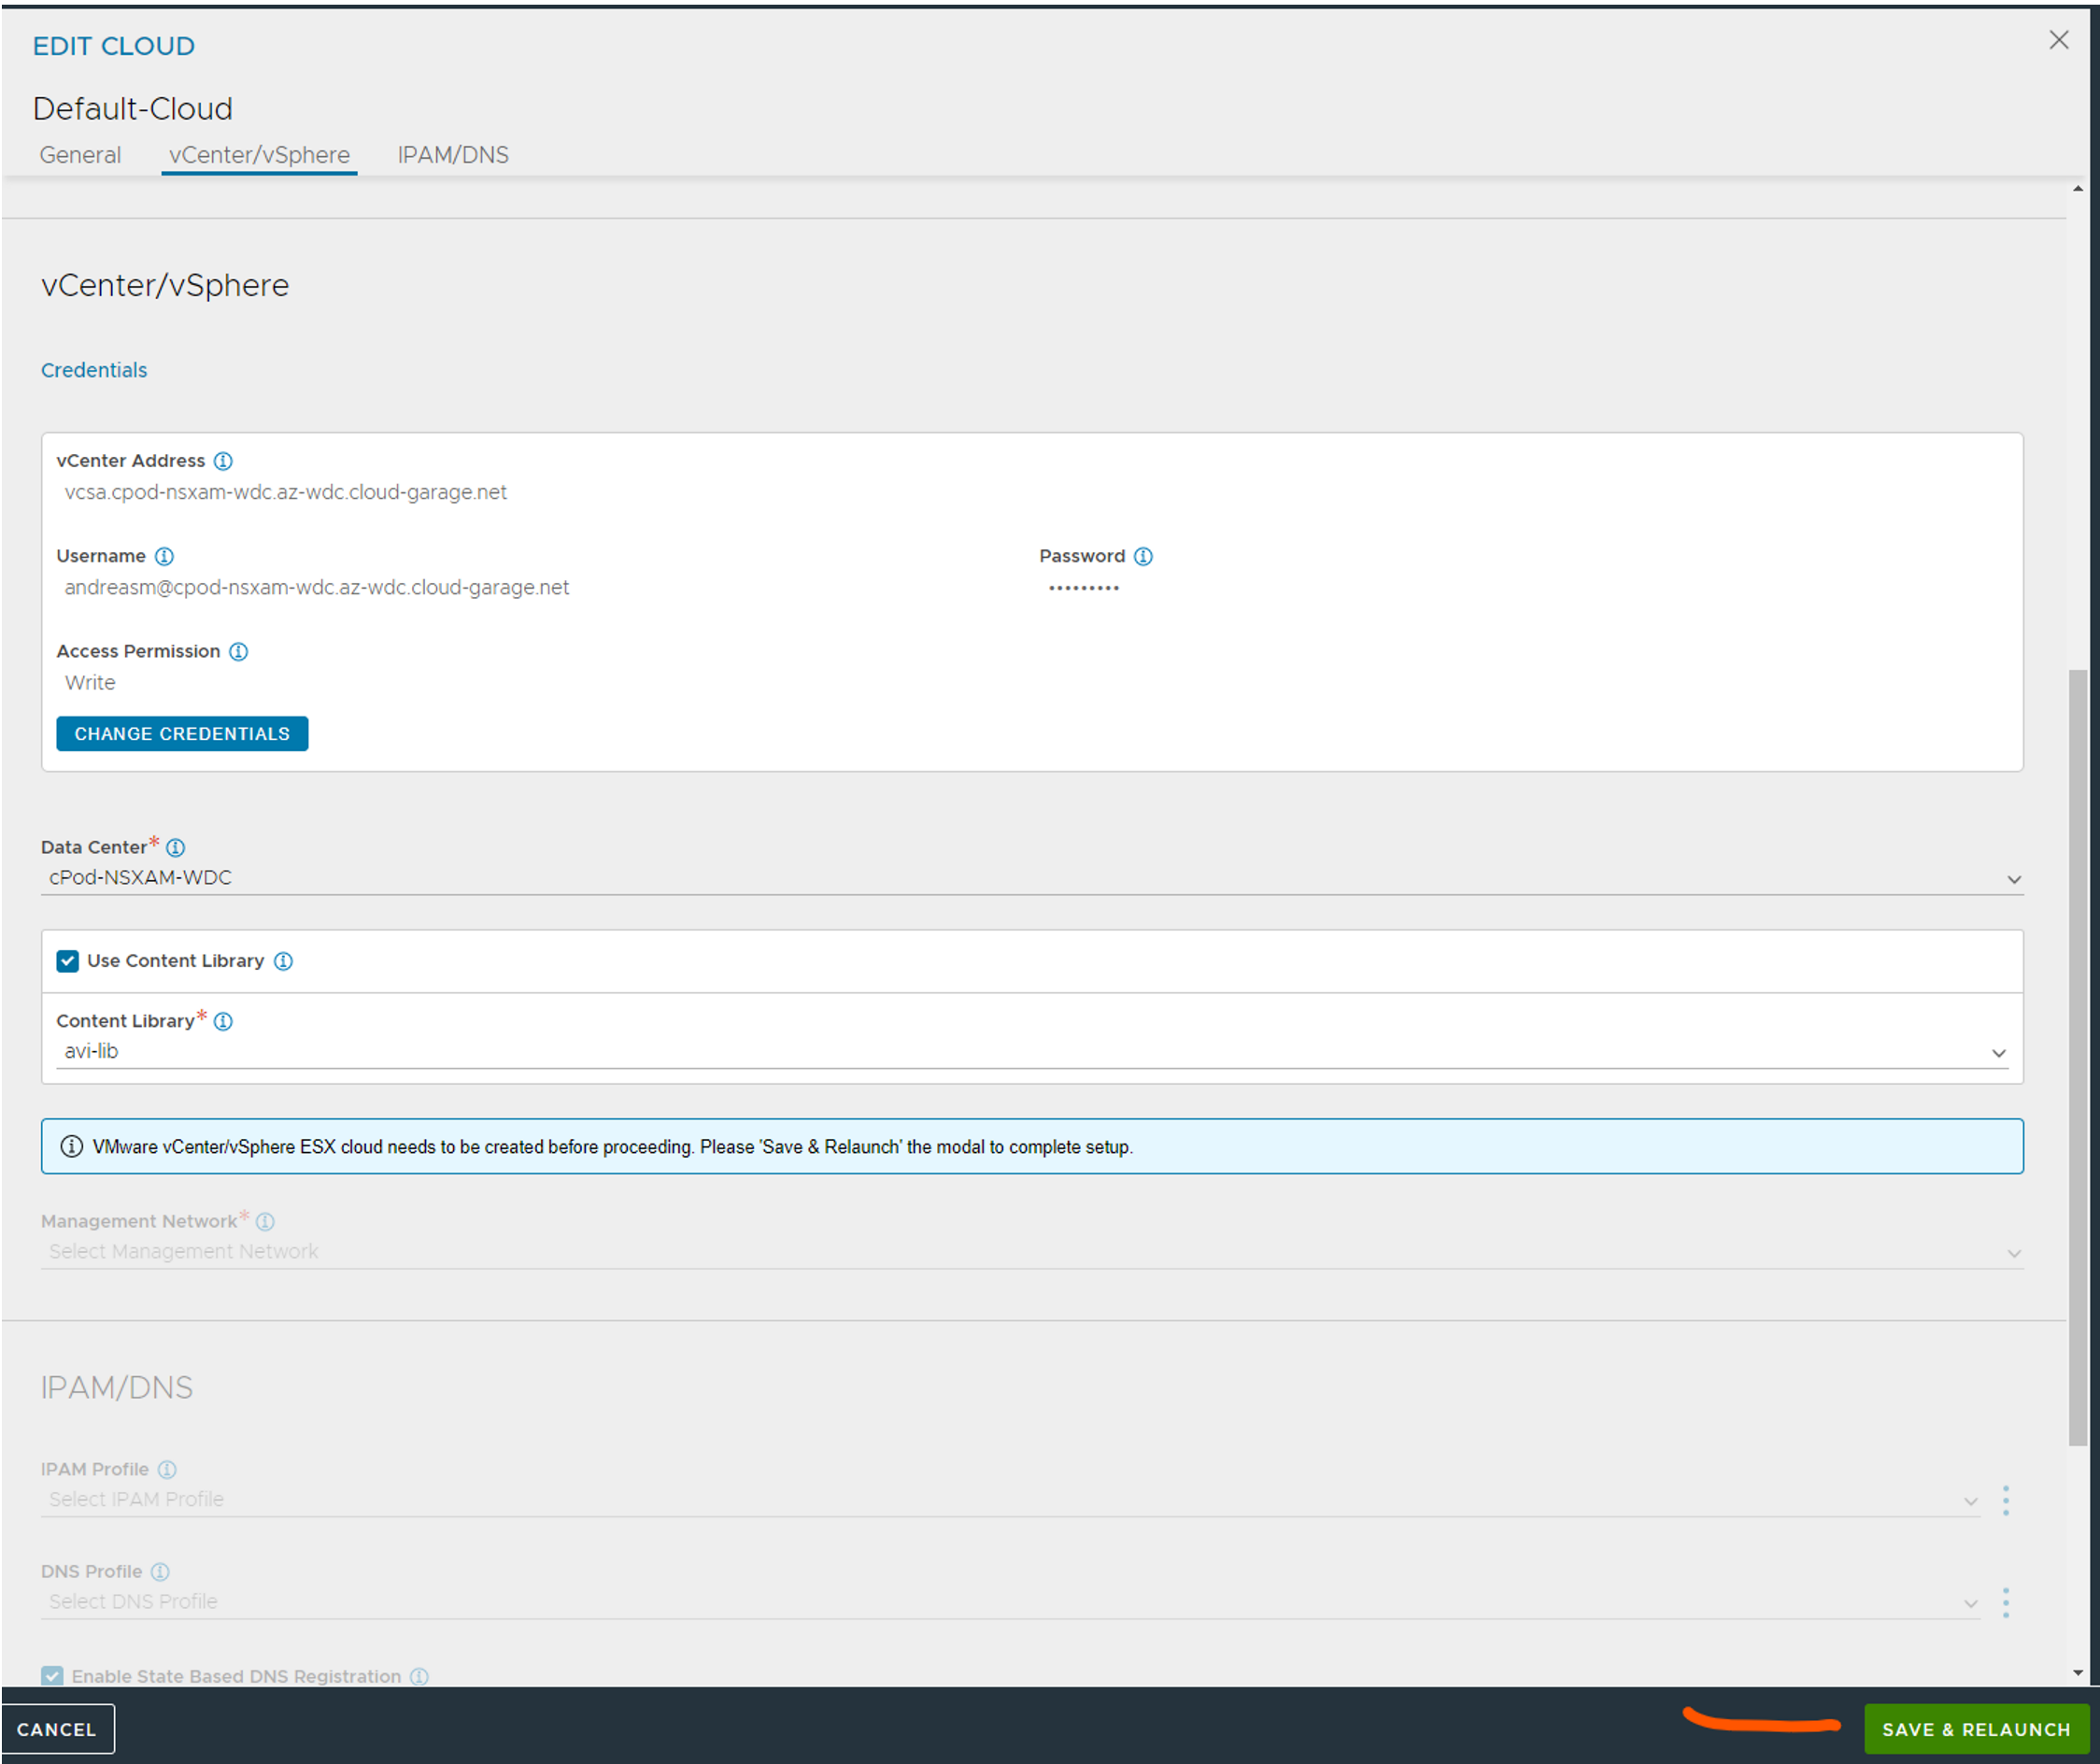
When credentials is added slect content library and choose your content library from the list, then click connect and then Save & Relaunch
When the dialog relaunches select the management network and ip address management. I have opted for DHCP (I have DHCP in my mgmt network, if not we can leverage Avi as IPAM provider for the mgmt network also.) This is used for the SE’s mgmt interface.
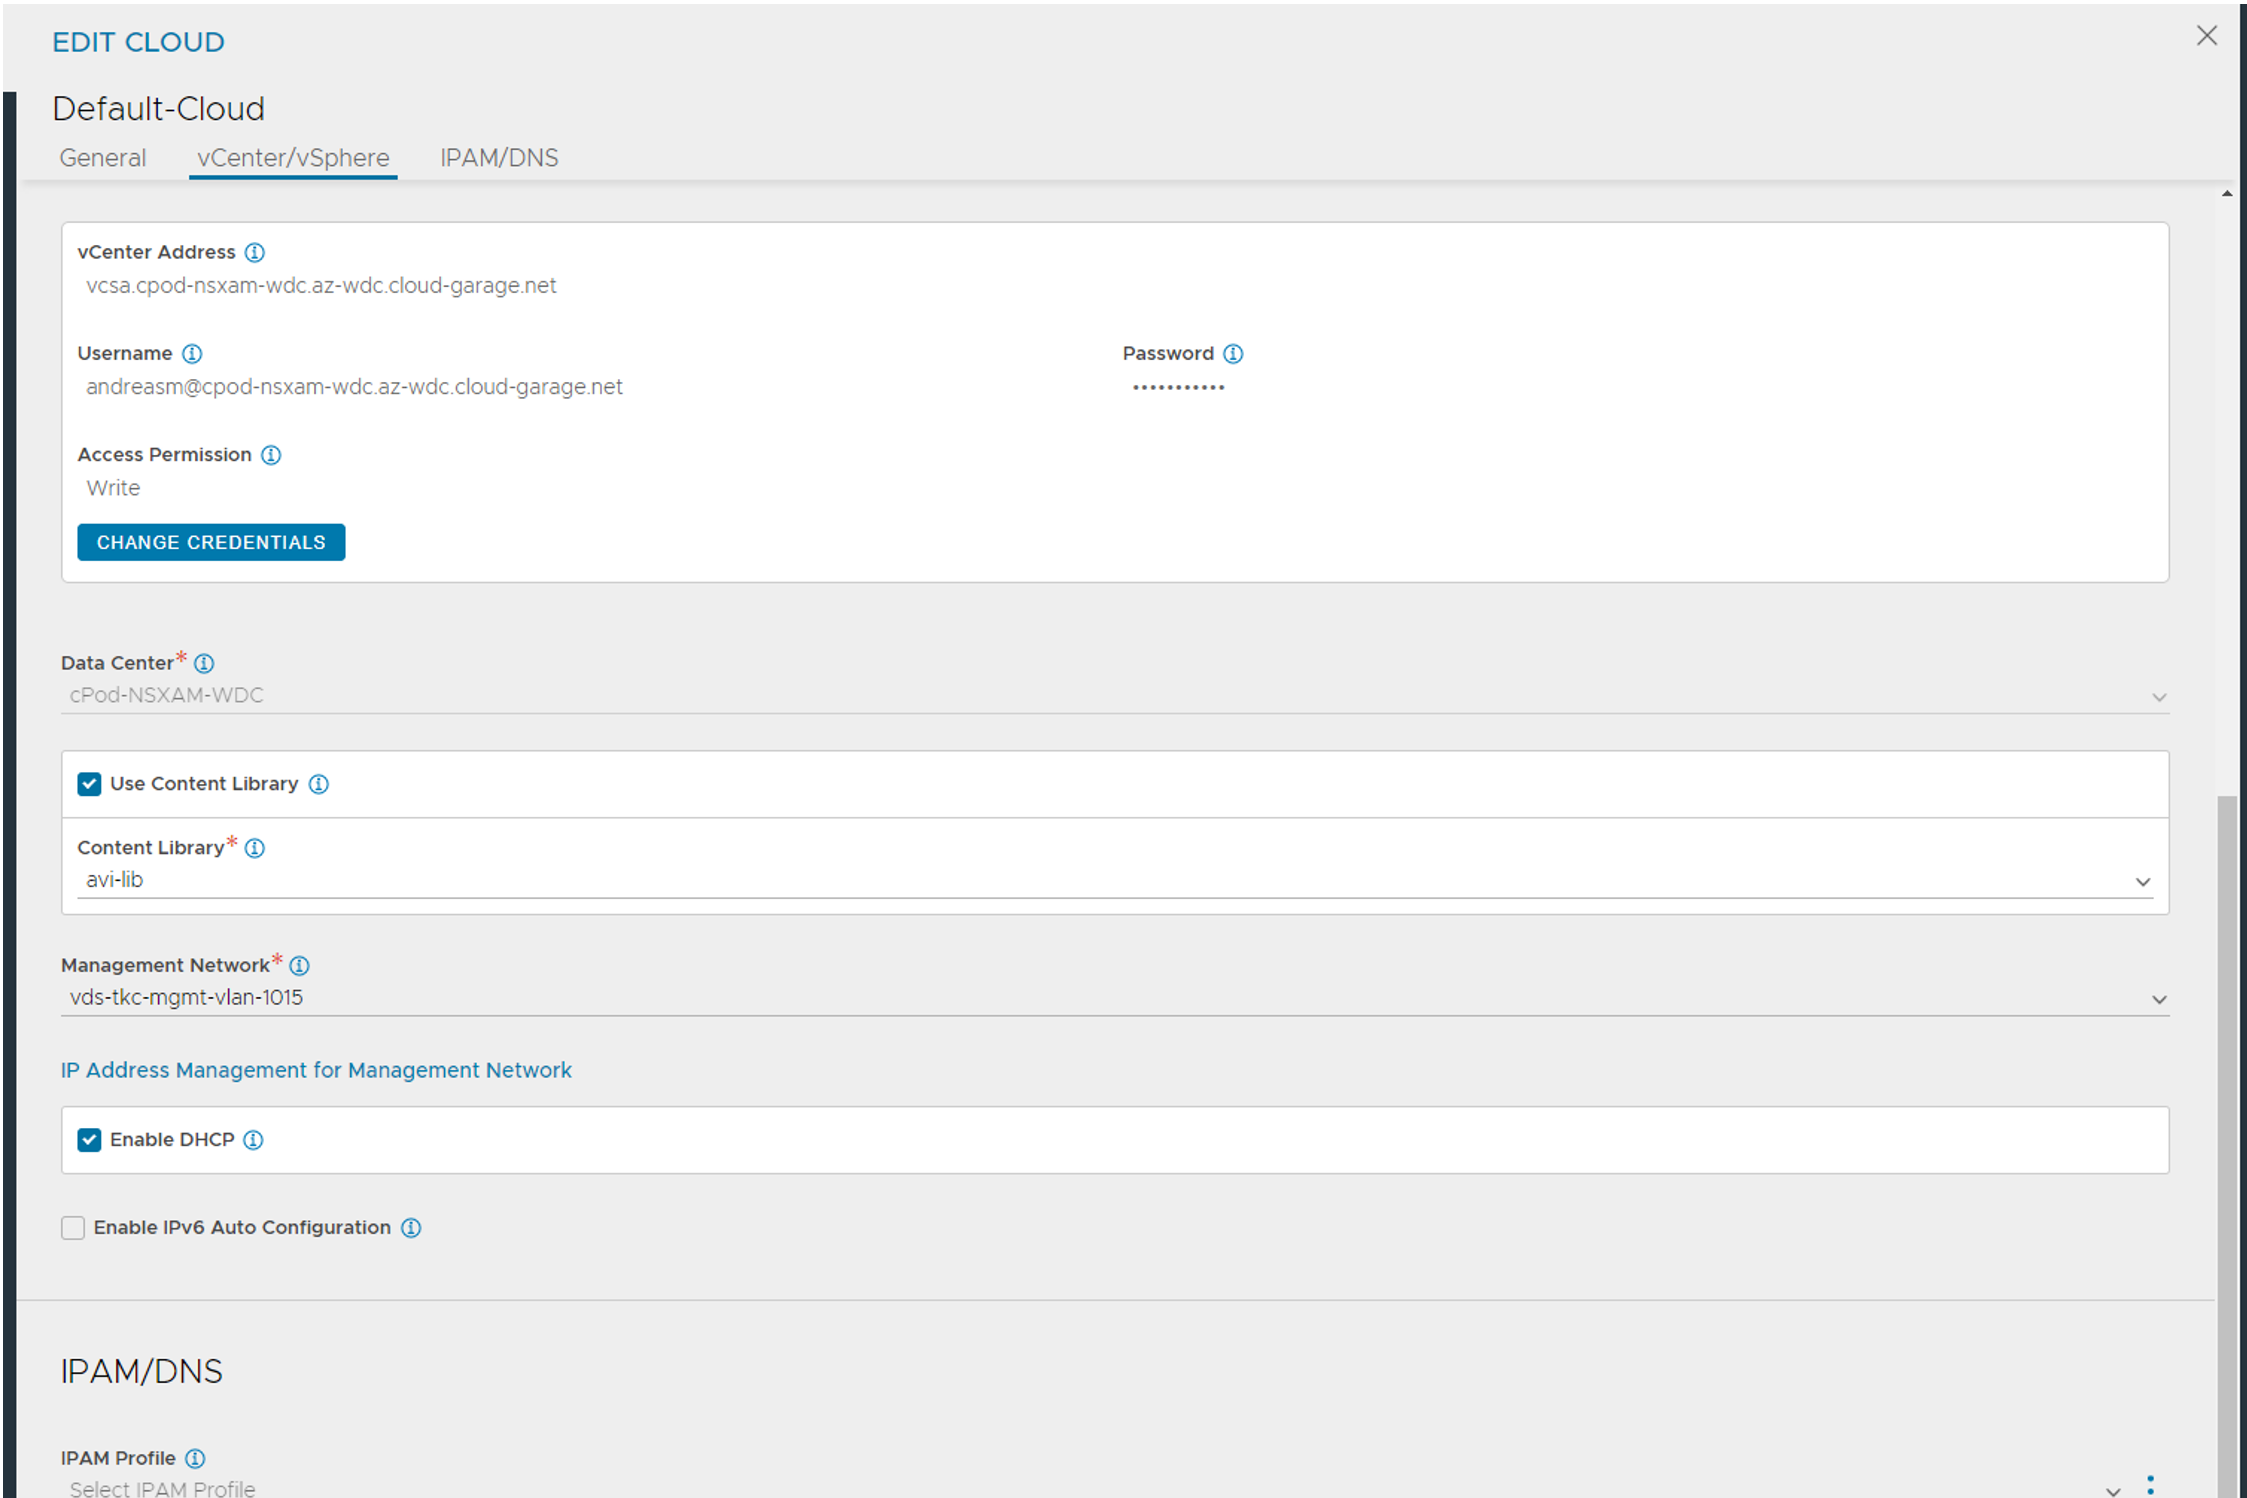
Click save for now. Head over to the Template section to add IPAM and DNS.
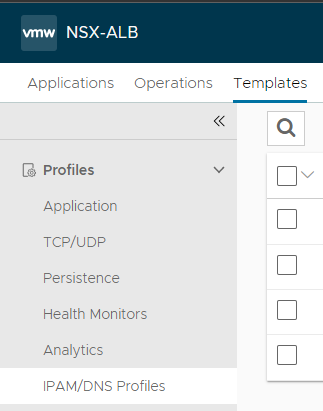
When using vCenter clouds the different portgroups is automatically added under networks. We need to configure some of them. But for now just create the IPAM and DNS profiles and we configure the networks later accordingly.
The DNS Profile (optional, only if you want to use Avi DNS service):
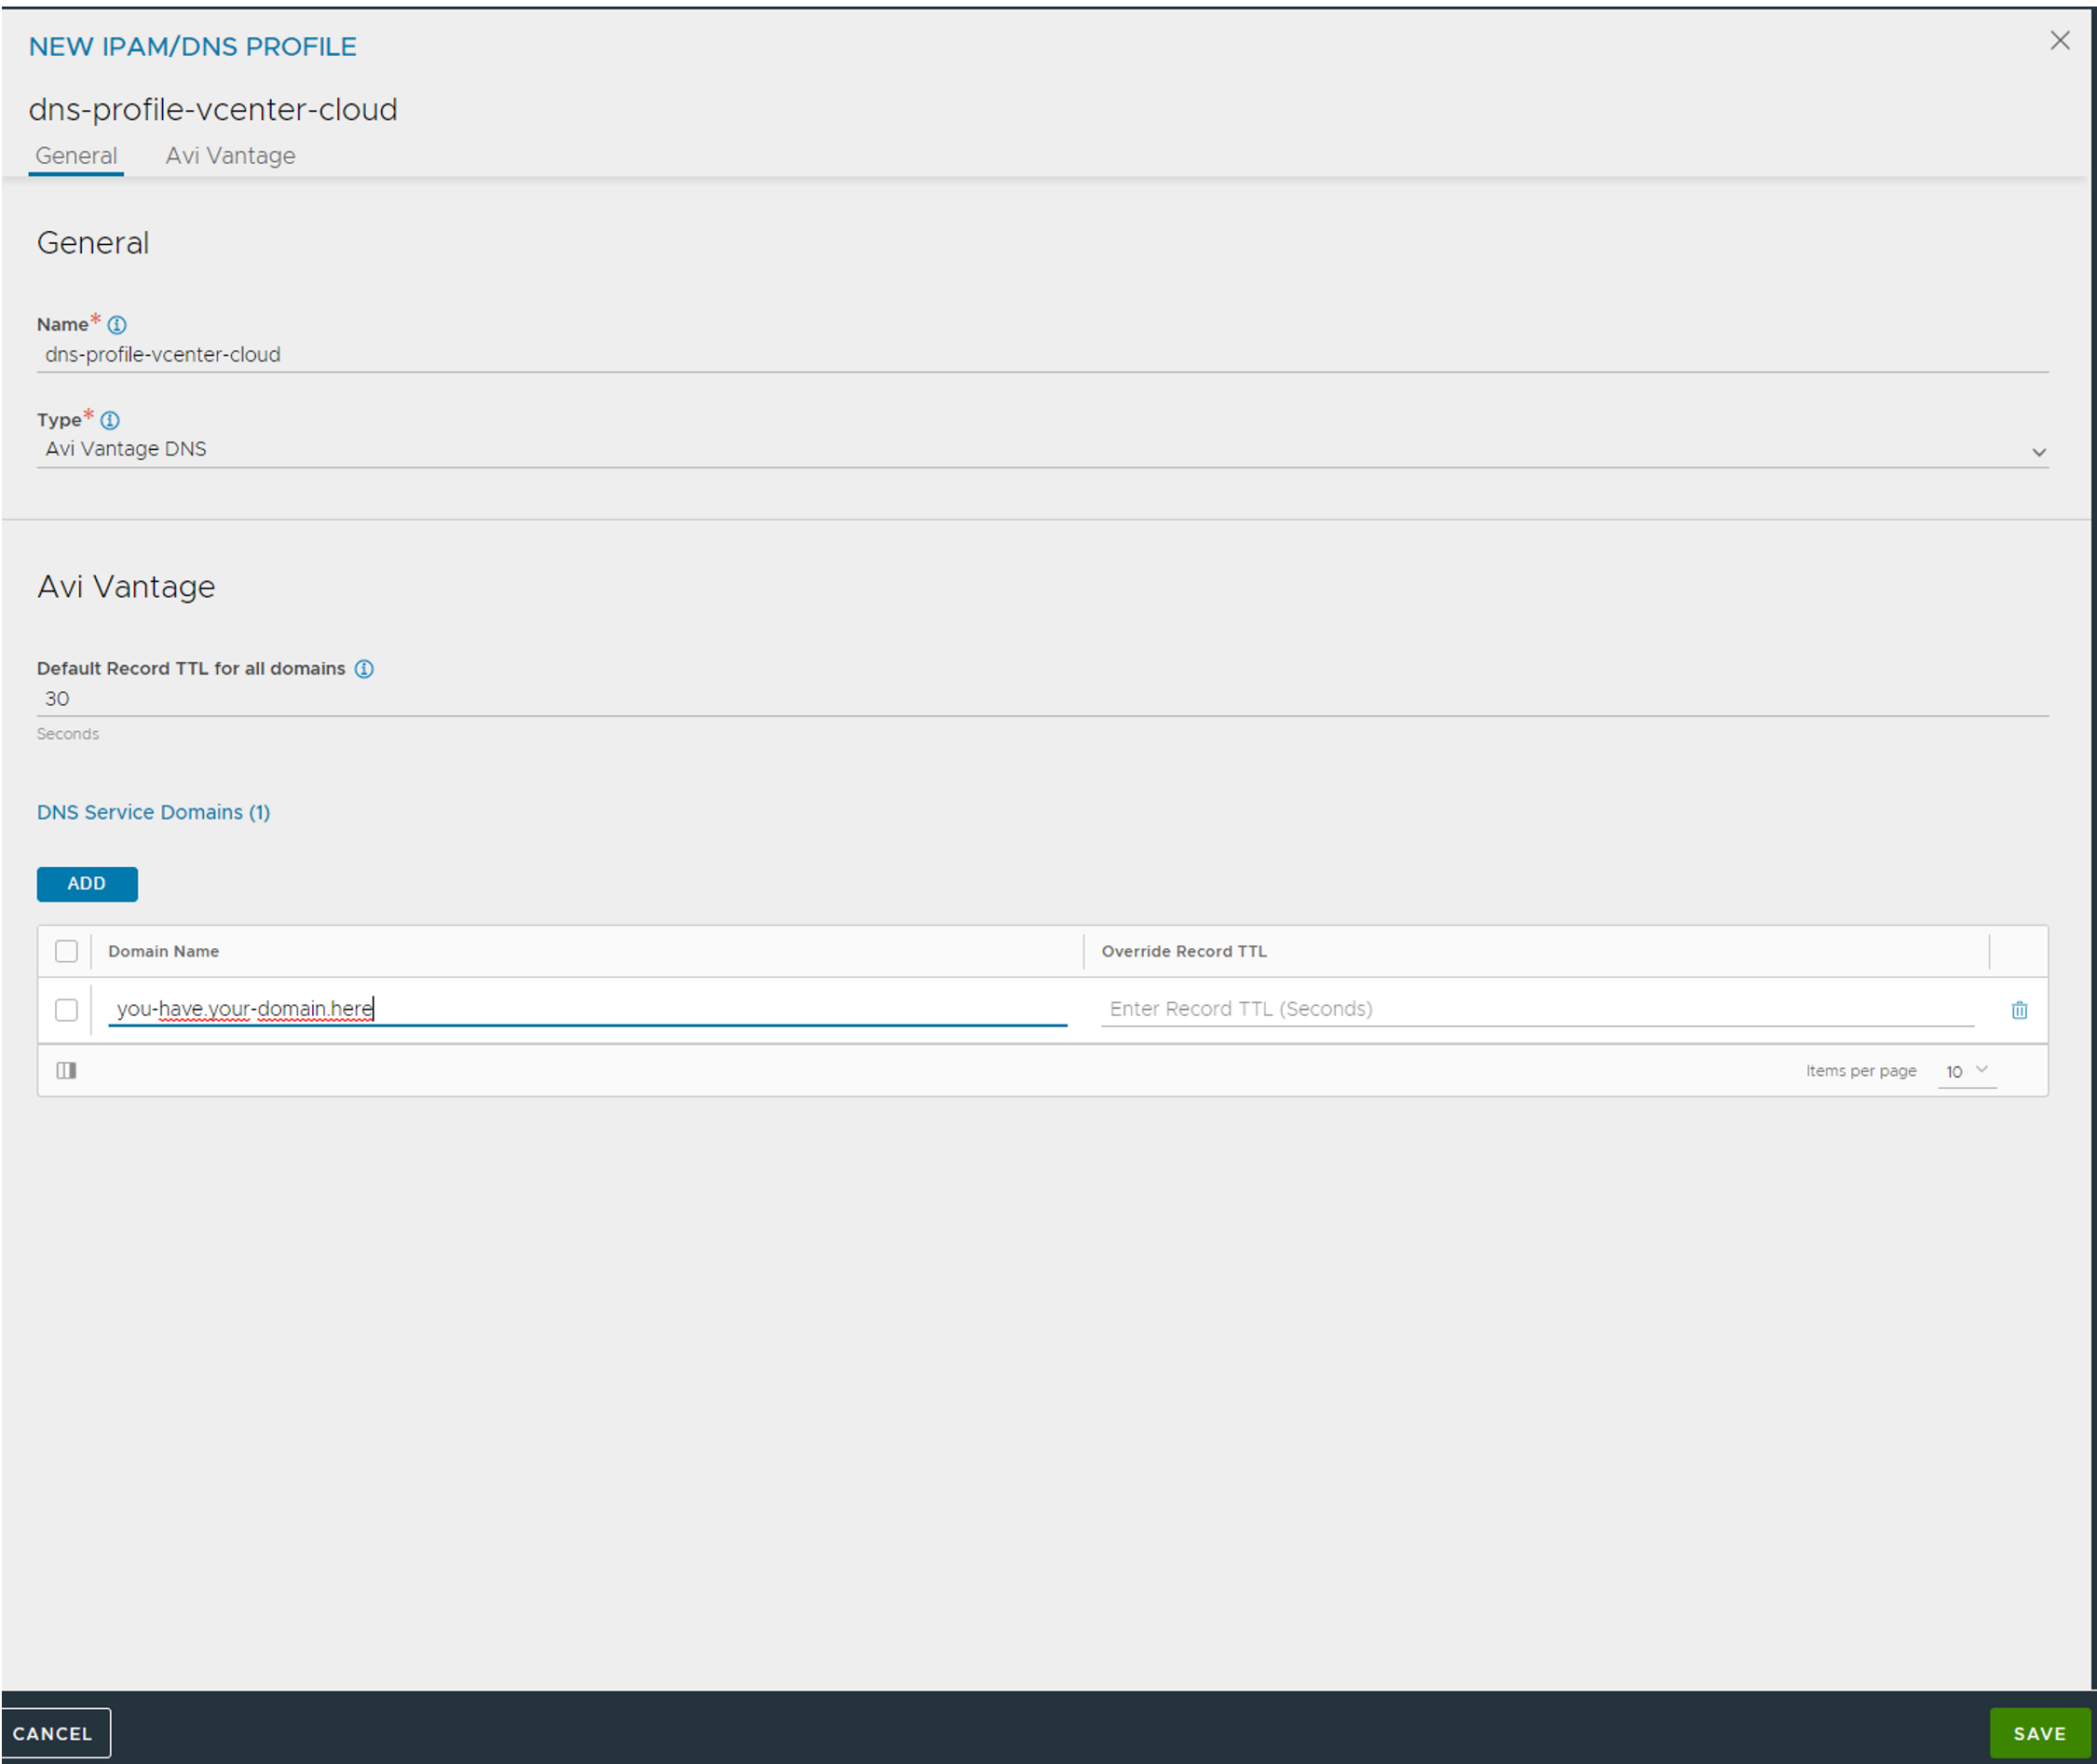
Click save when done
The IPAM profile:
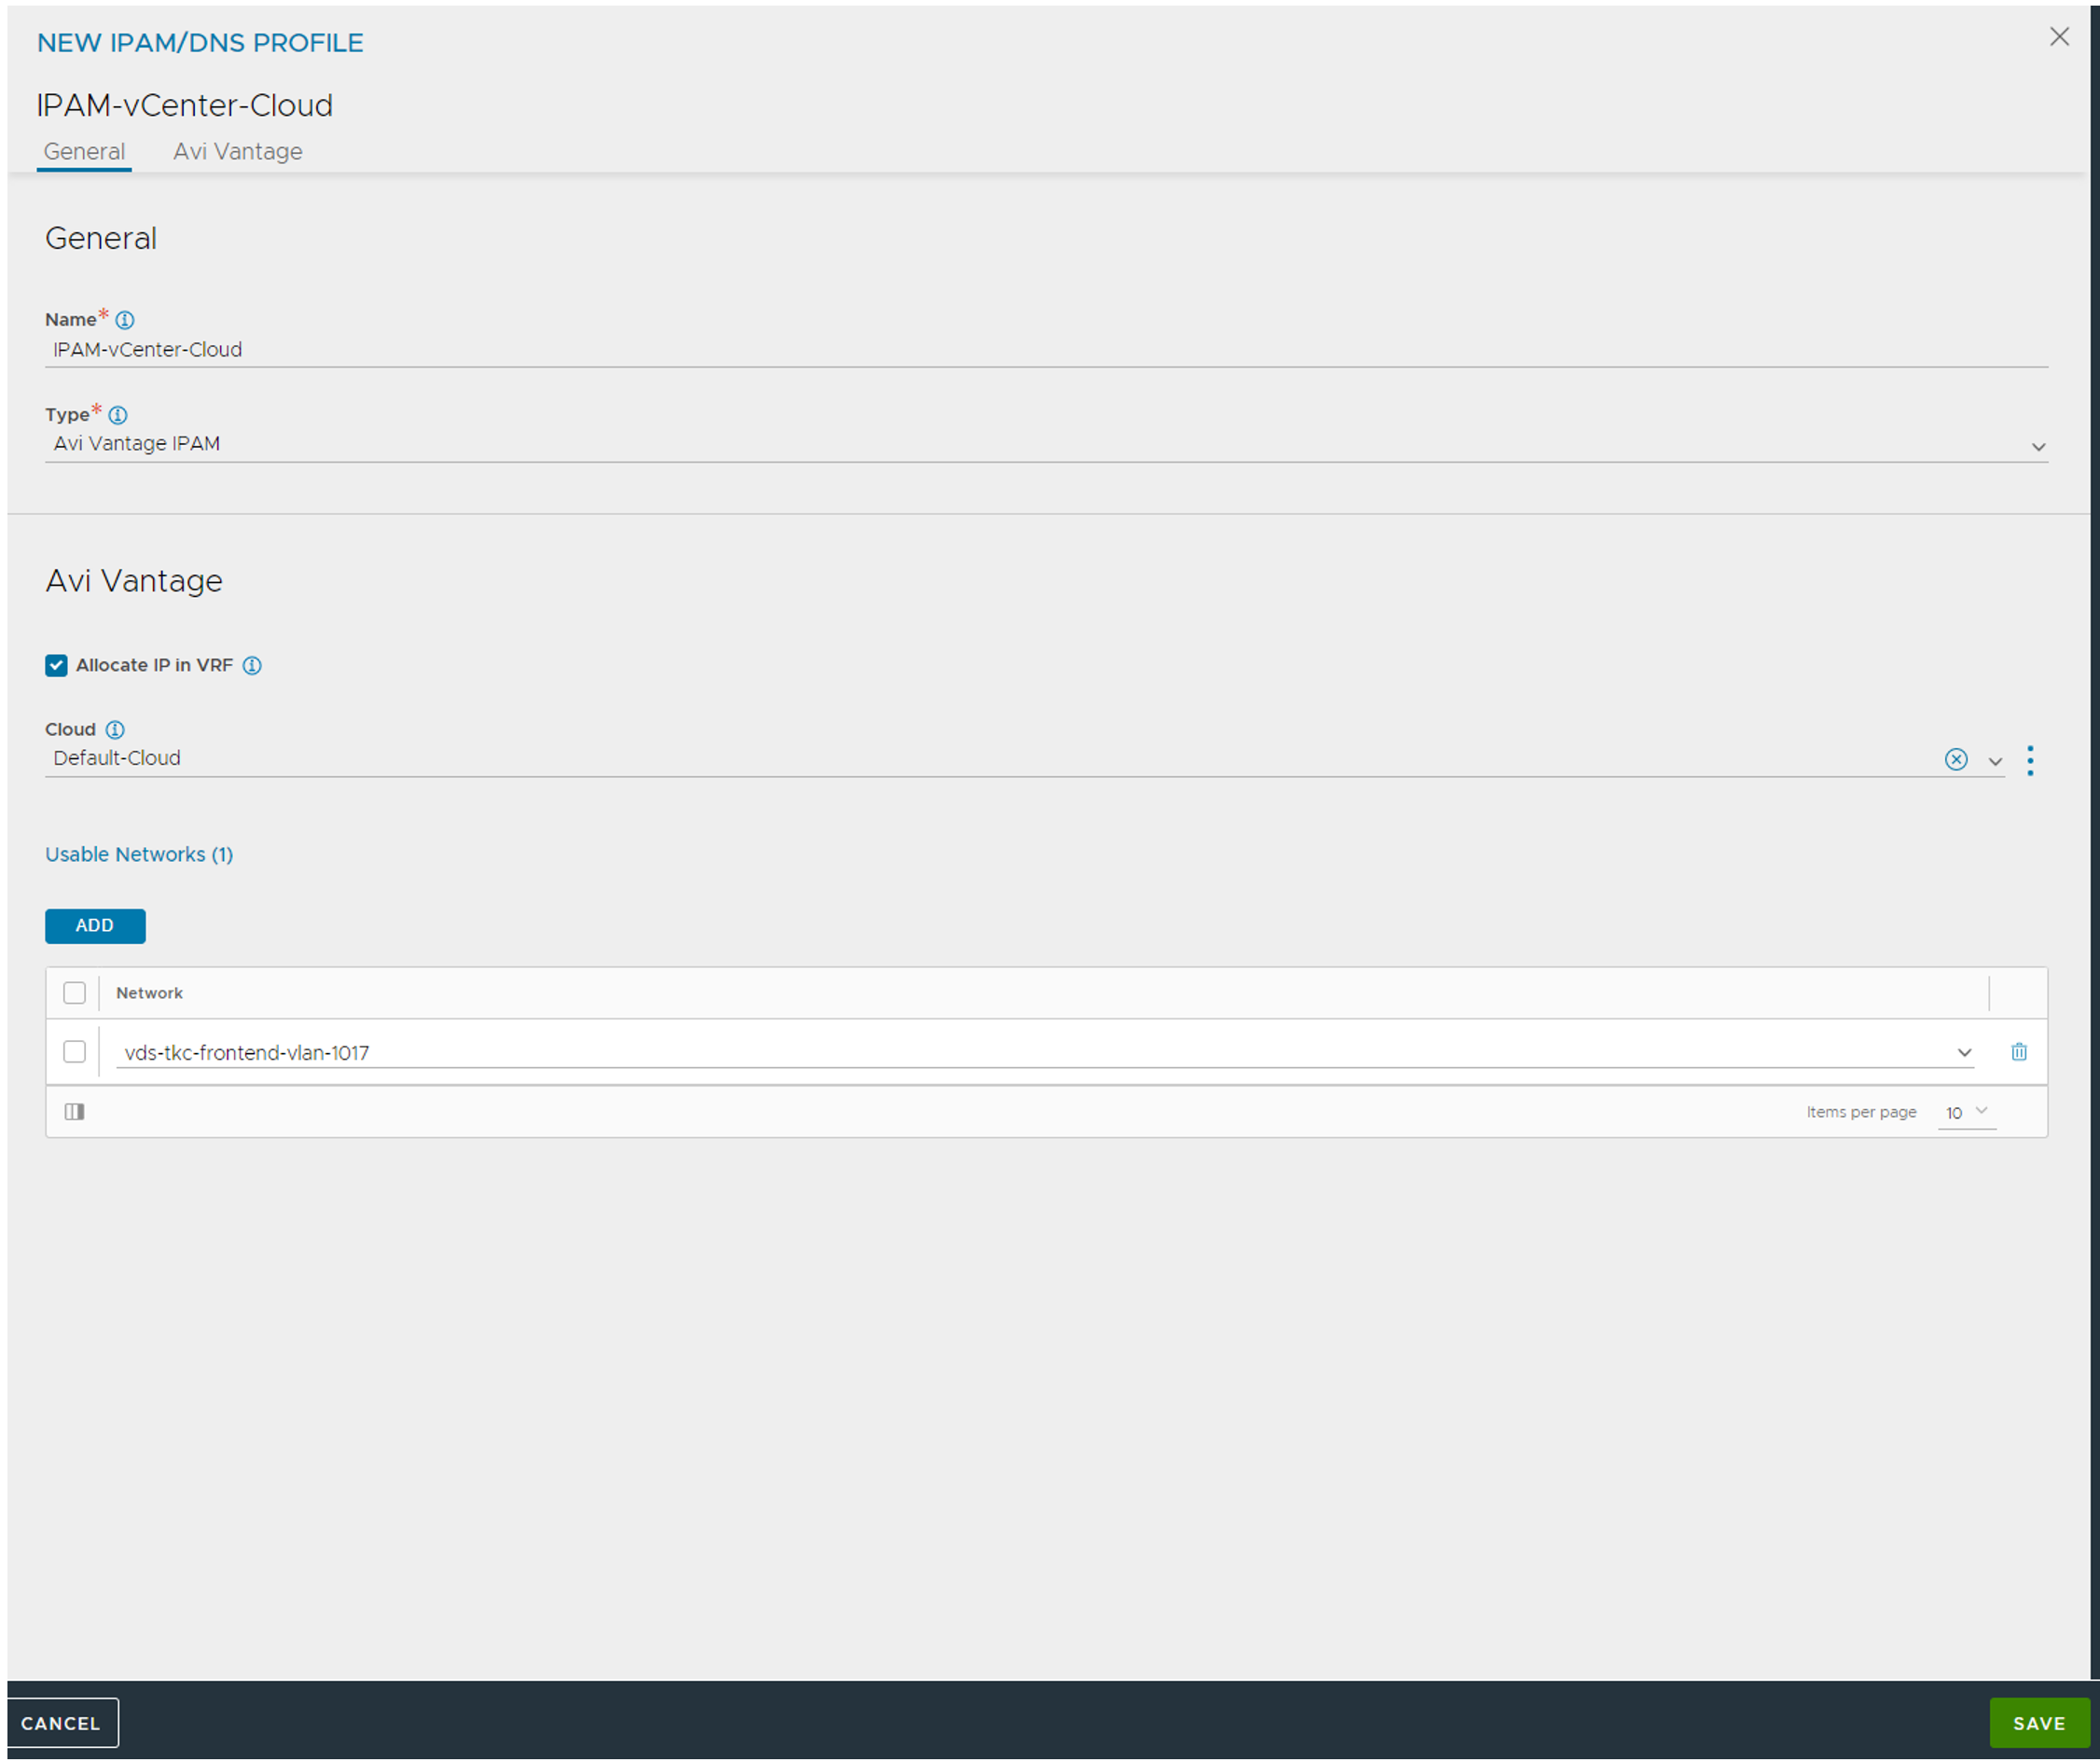
Select the Default-Cloud, then select from the list “Usable Networks” the Frontend network vds portgroup corresponding to the frontend network we want to use for our endpoint vips. Click save. You should have your profiles configured now:

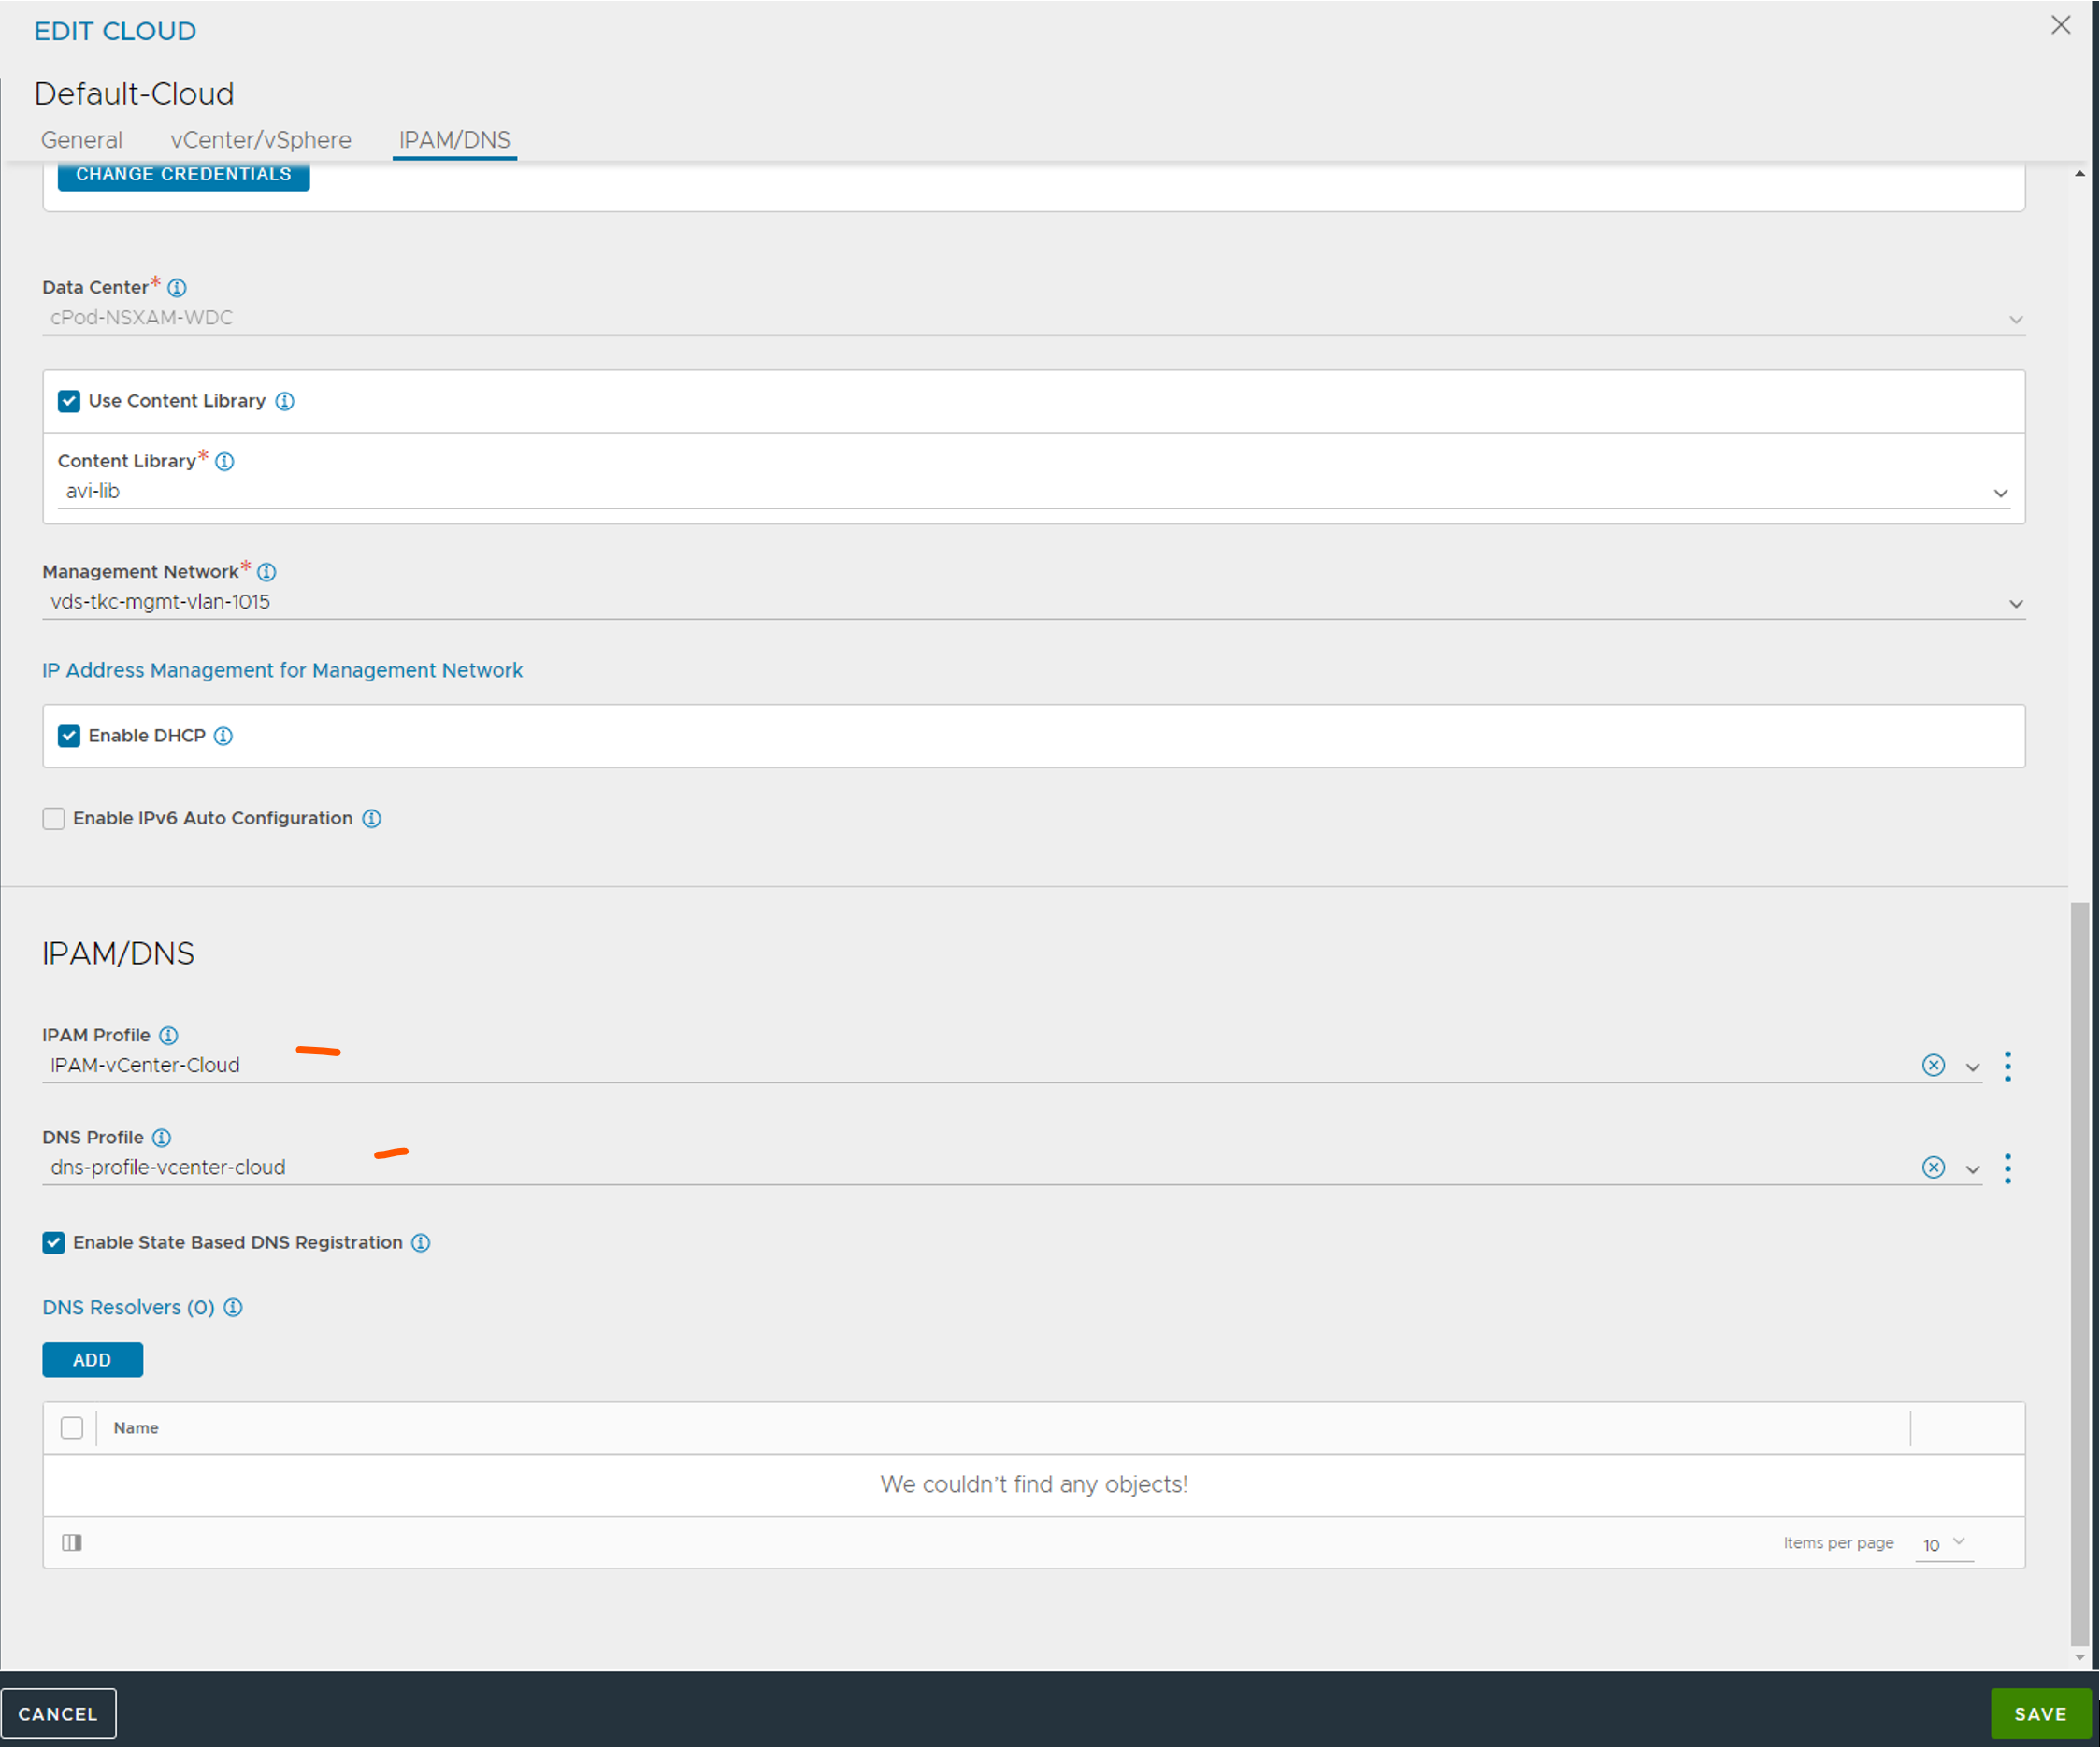
Head back to your cloud again and add your newly created IPAM and DNS profiles.

Add the profiles:
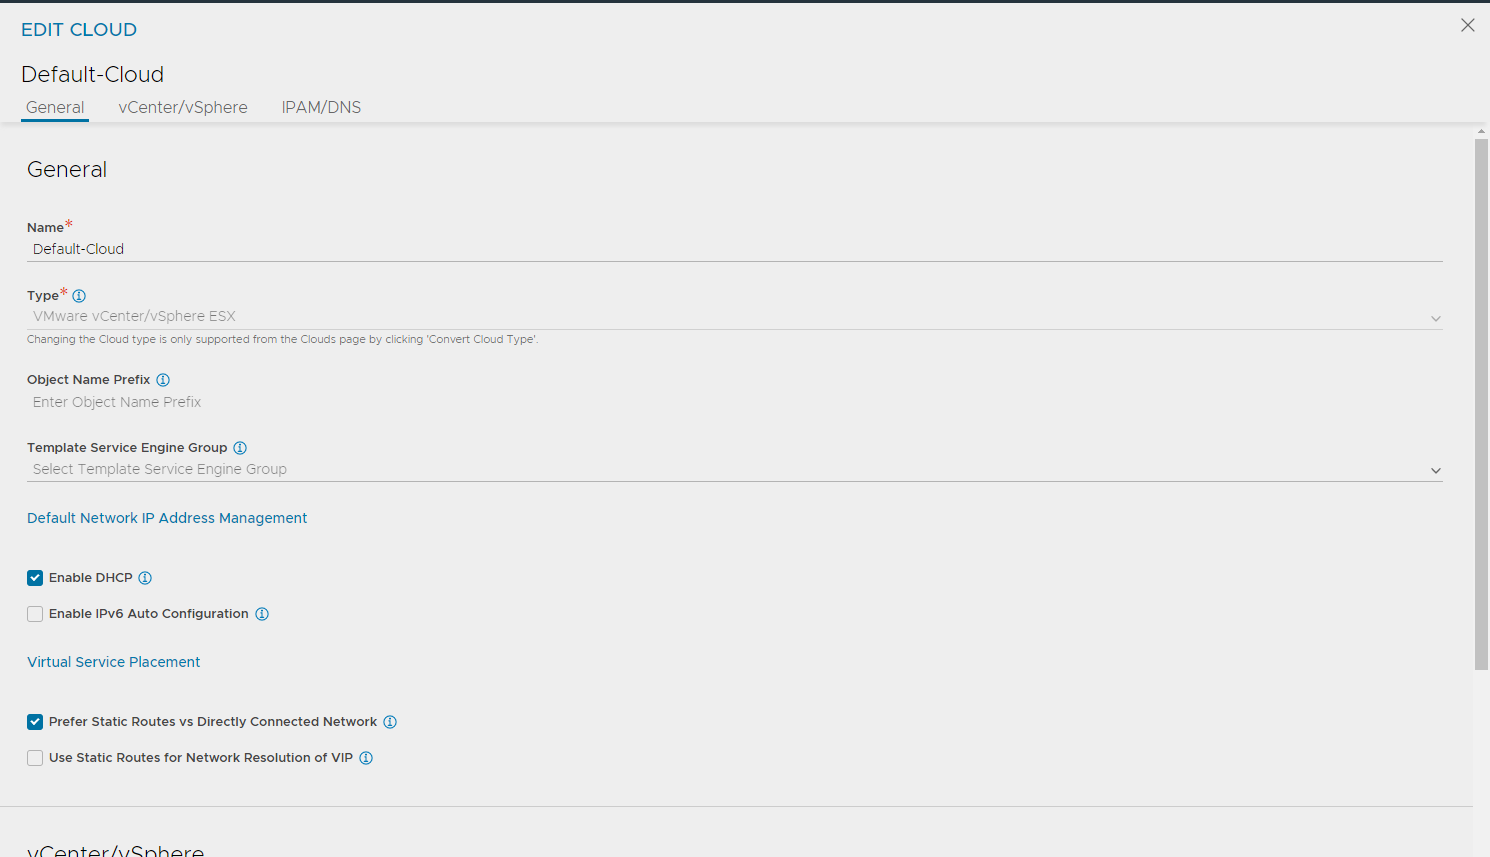
Before you click finish, make sure you have selected “Prefer Static Routes vs Directly Connected Network” like this:
Then click finish…
Avi network configs #
Now its time to configure the networks for the SEs (VIP, dataplane). I will go ahead and configure both the Frontend VIP for kubernetes API endpoint, but also the workload network I will use when I add L7 functionality later.
Head over to Cloud Resources:
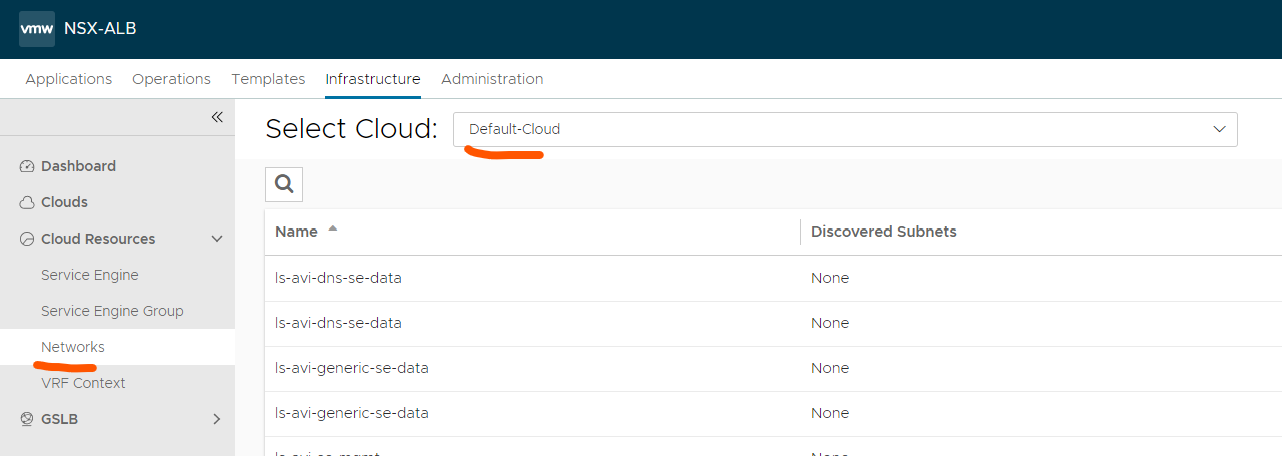
Scroll until you find your “Frontend-network”
Click edit all the way to the right:

In here we need to define the subnet (if not already auto discovered) and add and IP range for the SE’s and VIPS. We can decide to create just one range for both, or a range only for SEs, and one for VIPs only. To create a range for both SE and VIP do like this:
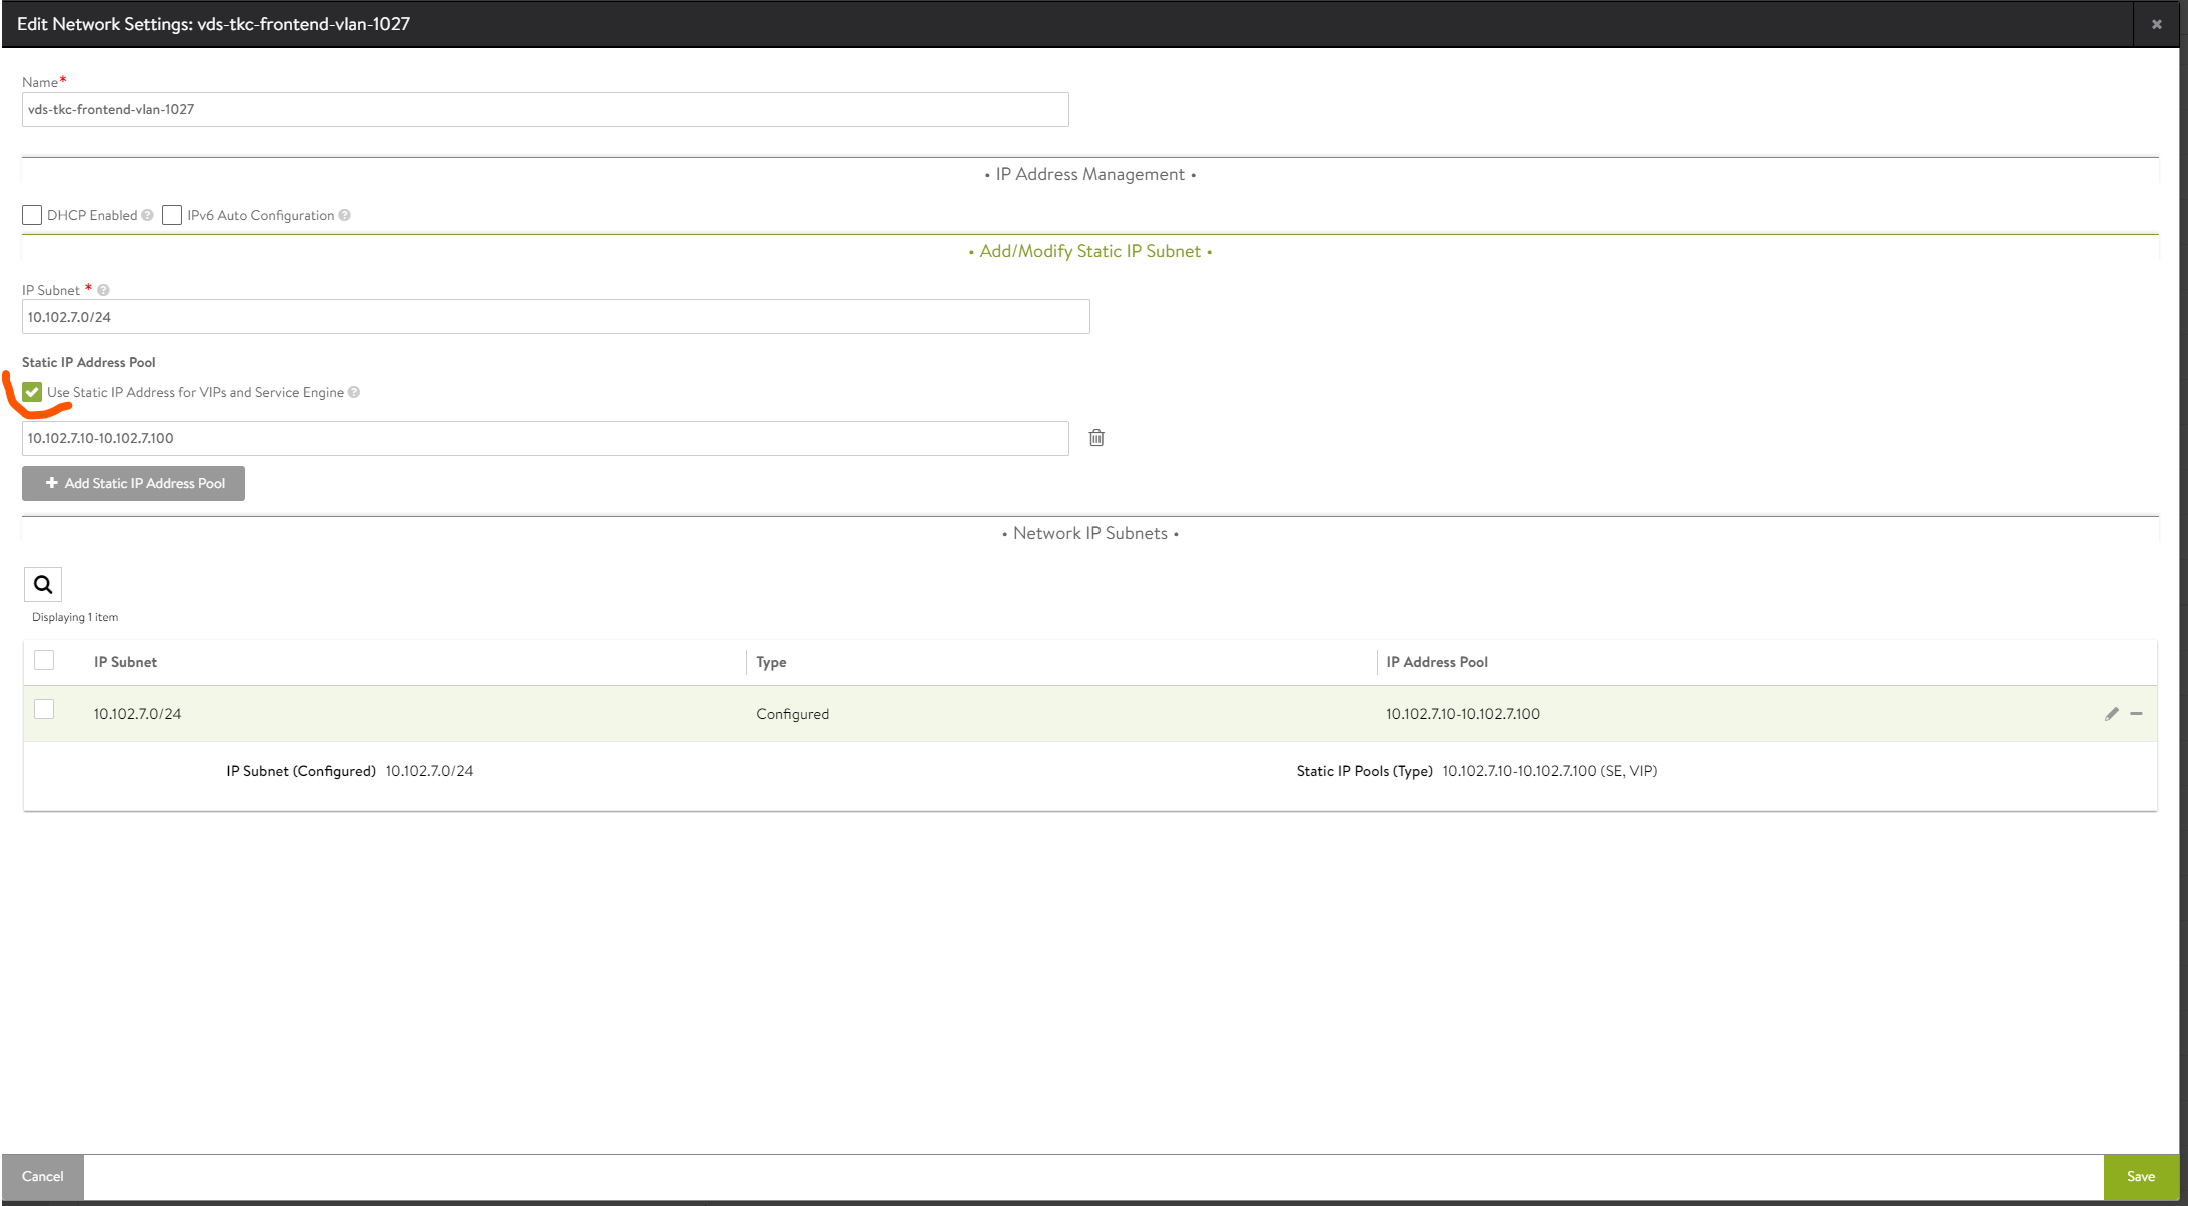
If you want a specific range for SE and a specific for VIP do like this:
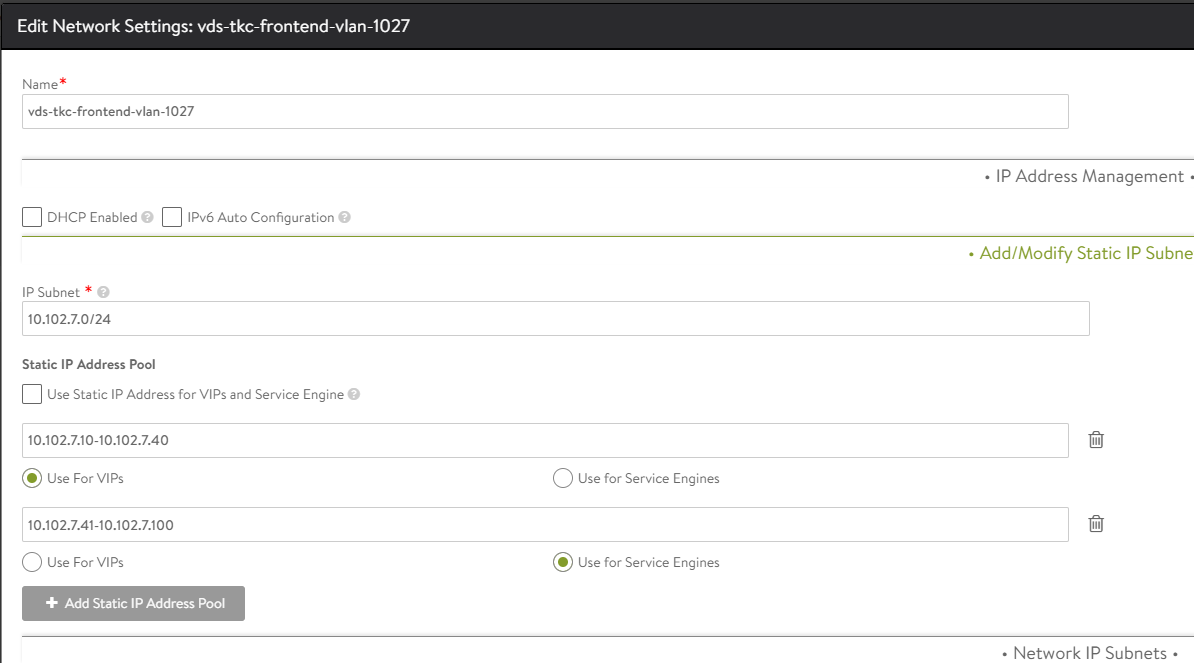
Common for both is to deselect the DHCP Enabled option. What we have done now is to tell Avi that Avi is responsible for IP allocation to our SE’s when they are deployed and configured to give them each their IP in the Frontend network, and also “carve” out an IP for the VIP when a Virtual Service is created and IP allocation for that service is selected to auto-allocate. The same would go if you decided to not use DHCP for mgmt IP, you would need to defined the network and select only “Use for Service Engine” (no VIPs in the management network)
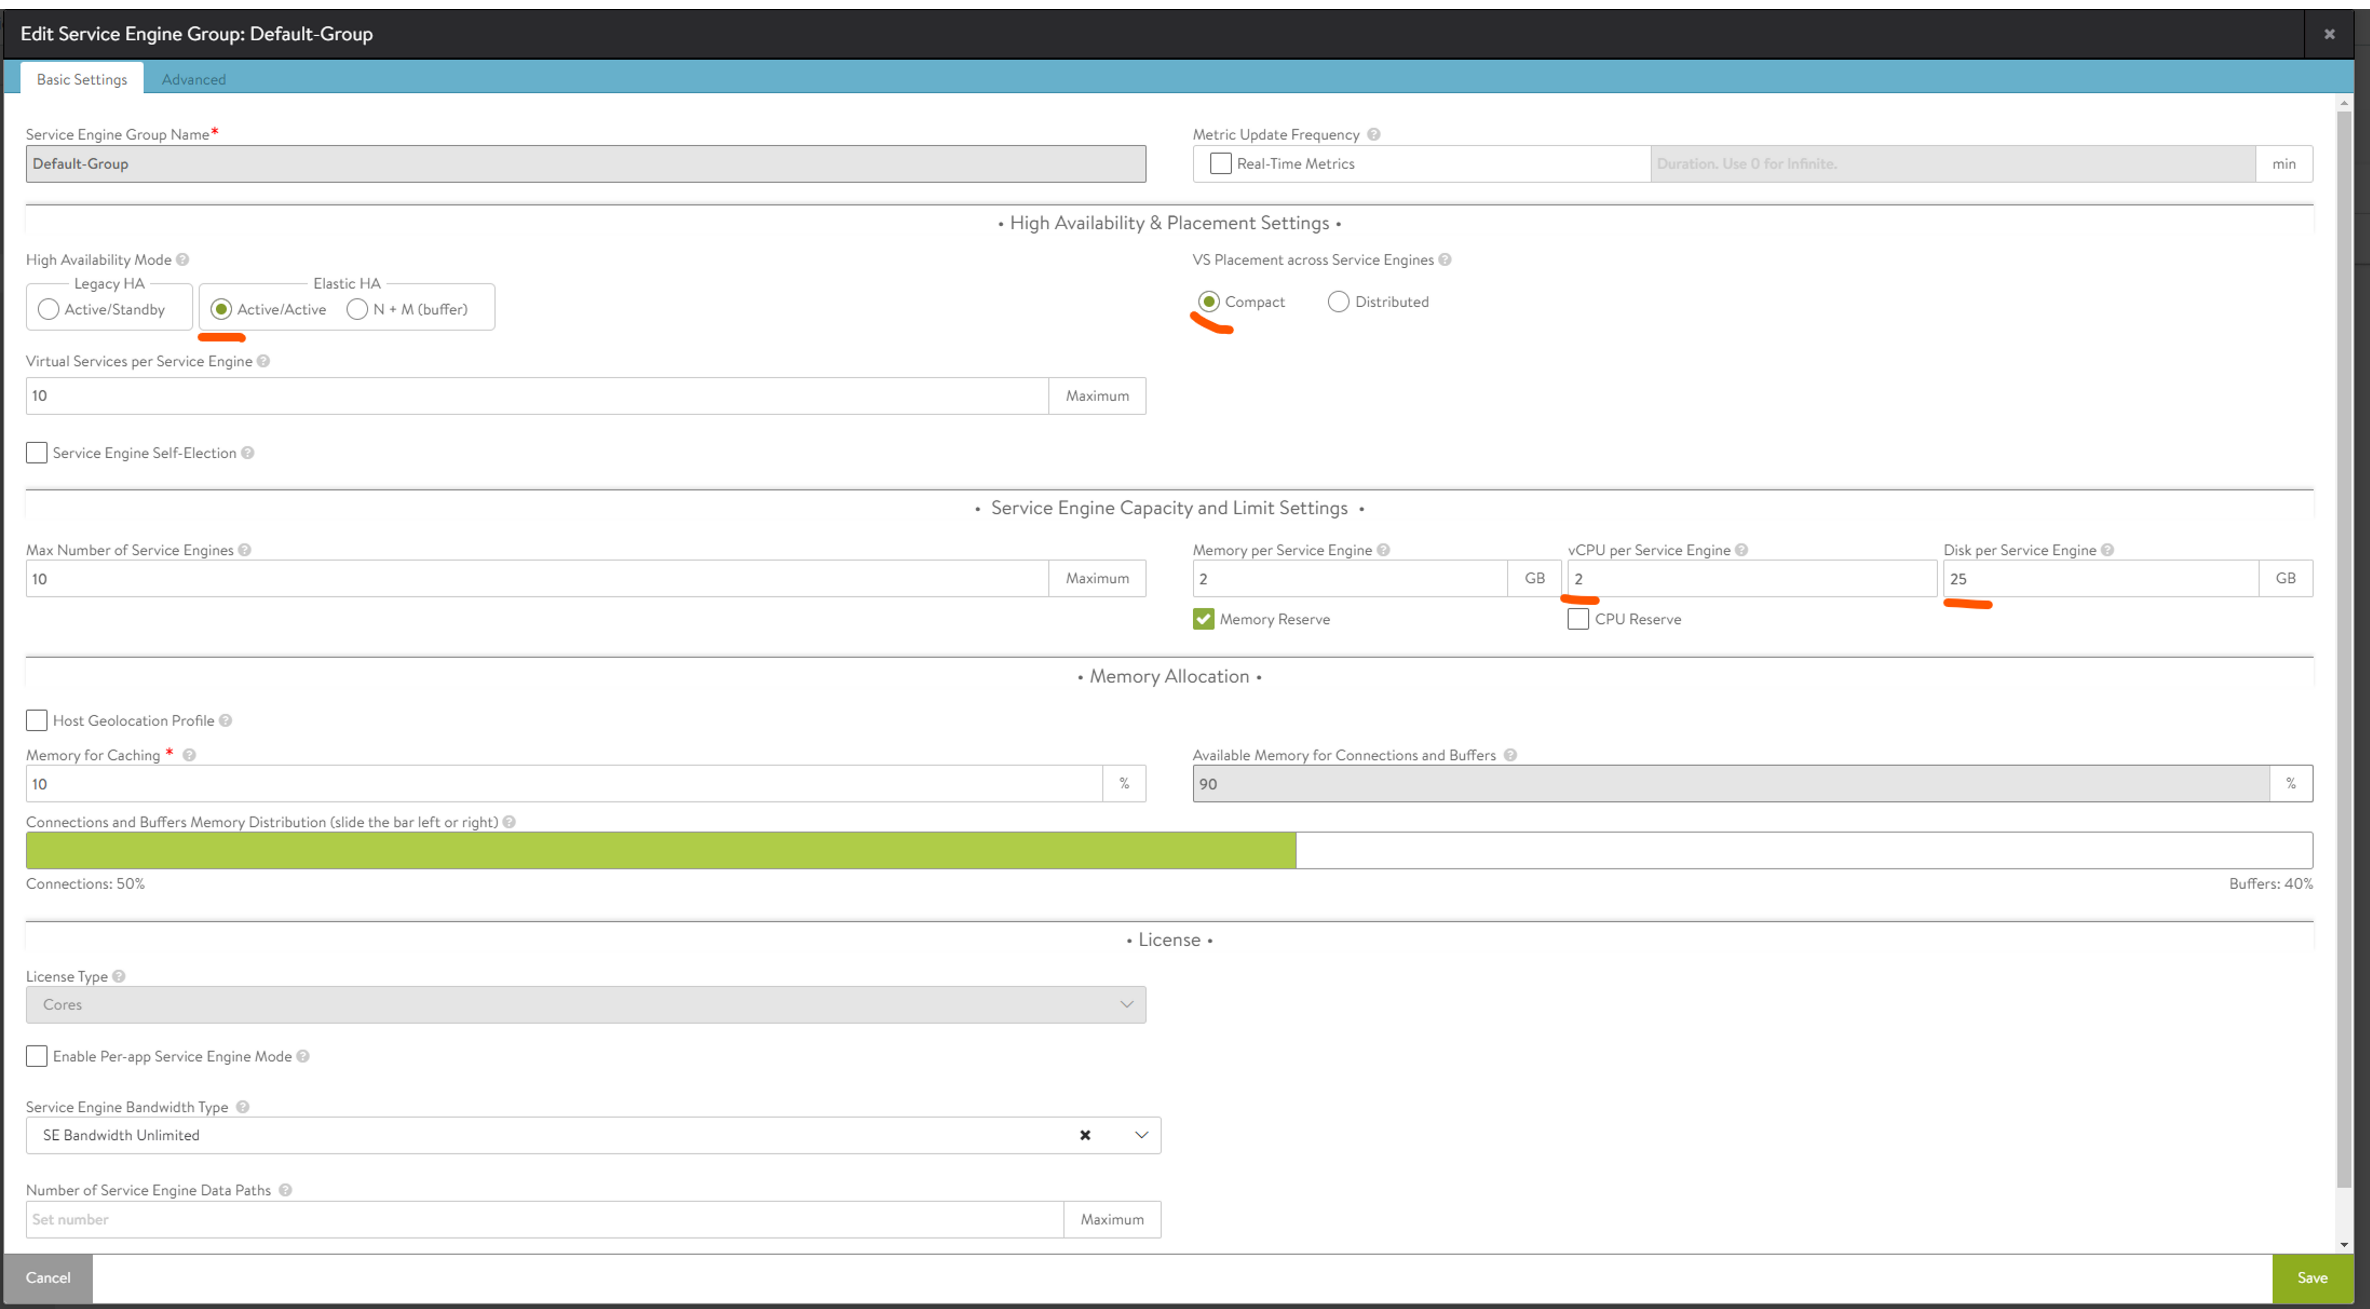
Avi service engine group #
Now its time to prepare the Default Service Engine Group. Head over to Cloud Resources - Service Engine Group
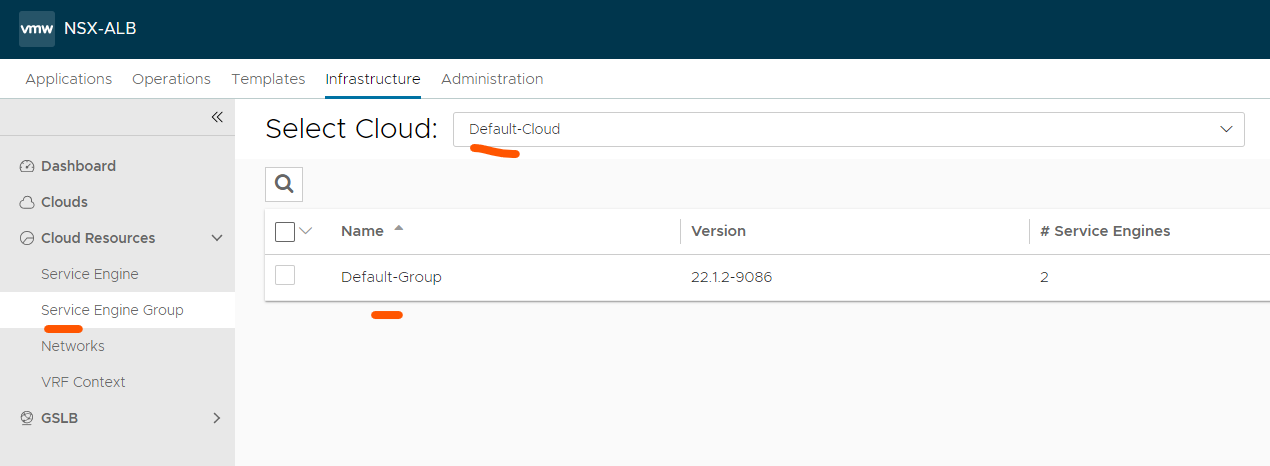
Click the pencil on the far right side of the Default-Group and make the following changes:
In the Advanced tab:
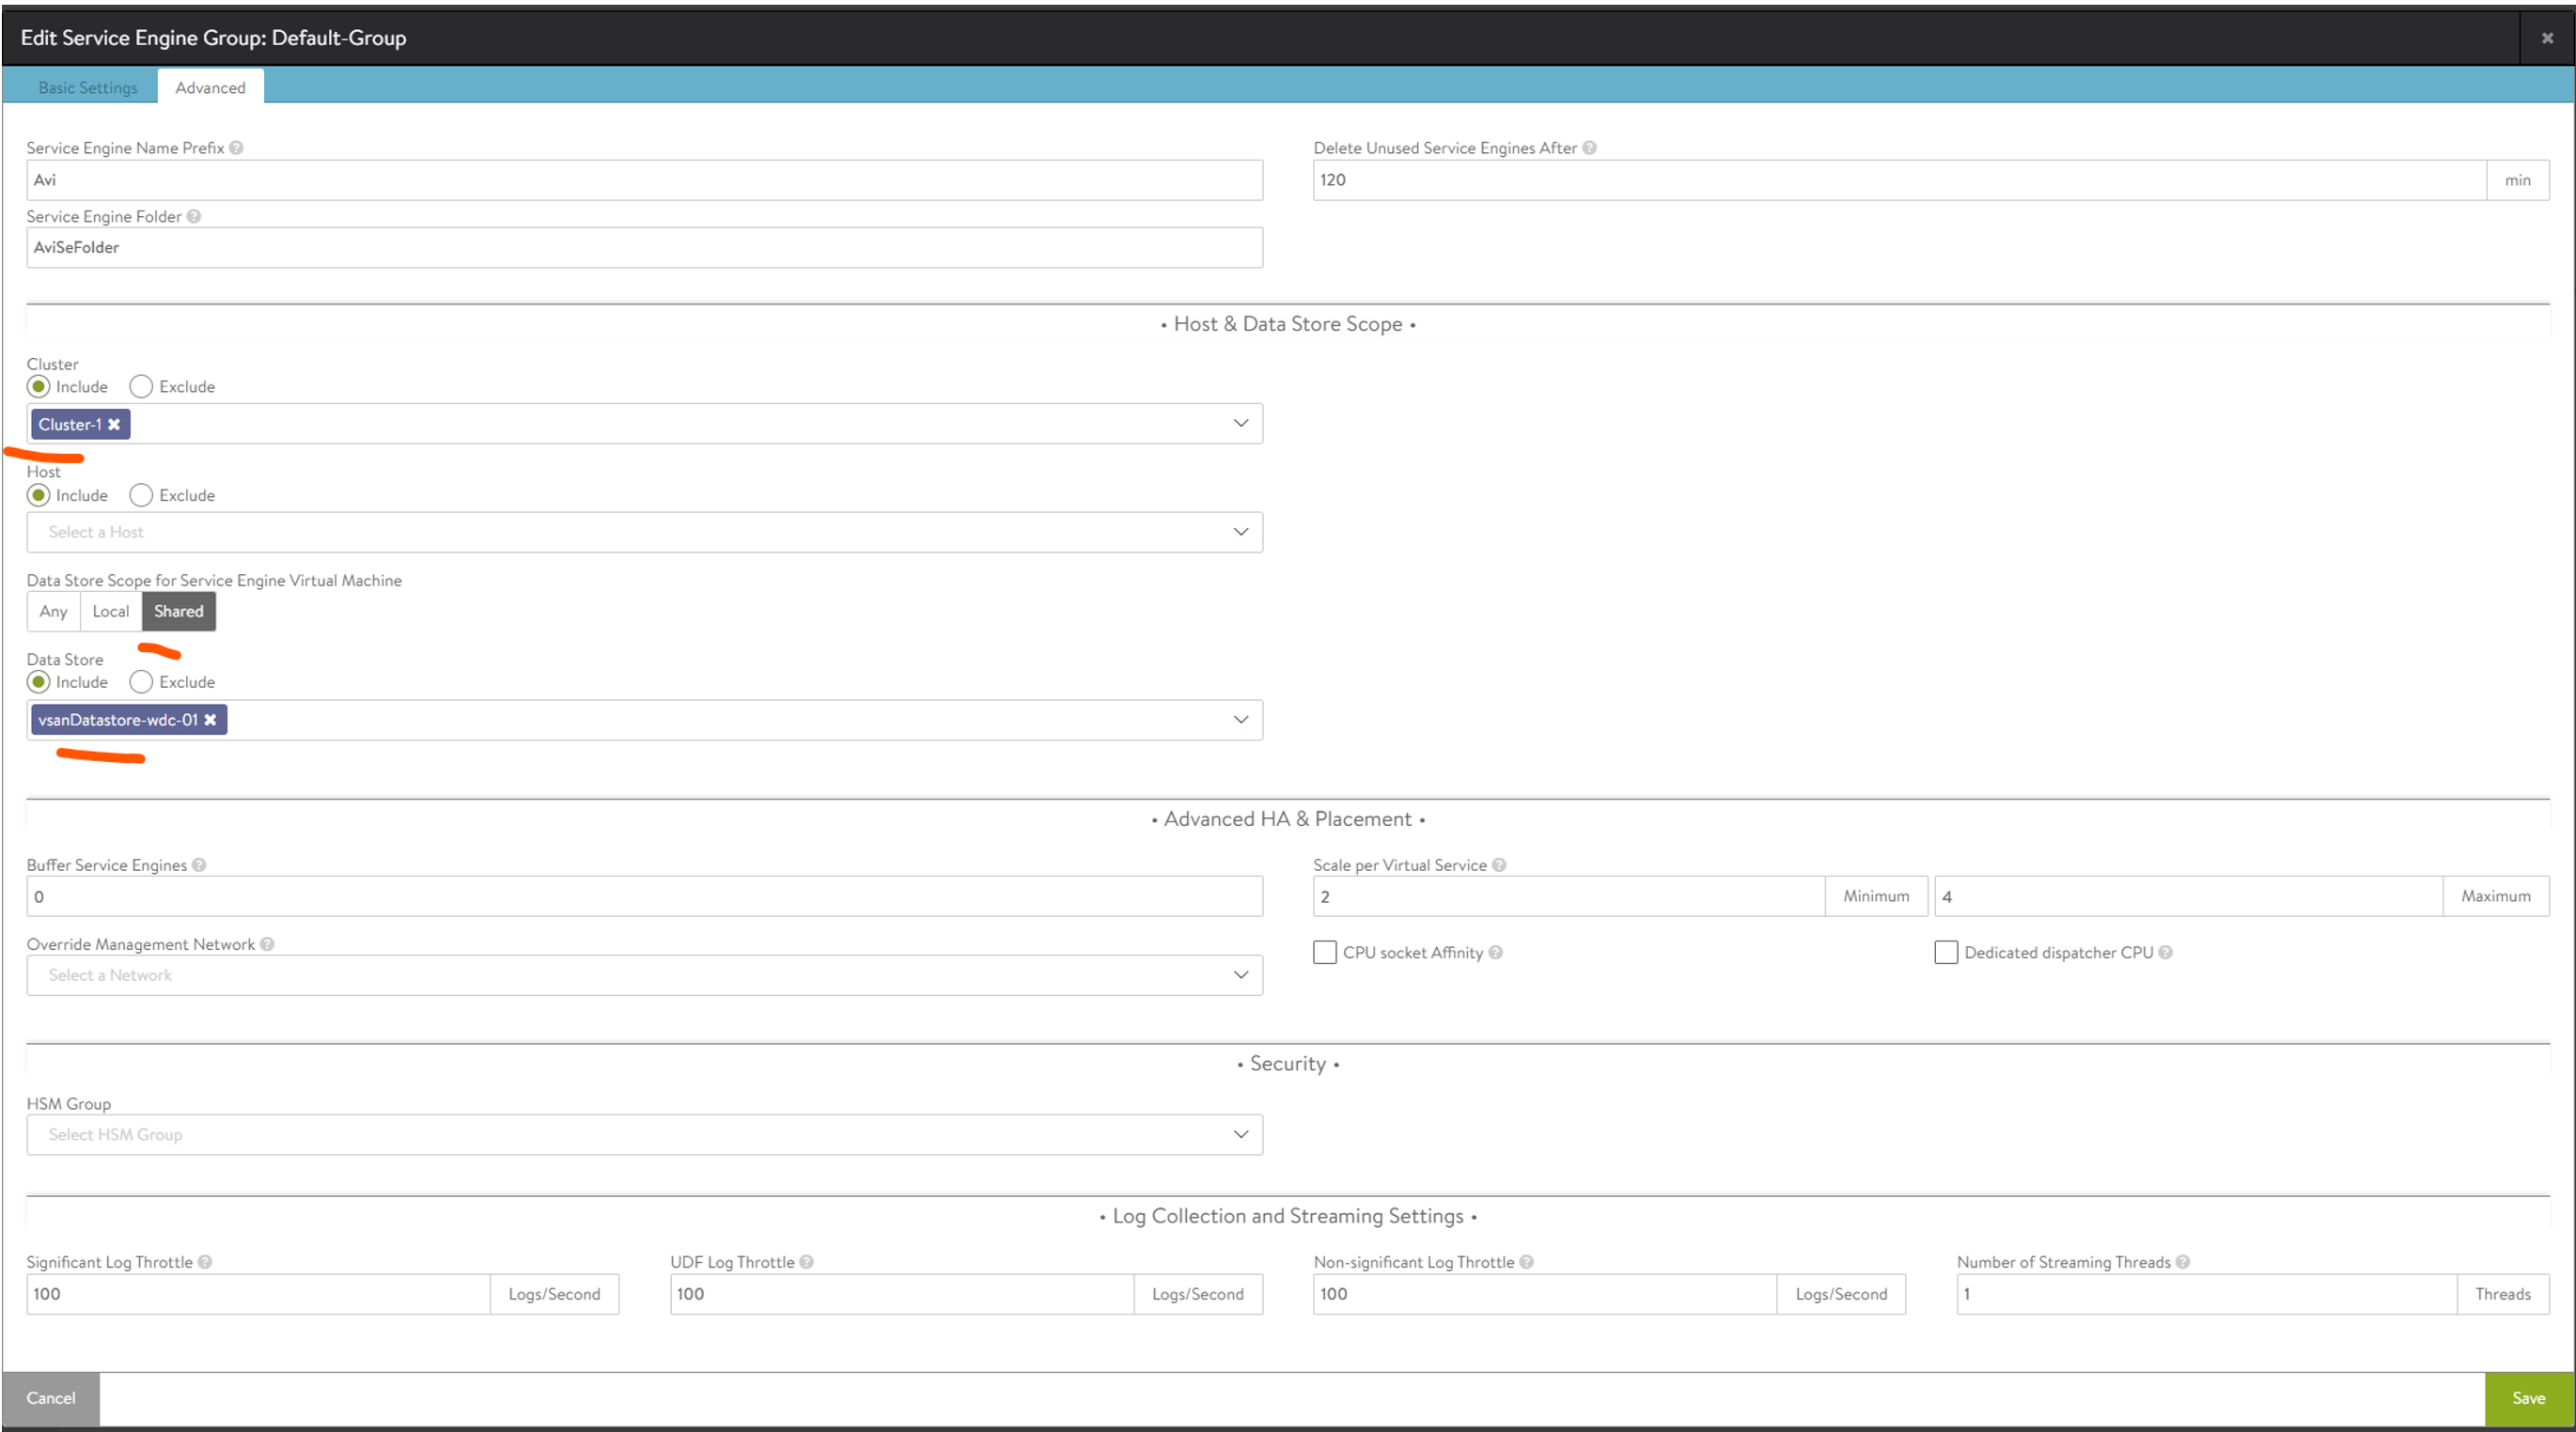
Here we select our vSphere cluster for the SE placement, vSphere shared storage, and the Prefix and vCenter folder placement (if you want). Now that is done.
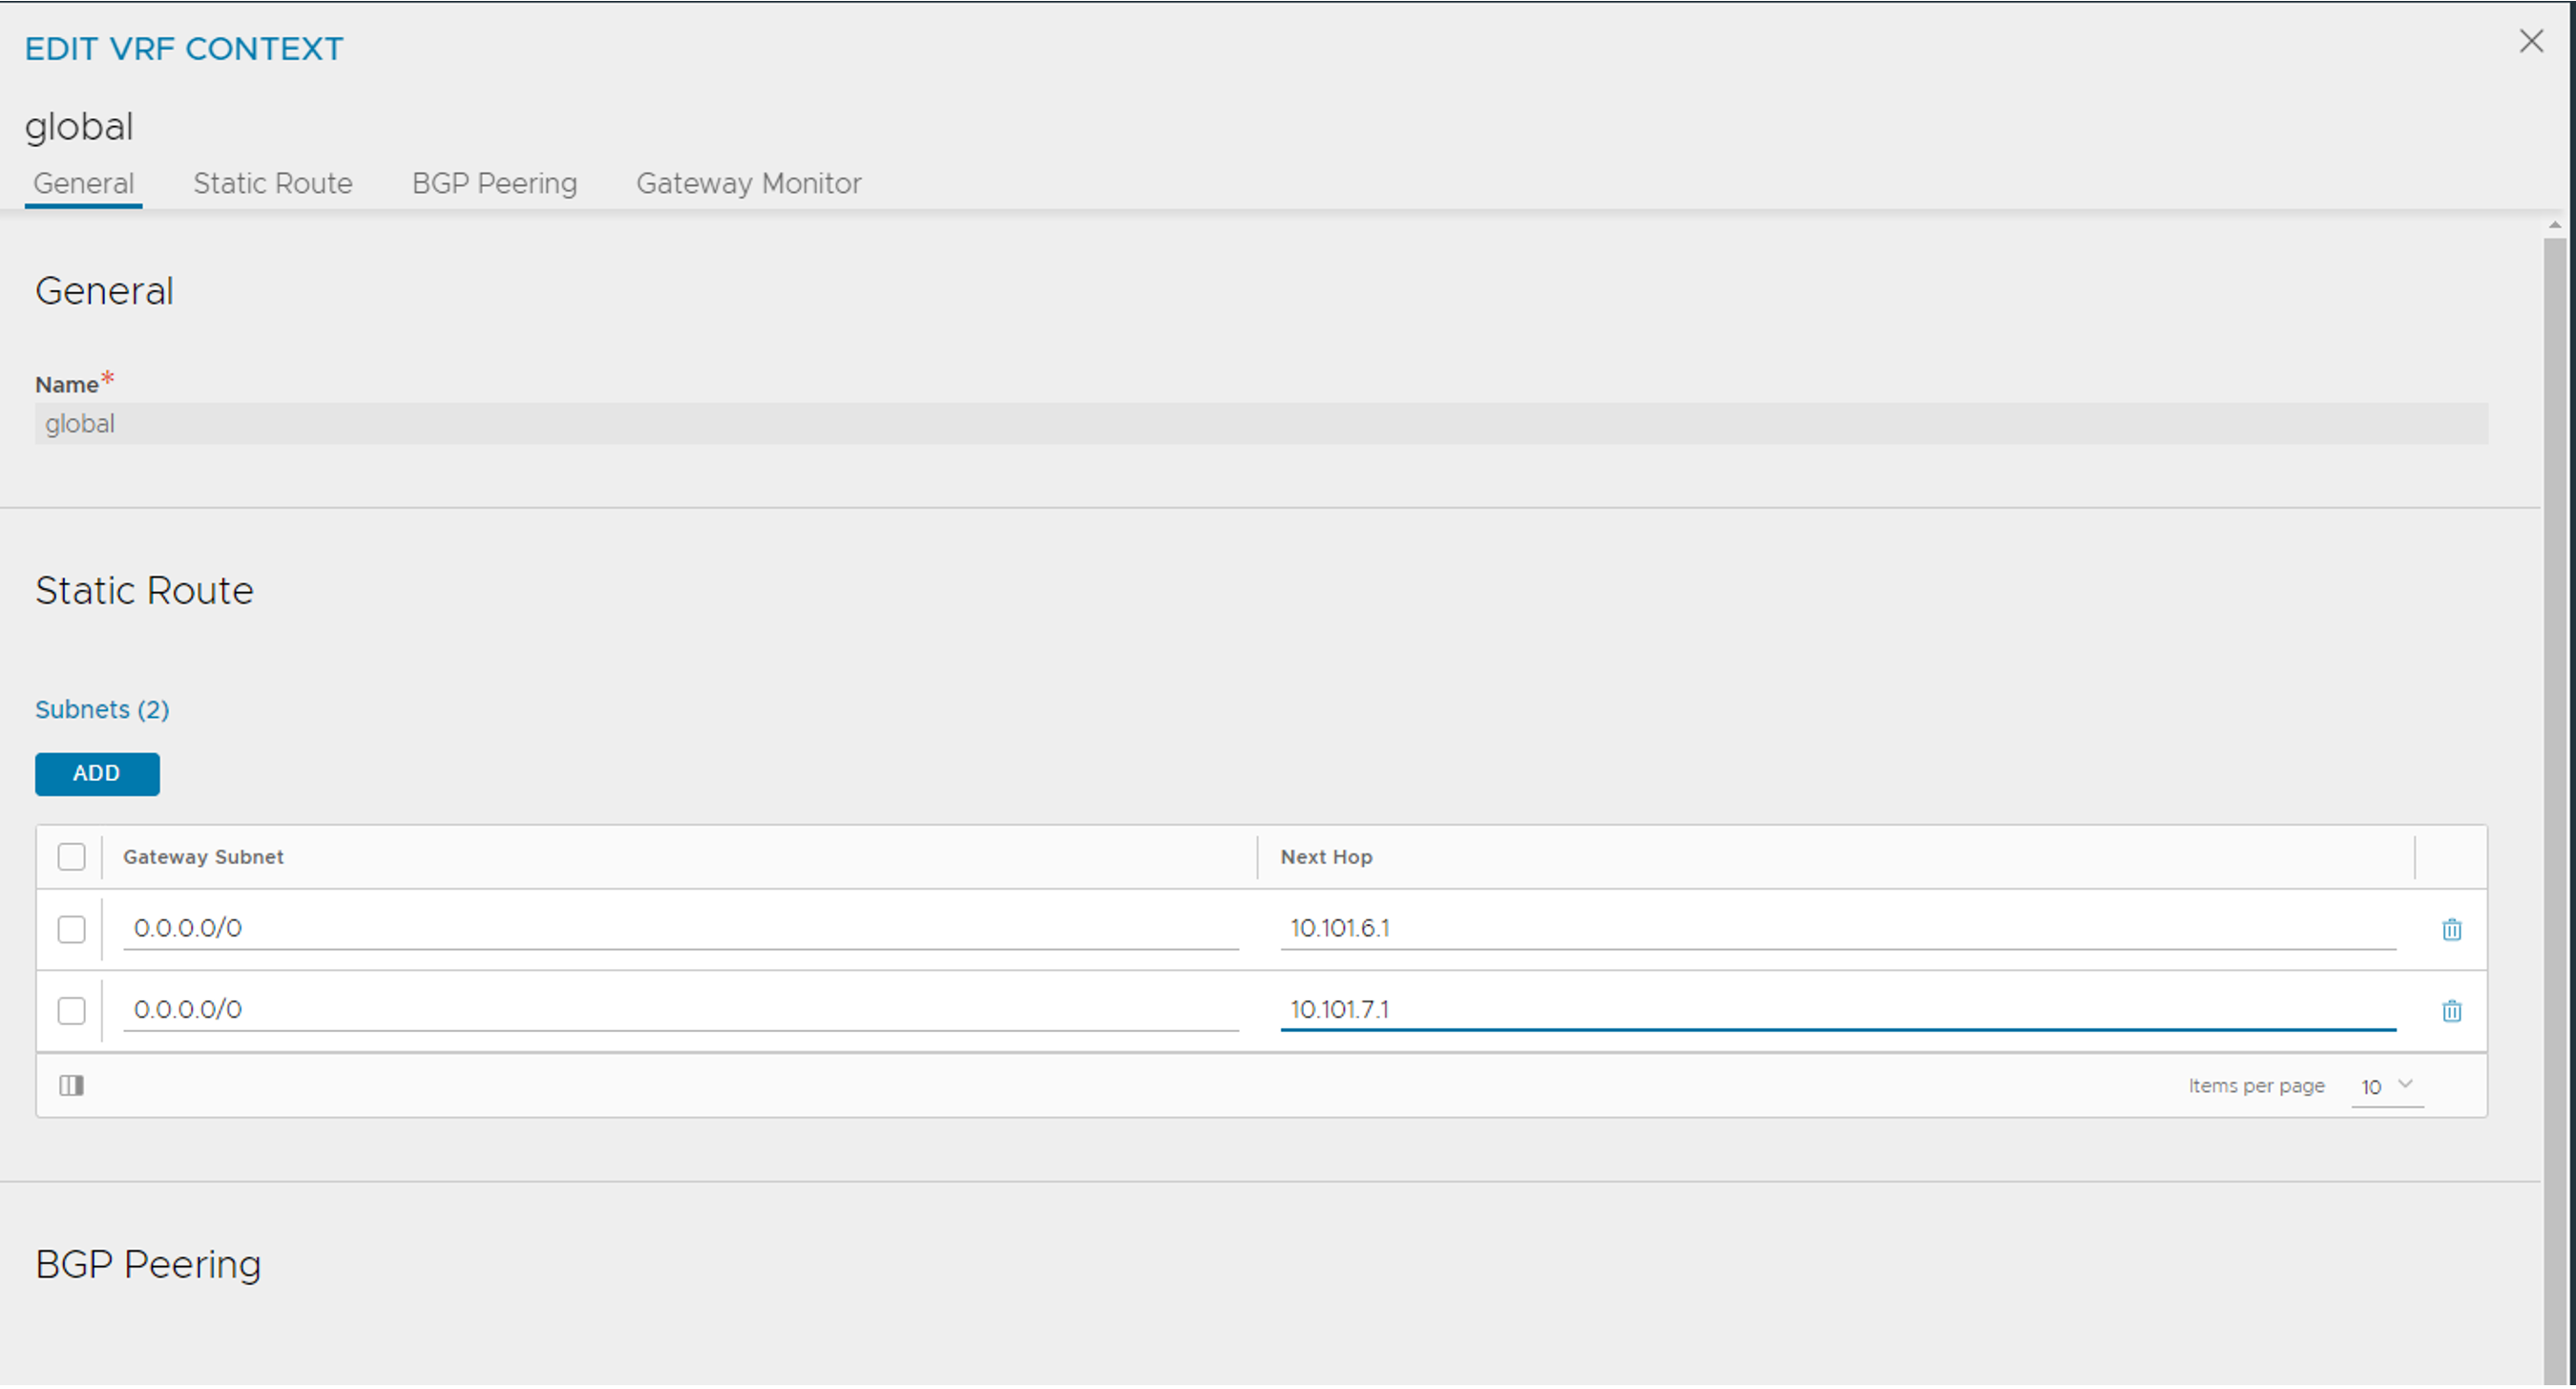
Avi VRF context #
Now we need to create a static route for the SE dataplane to know which gateway will take them to the “backend-pool” (the services they are acting as loadbalancer for). This is usually the gateway for the networks in their respective subnet as the dataplane is residing in.
Here I prepare the route for the Frontend network, and also the Workload network (so it is already done when moving to the step of enabling L7).
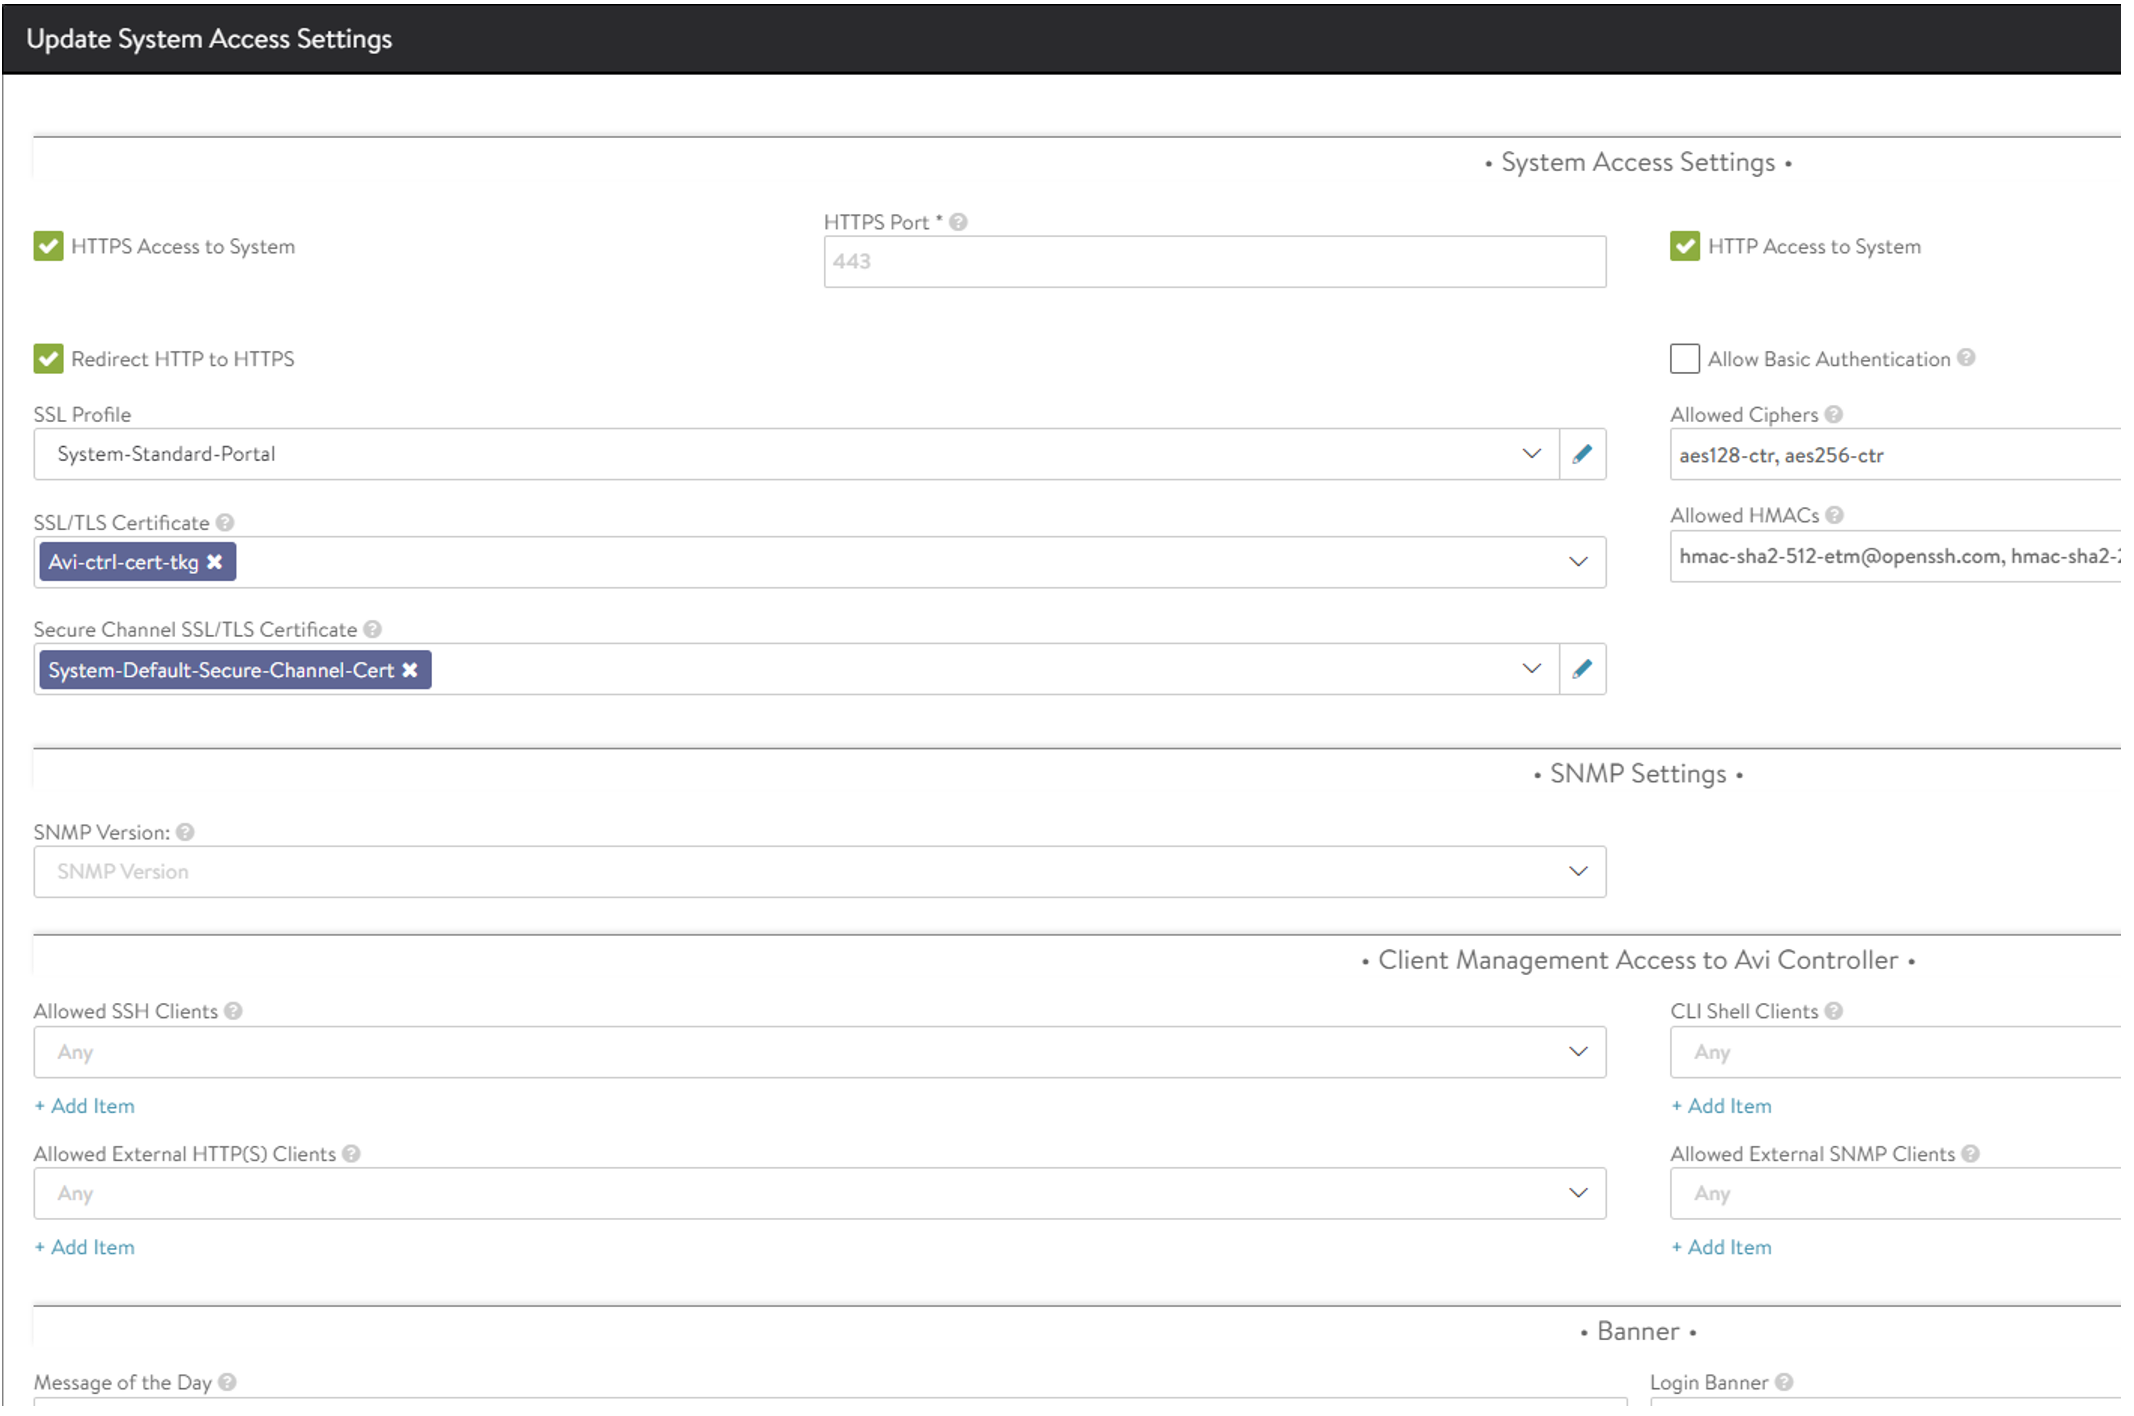
Avi controller SSL certificate for Tanzu “integration” #
The last step is to create a new certificate, or use your own signed certificate, for the Tanzu deployment to use.
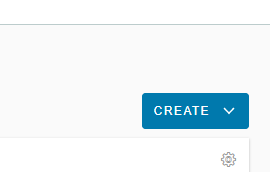
Head over to Templates - SSL/TLS Certificates.
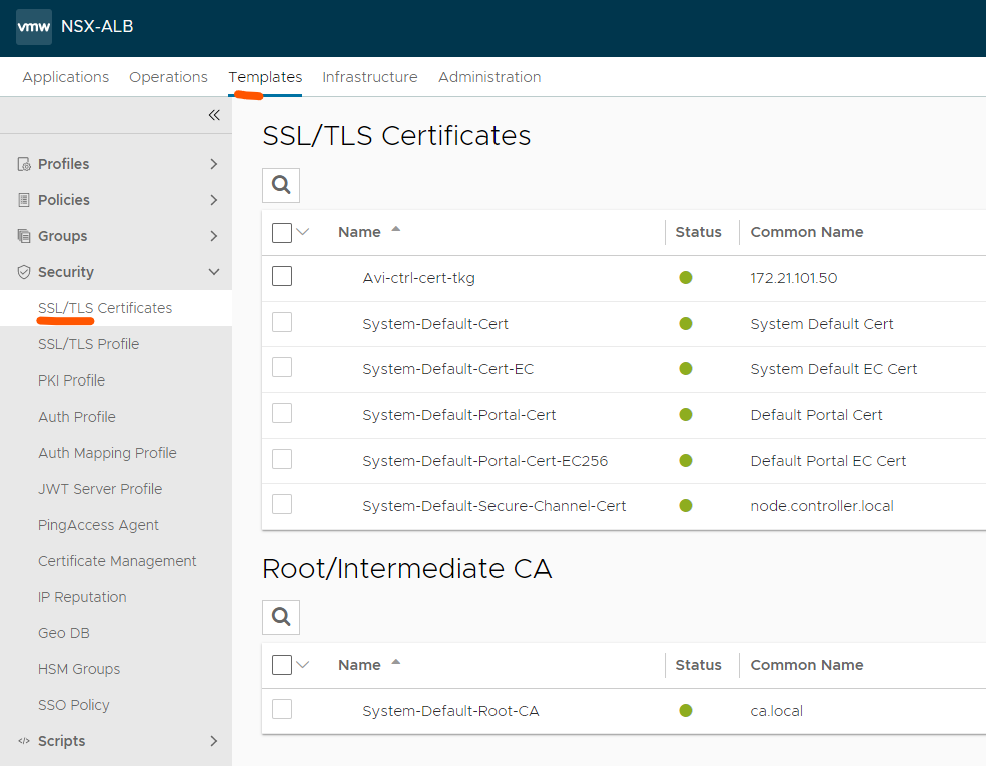
From here we click “Create” in the top right corner:
I will go ahead and create a new self-signed certificate:
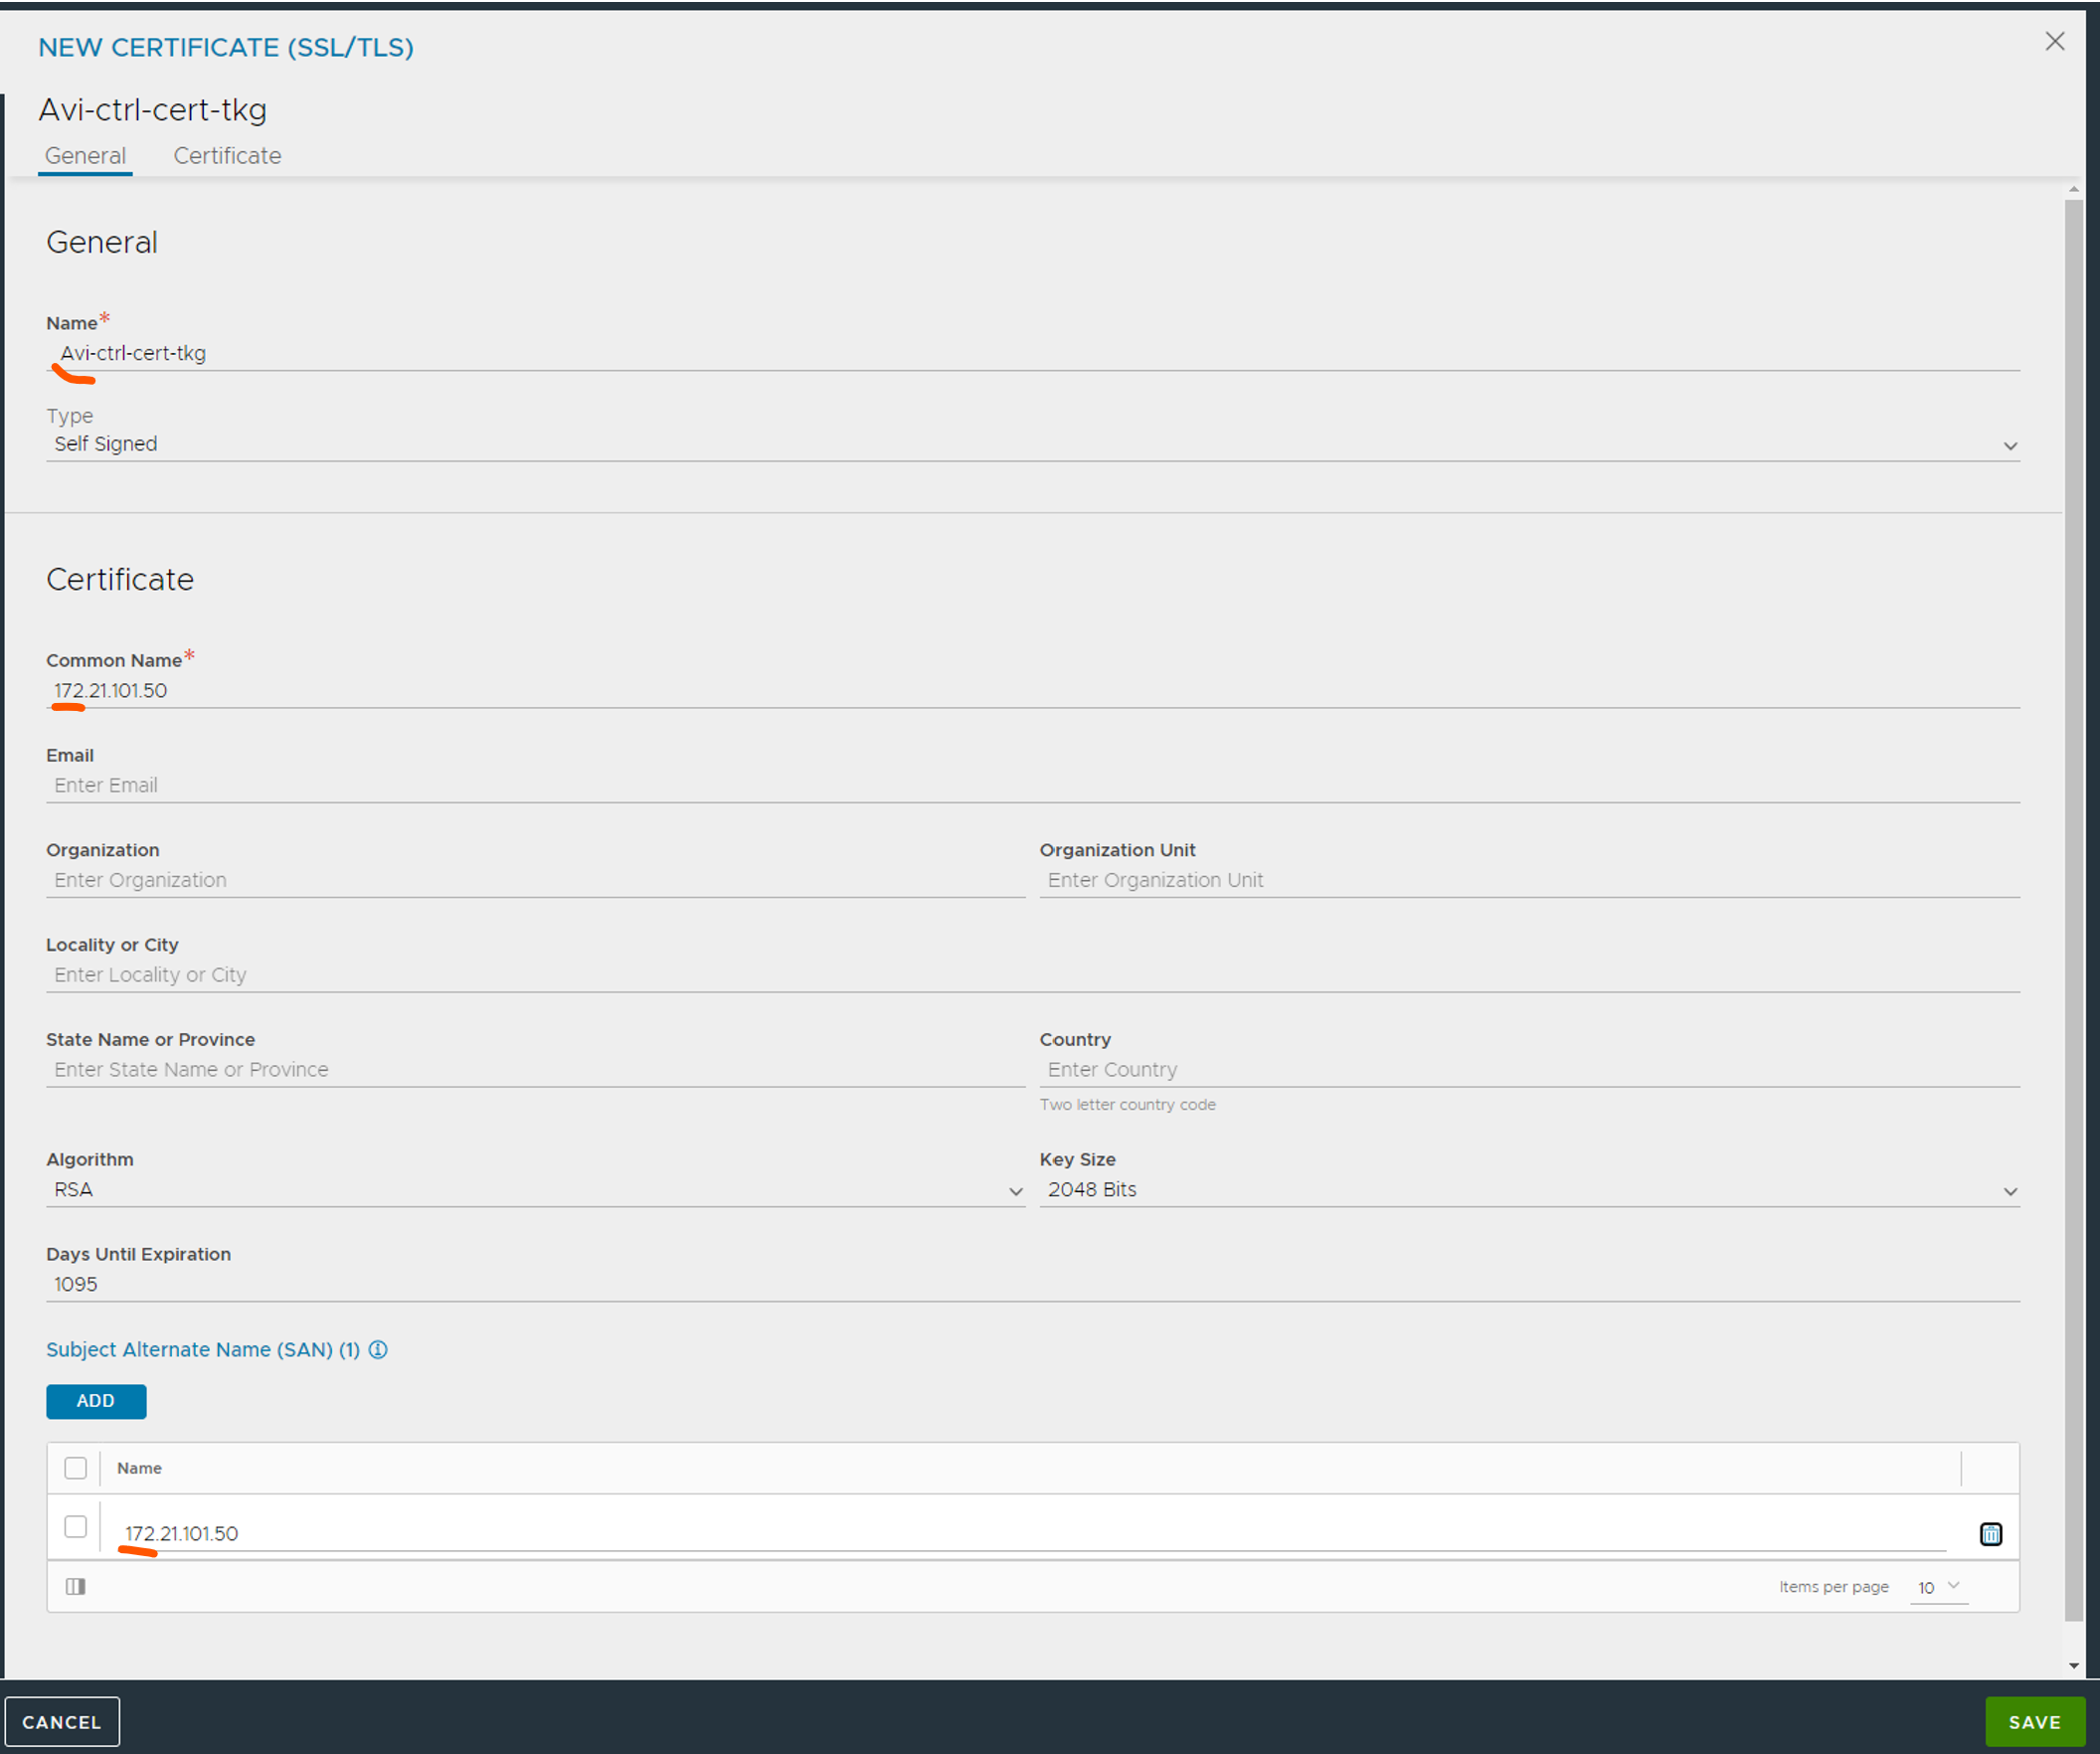
It is important that you use the IP or FQDN of the controller under “Common Name” and under “Subject Alternate Name (SAN)”
Now head over to Administration - Access Settings:
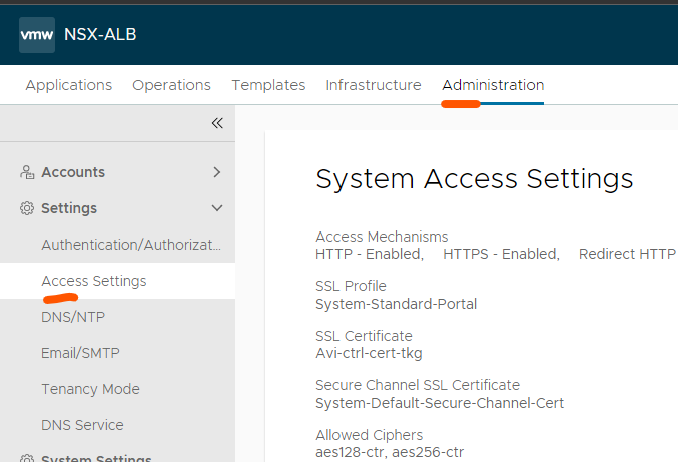
Click edit on the pencil in the top right corner, remove the existing certificates under SSL/TLS Certificate:
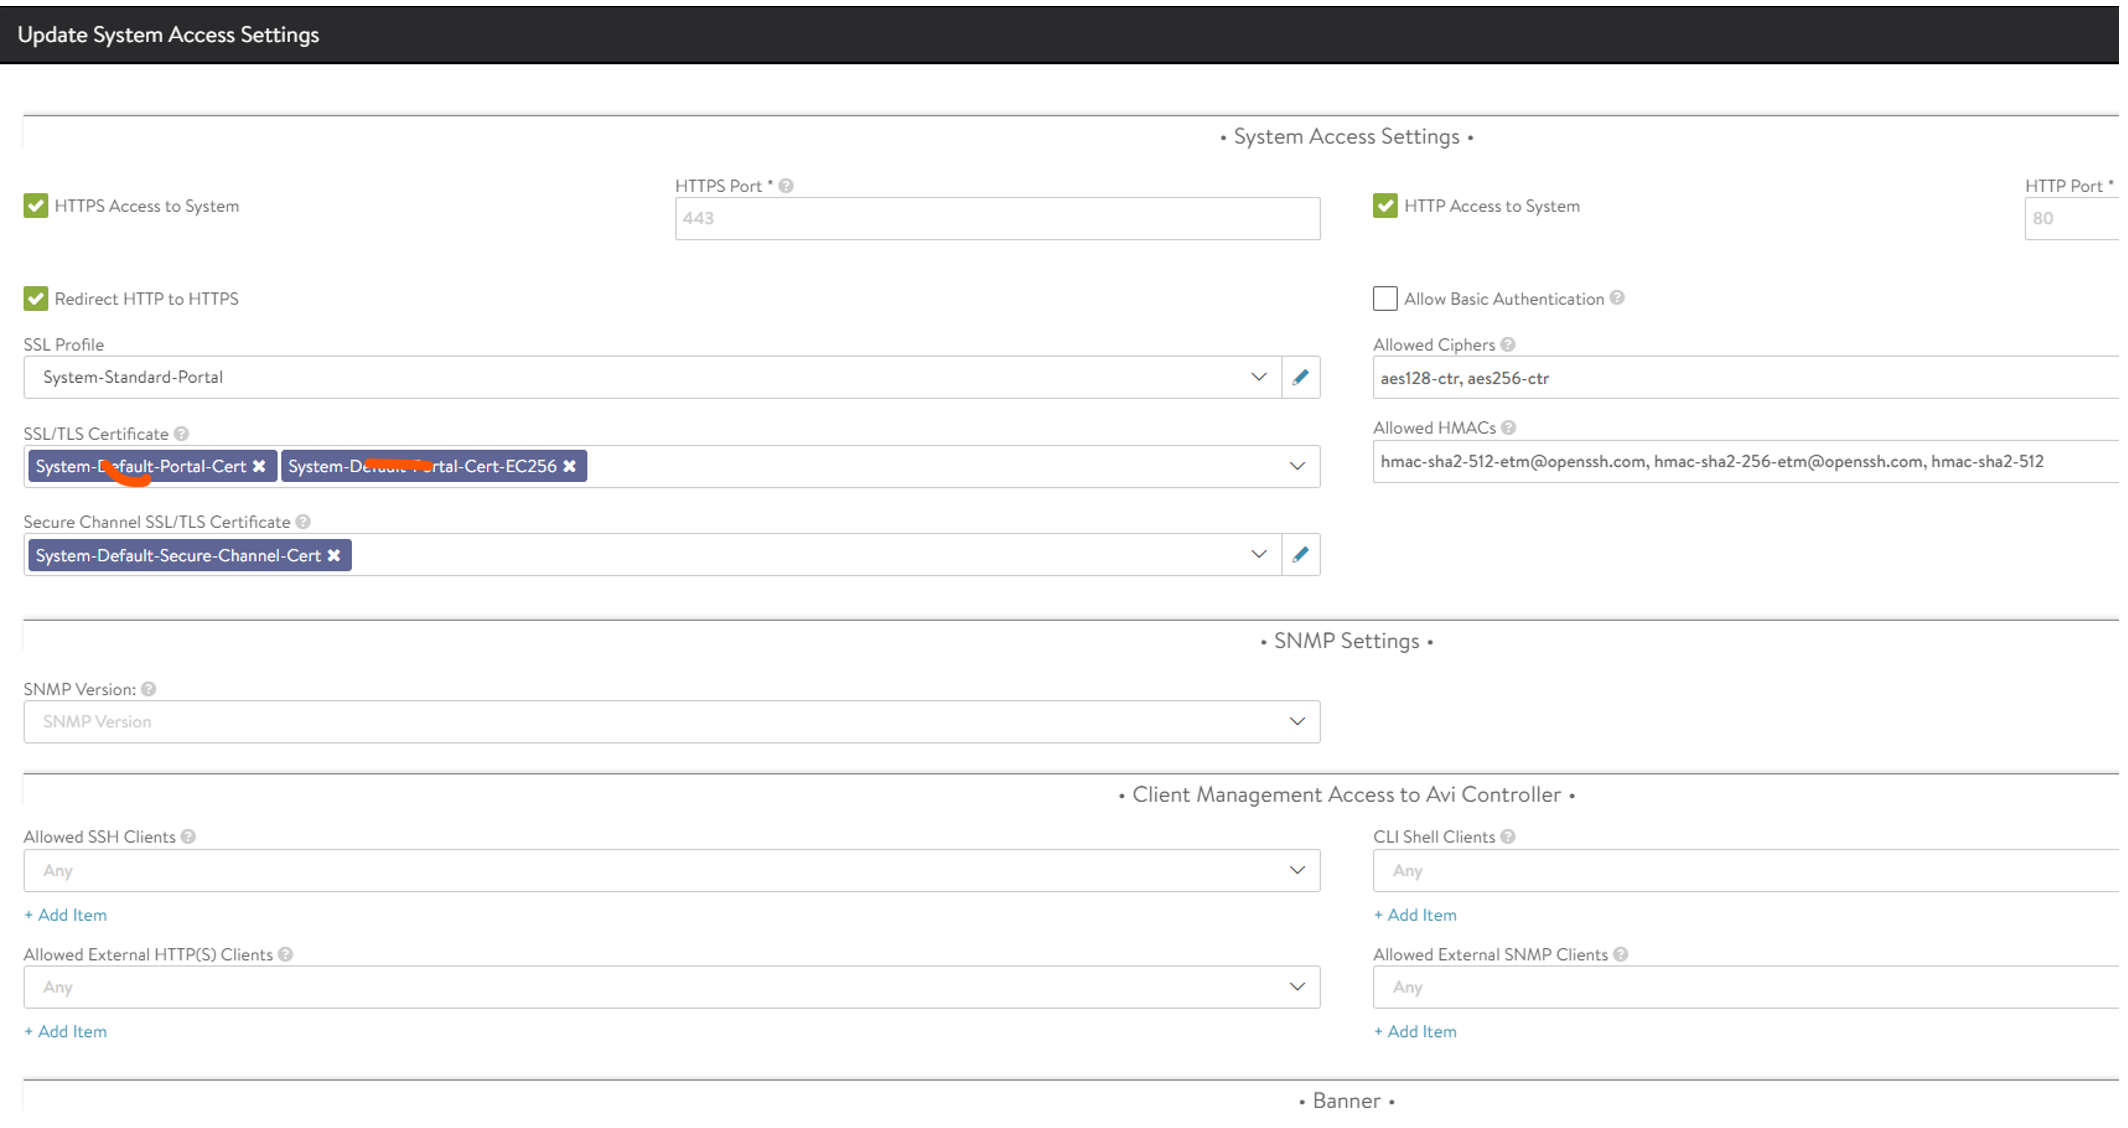
And replace with the one you created:
Now the Avi config is done for this round. Next step is to enable Workload Management in vSphere…
Enable Workload Management in vSphere #
This section will cover all the steps to enable Tanzu from vCenter, describing the selections made and the network configs.
Enable workload management #
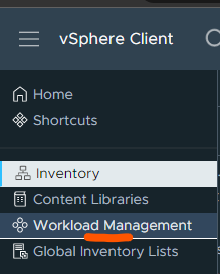
Head over to your vCenter server and click here: (from the the “hamburger menu” top left corner)
Click the Get Started button:

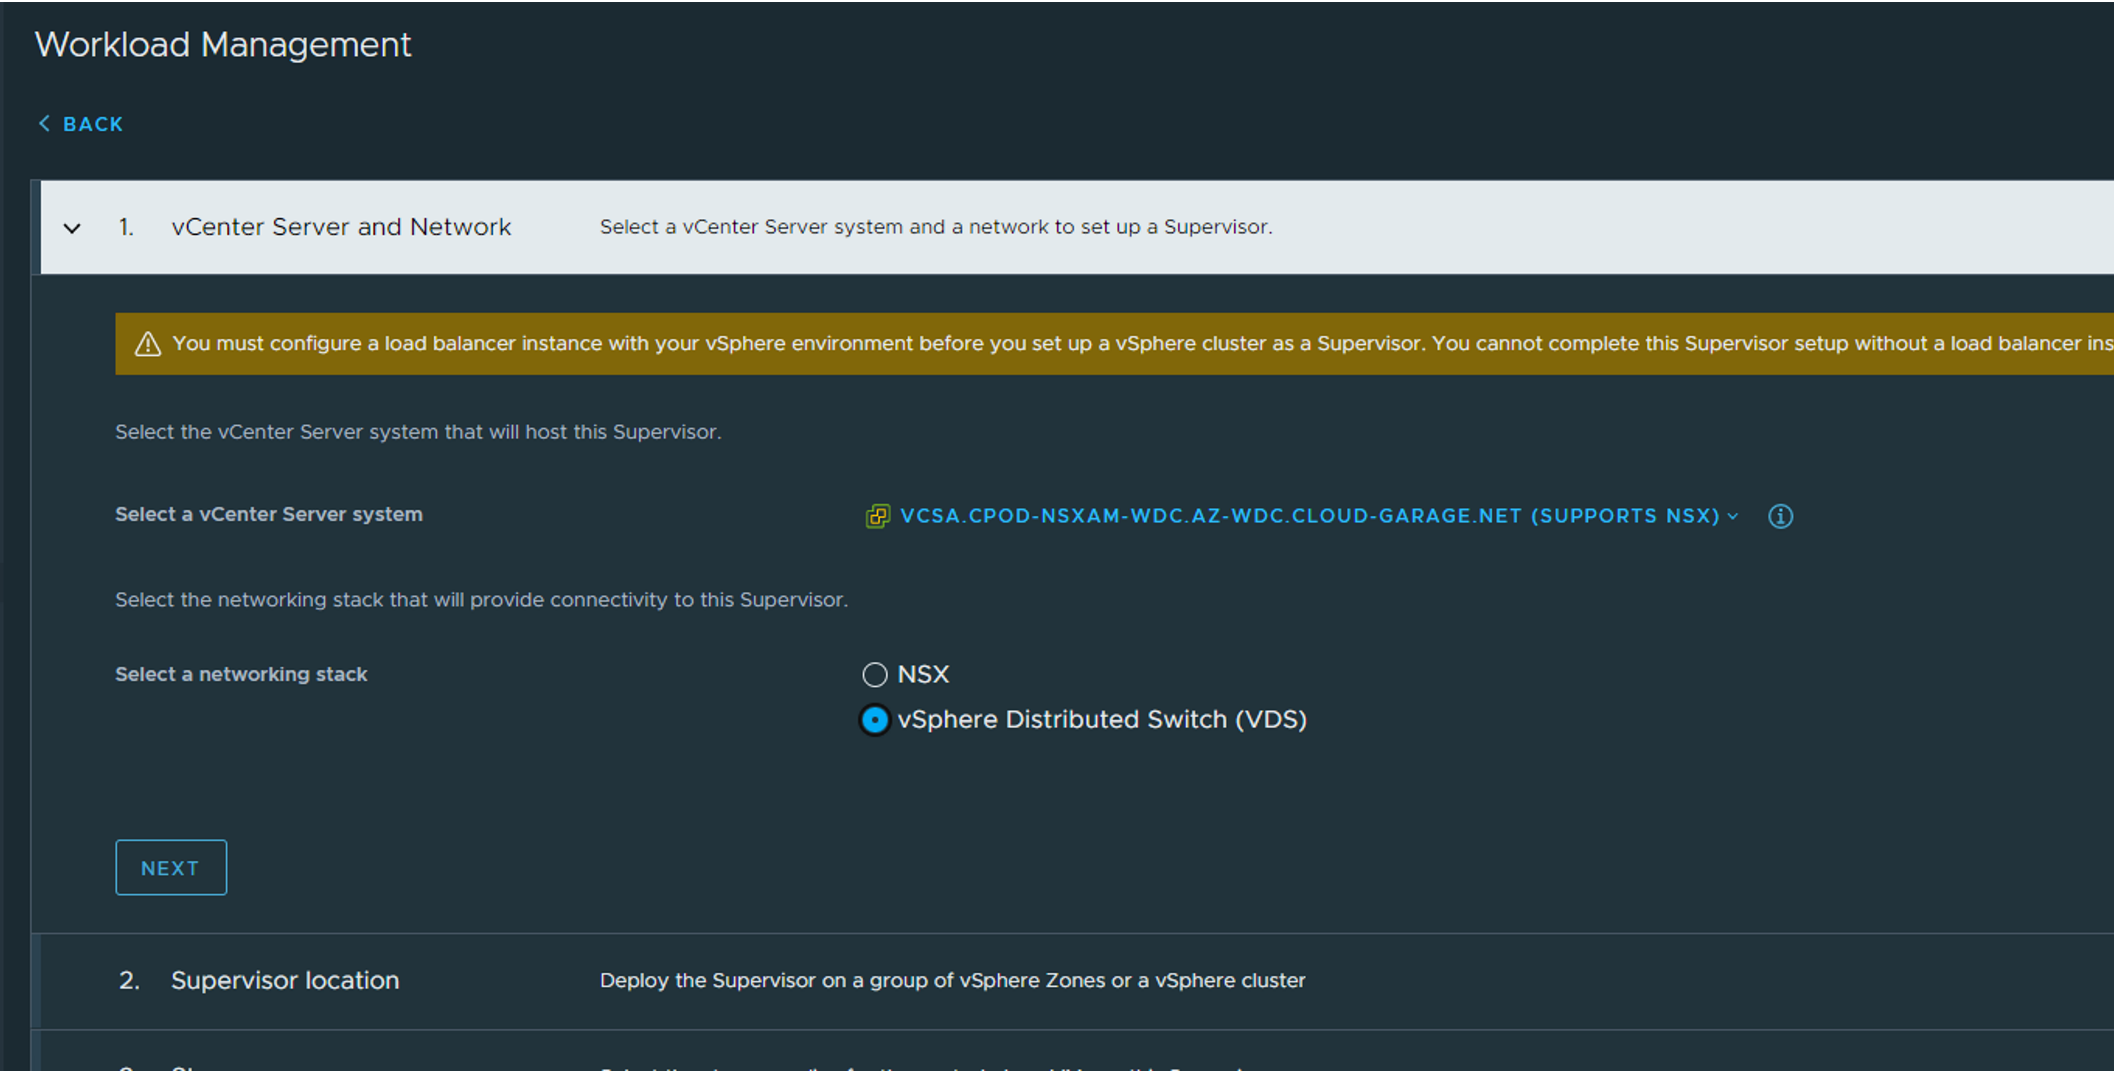
Step 1: Select vSphere Distributed Switch
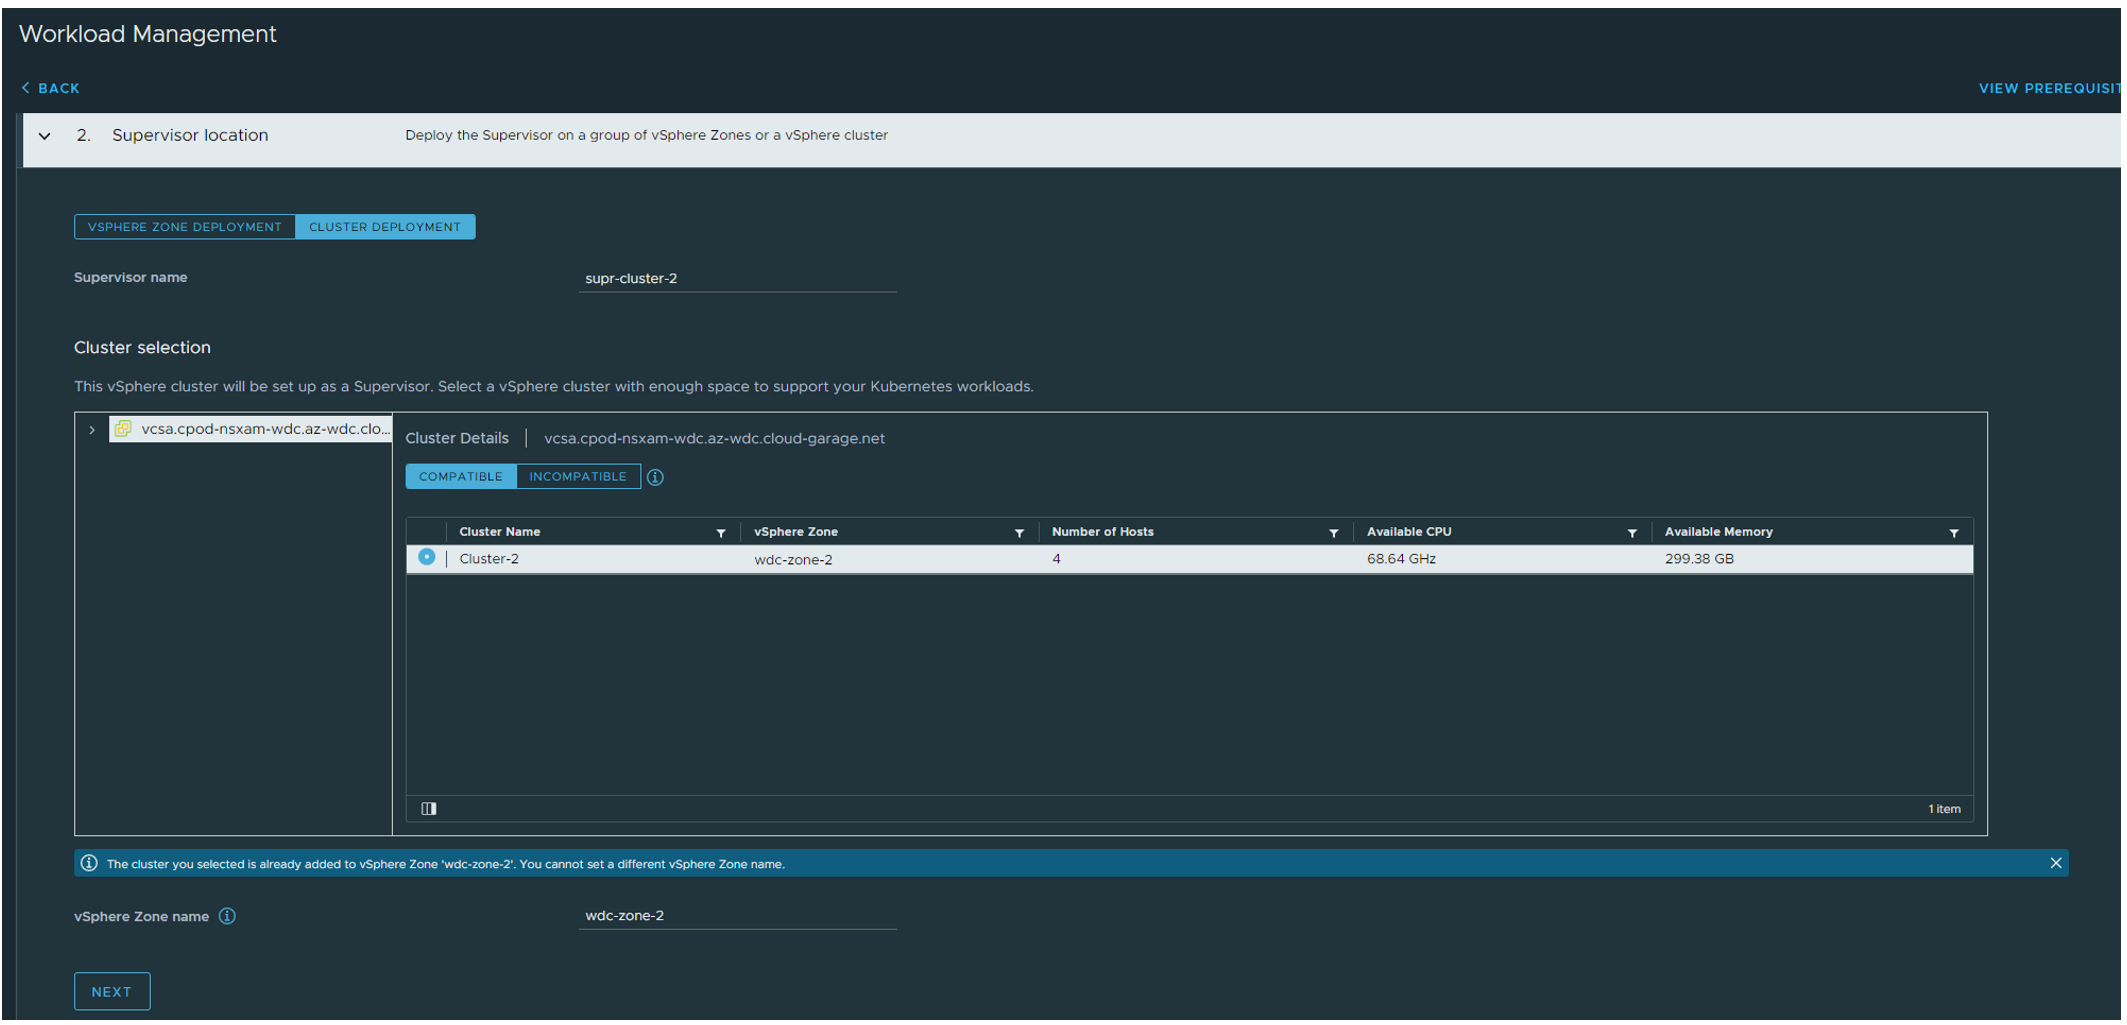
 Step 2: Select Cluster Deployment, give the supervisor cluster a name and give it a zone name:
Step 3: Select your Storage Policy (If VSAN and you dont have created a specific VSAN policy for this use Default Storage Policy):

Step 4: Type in the relevant info for your Avi Controller and copy paste the certificate from your Avi controller:
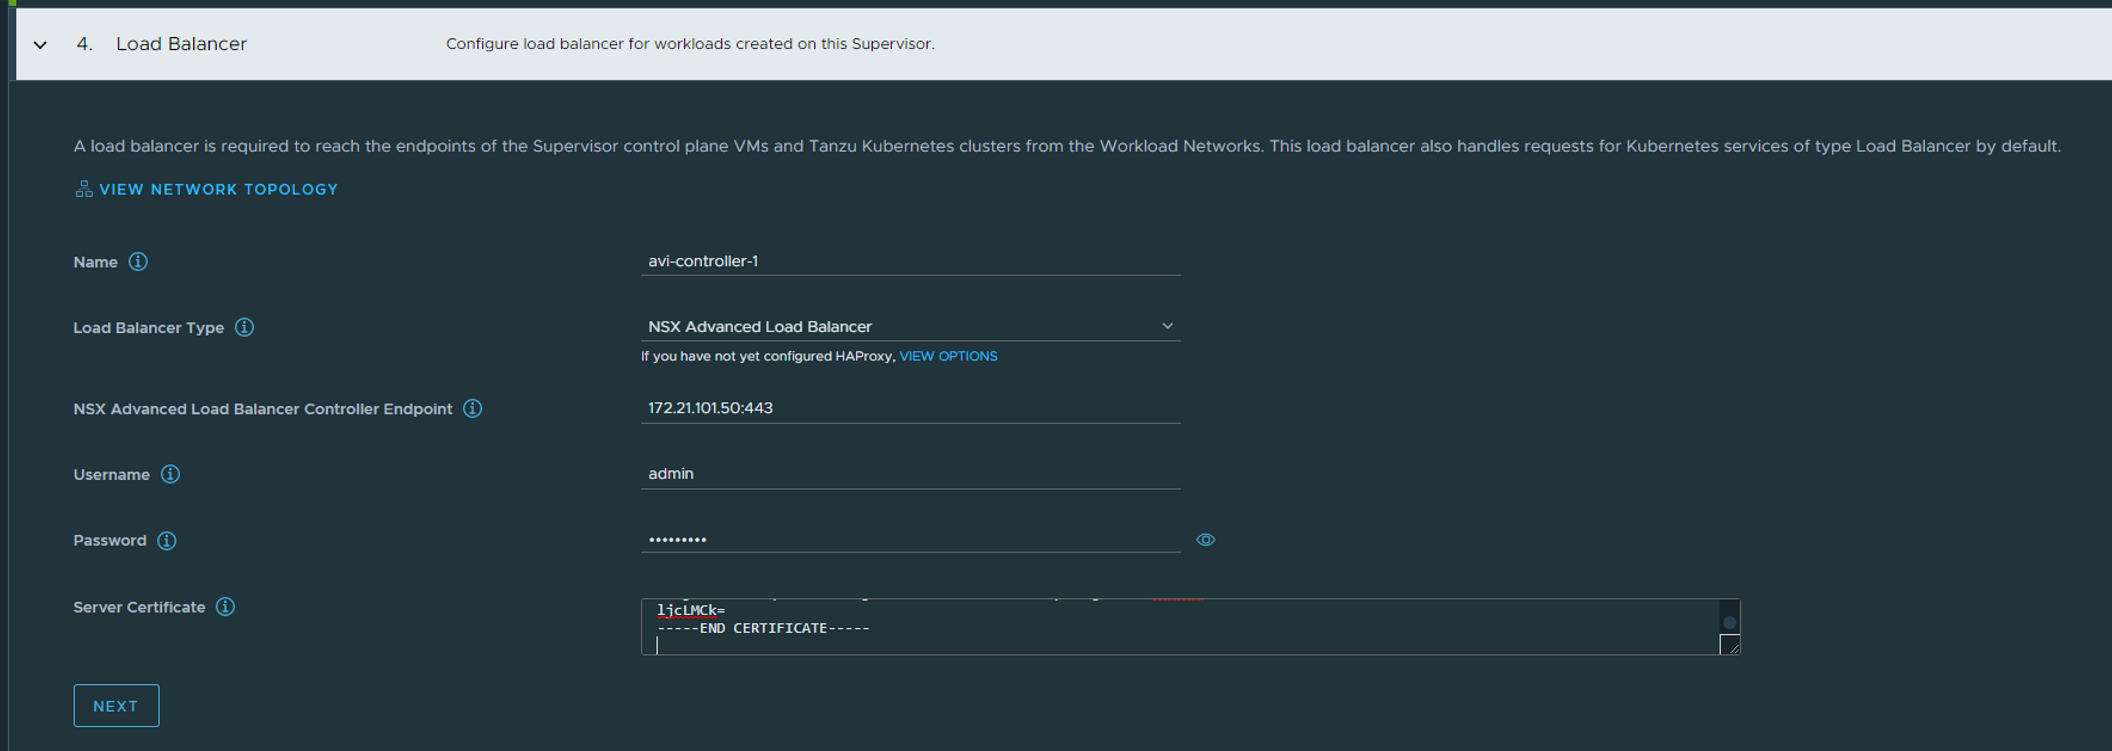
The certificate is easily copied from the Avi controller by going to Templates - SSL/TLS Certificates and click the “down arrow”:

Then copy the certificate:
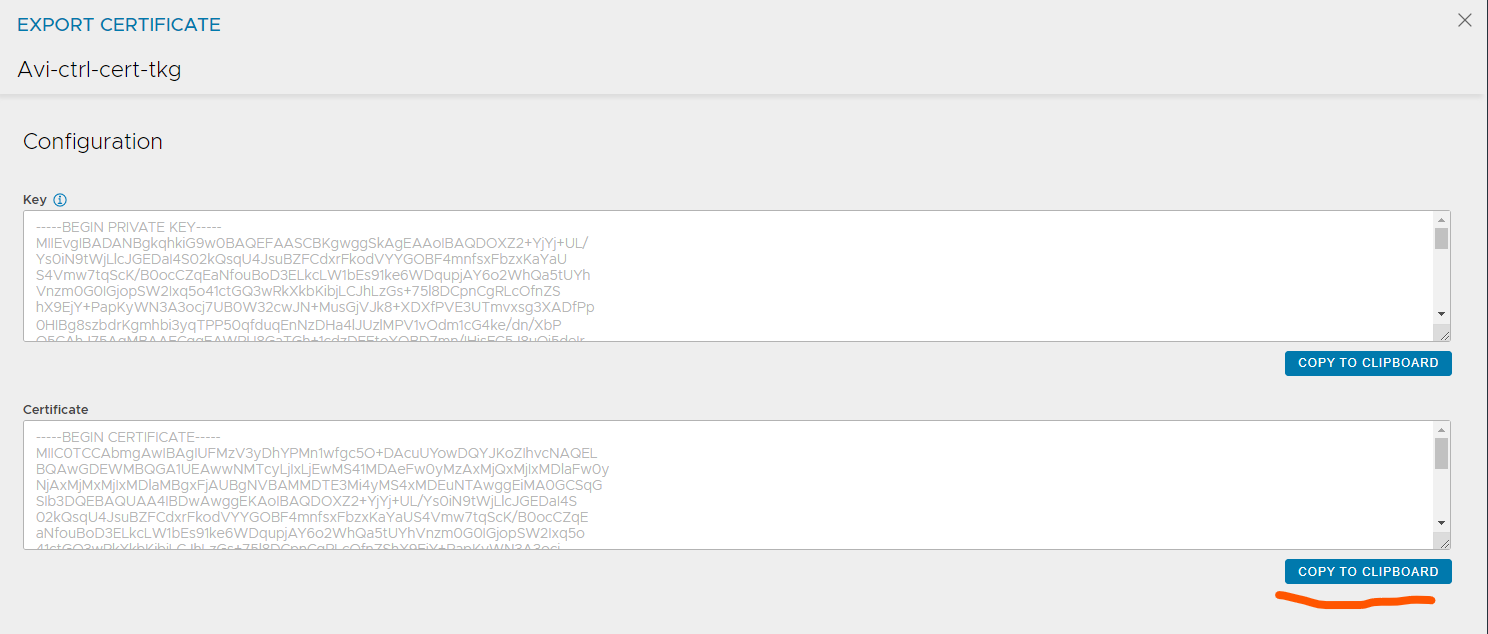
Paste the content in the Server Certificate field above (step 4)
Step 5: Management Network
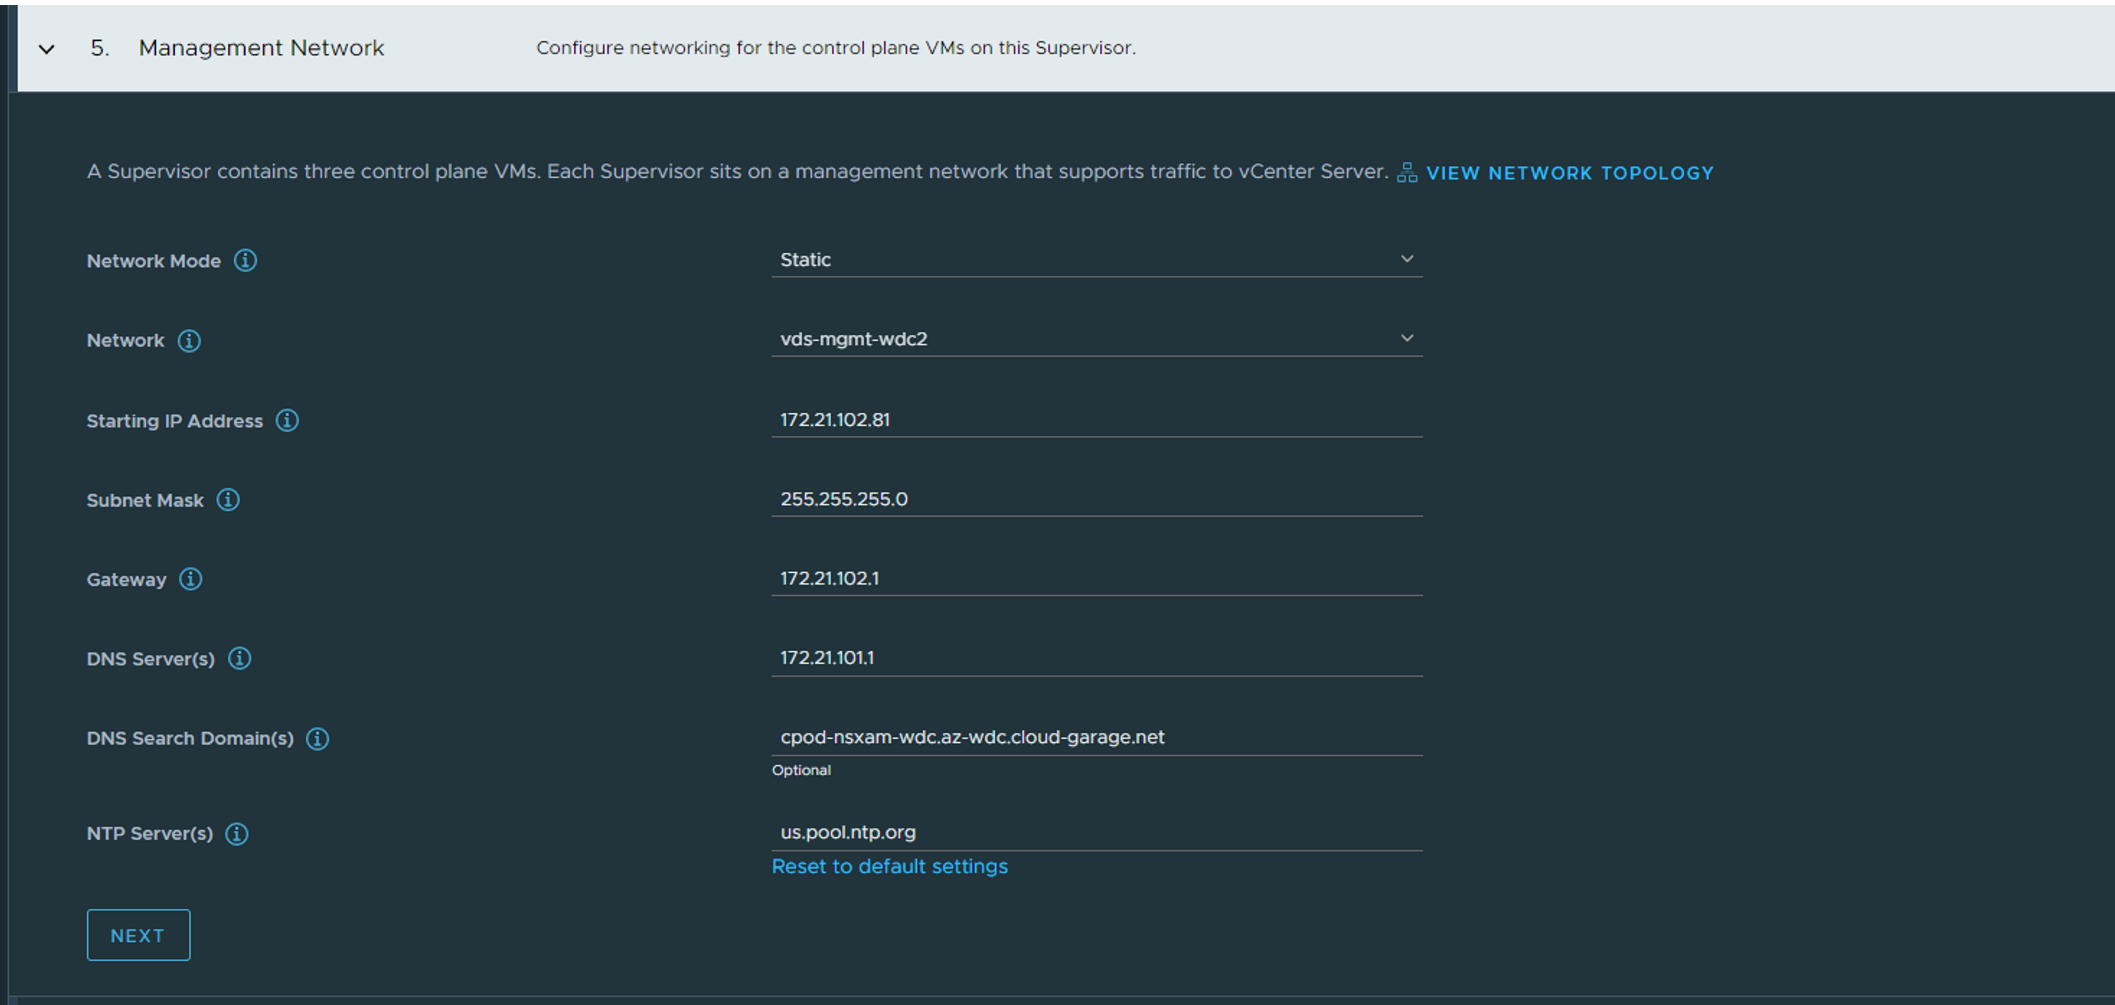 Here we fill in the required information for the Supervisor nodes. Management IP for the nodes themselves (needs connectivity to both vCenter and ESXi hosts, could be in the same mgmt network as vCenter and ESXi). Select the corresponding vds portgroup, select either static or DHCP if you want to use DHCP.
Step 6: Workload Network
Here we fill in the required information for the Supervisor nodes. Management IP for the nodes themselves (needs connectivity to both vCenter and ESXi hosts, could be in the same mgmt network as vCenter and ESXi). Select the corresponding vds portgroup, select either static or DHCP if you want to use DHCP.
Step 6: Workload Network
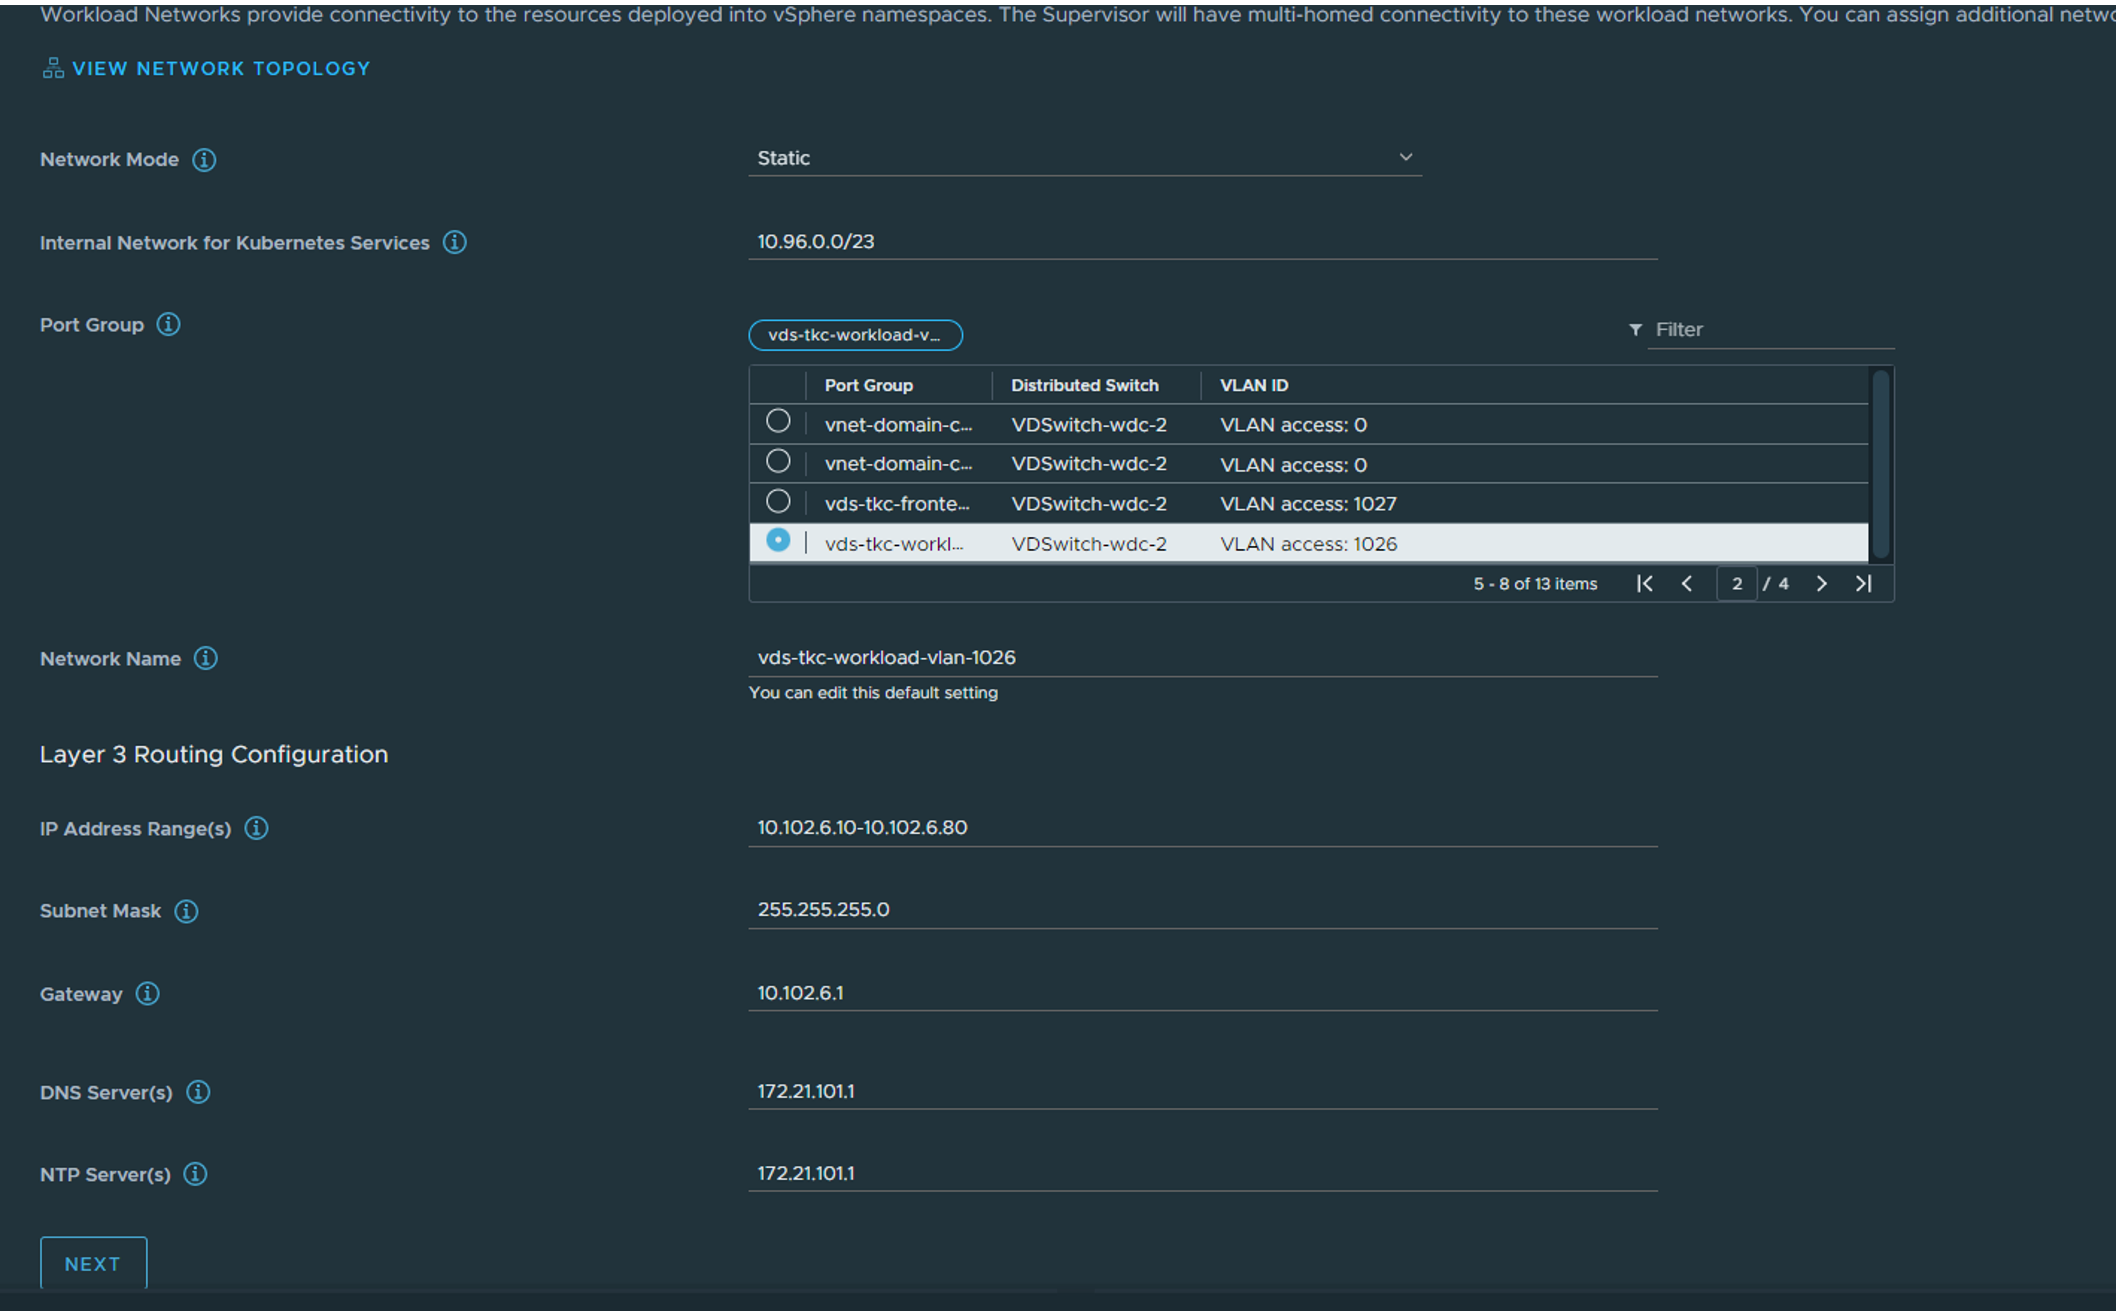
Select the correct vds portgroup for the workload network. The supervisor and the workload nodes will be placed here. Can be static or DHCP. Leave the default “Internal Network for Kubernetes Services”, that is for the internal services (clusterIP etc inside the K8s clusters, they will never be exposed outside). Fill in the necessary config if you go with static. Step 7: Review and Confirm and optionally give the Supervisor endpoint a DNS name which you later can register in your DNS service when we have the L4 IP for the kubernetes API endpoint. Click finish:
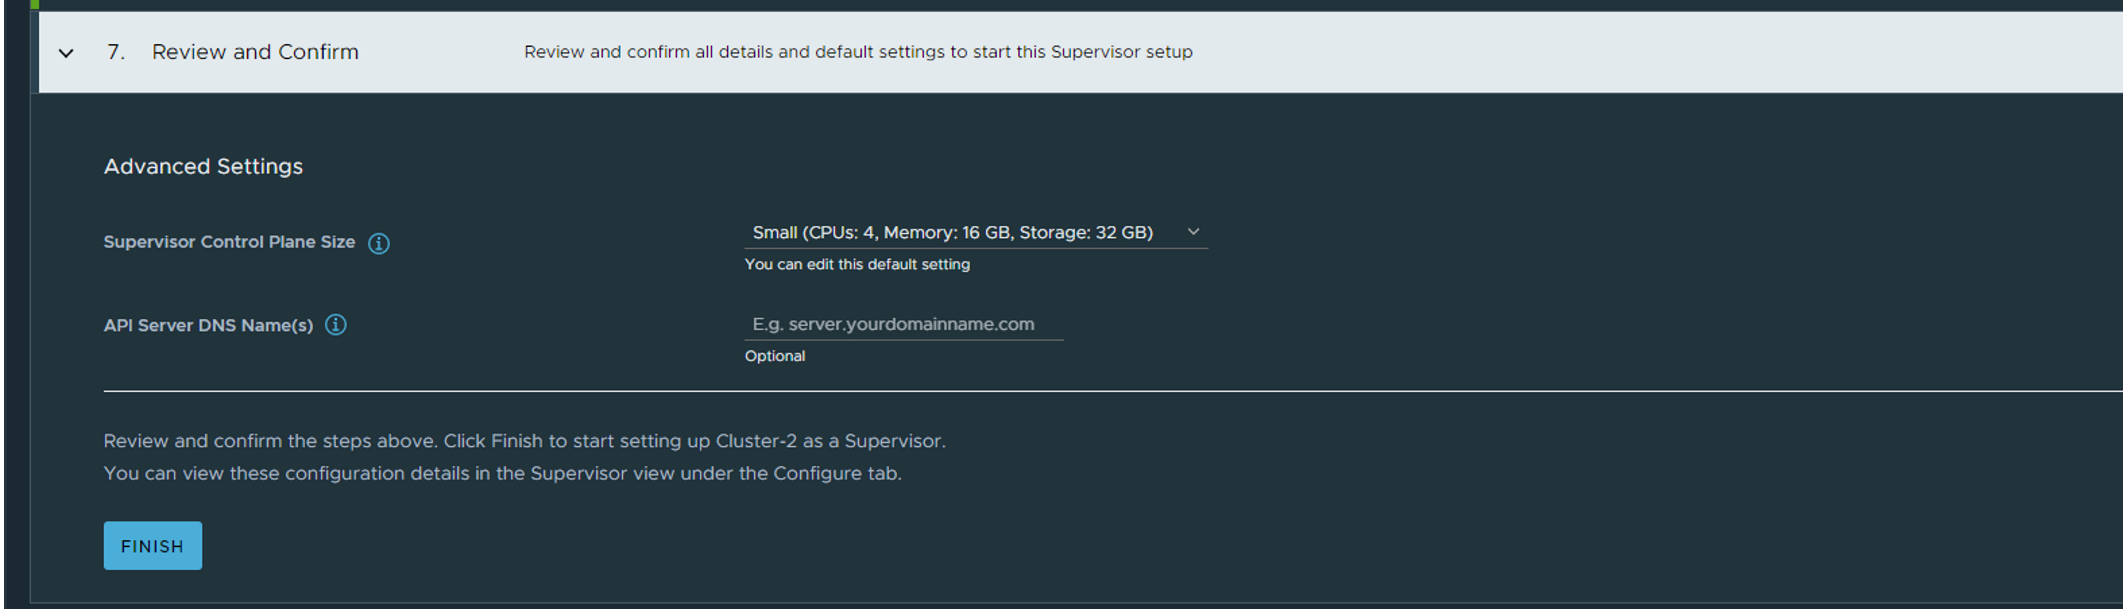
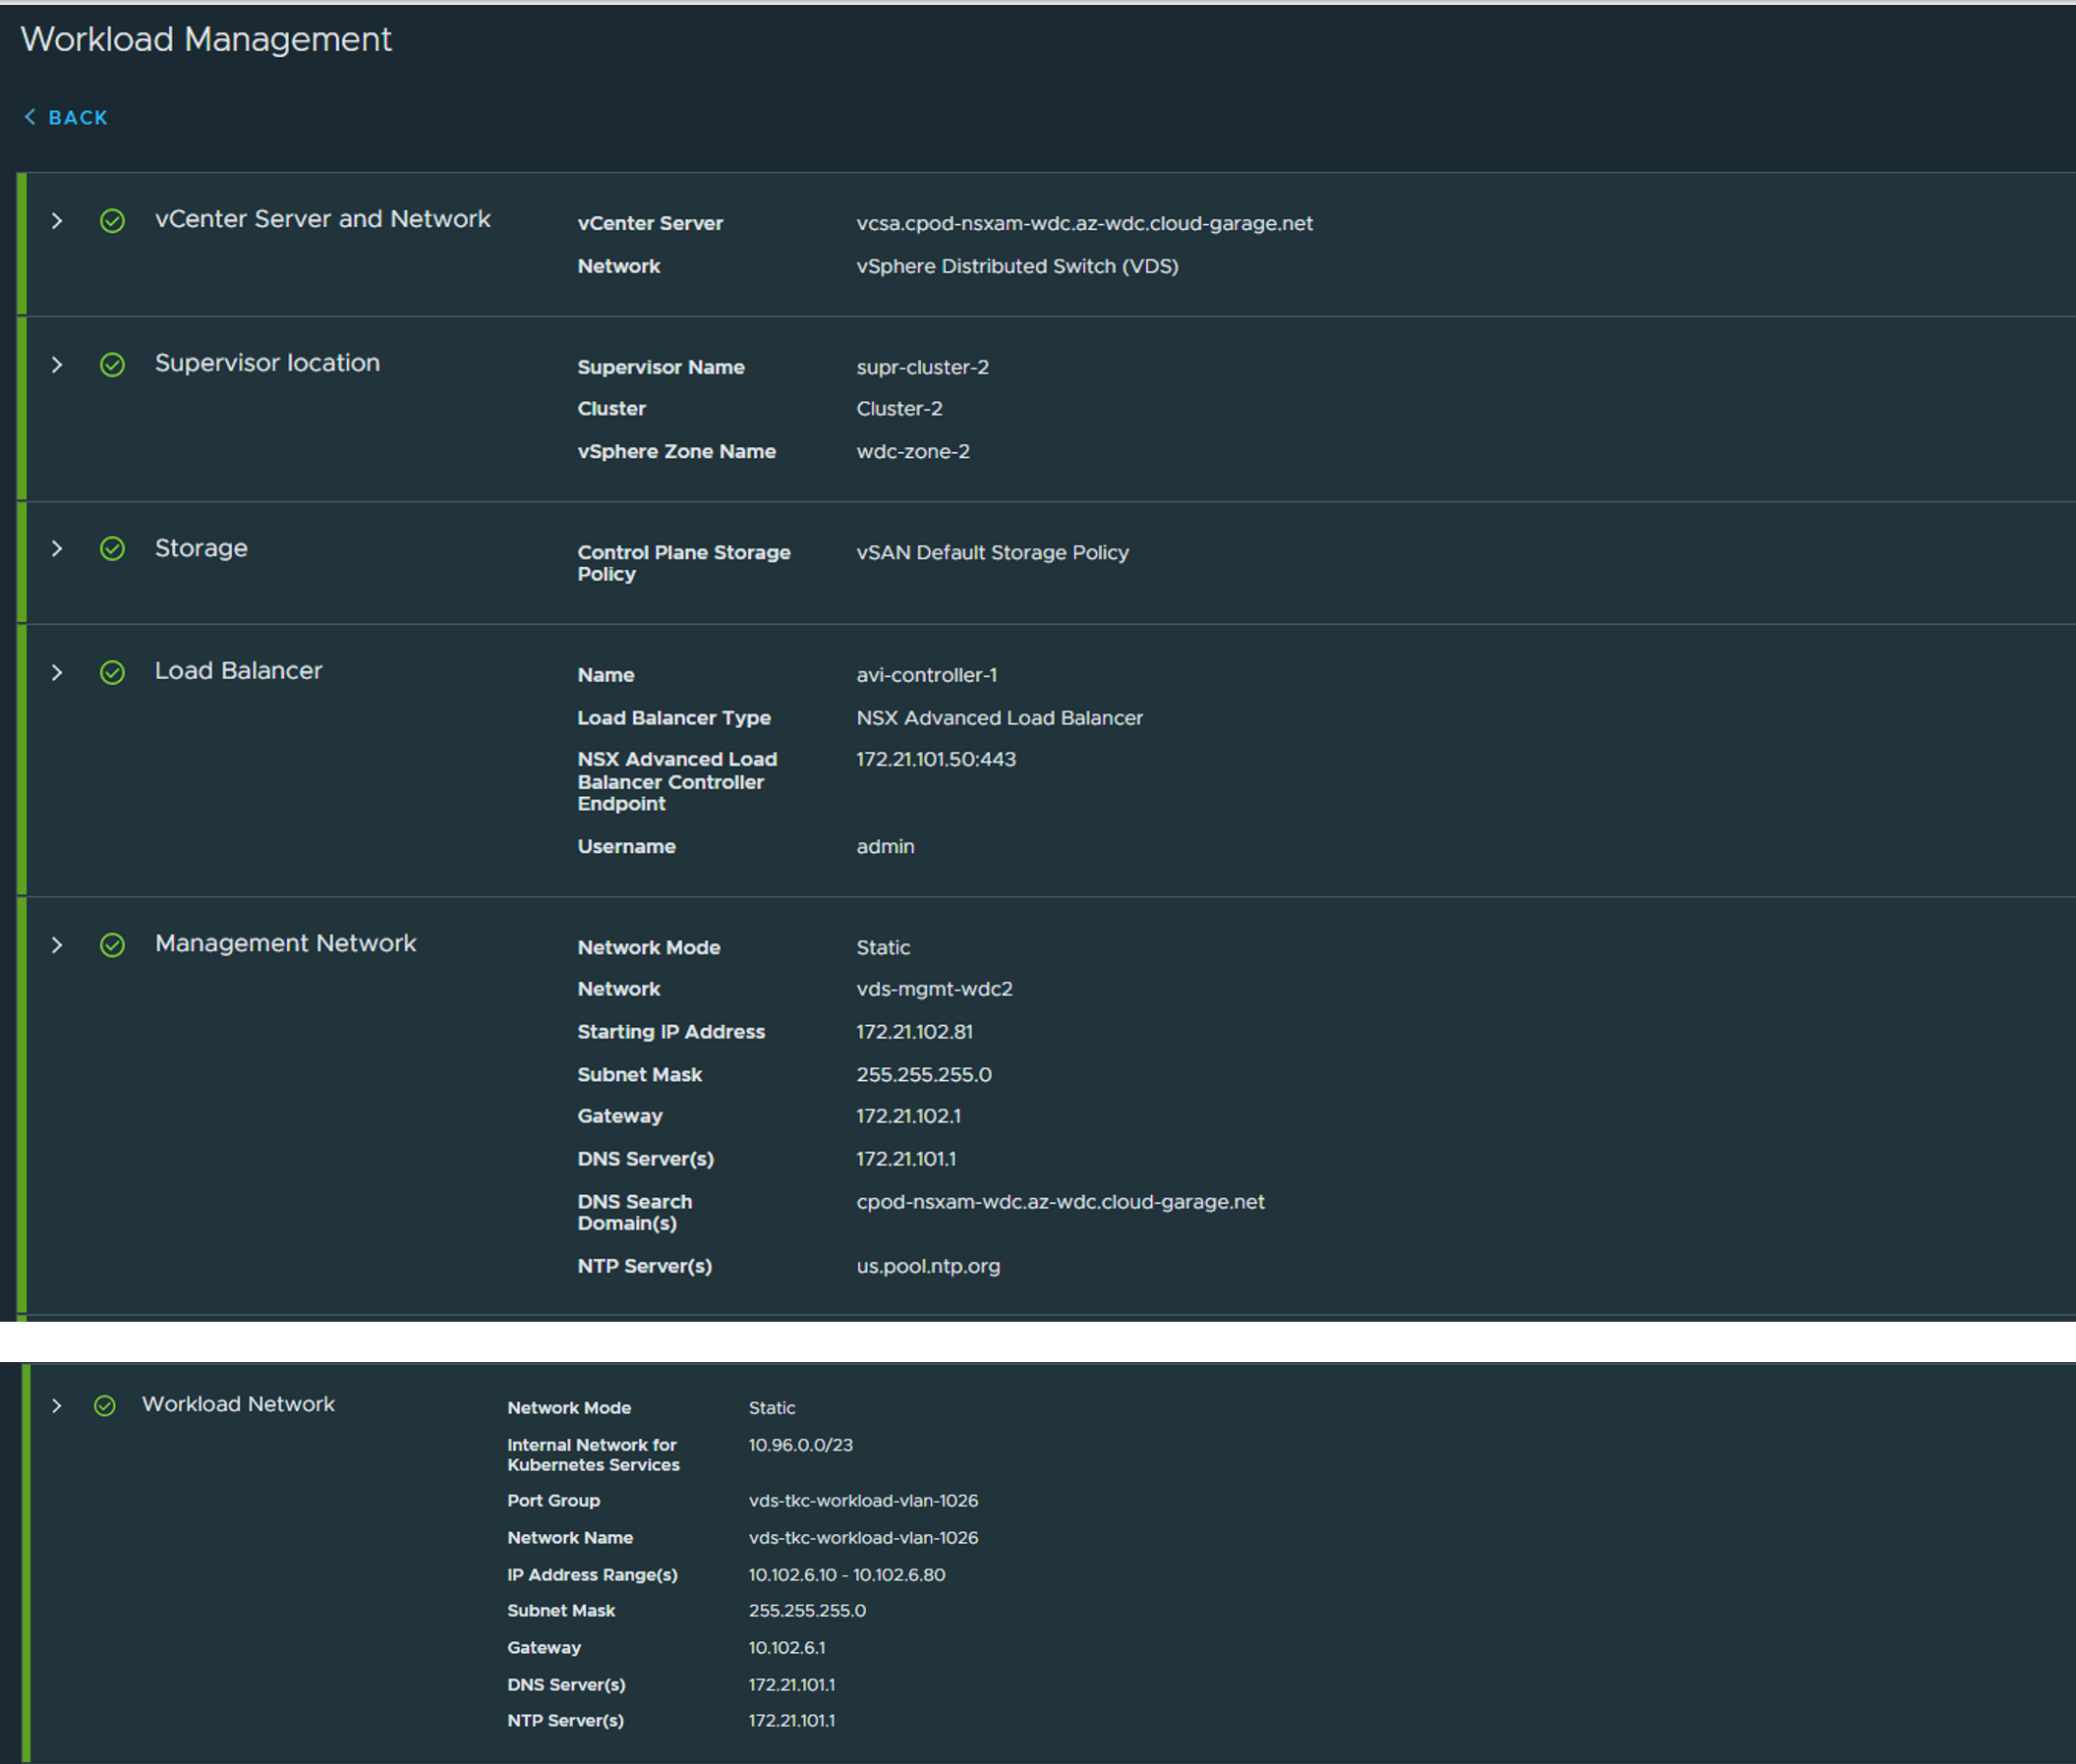
The whole summary:
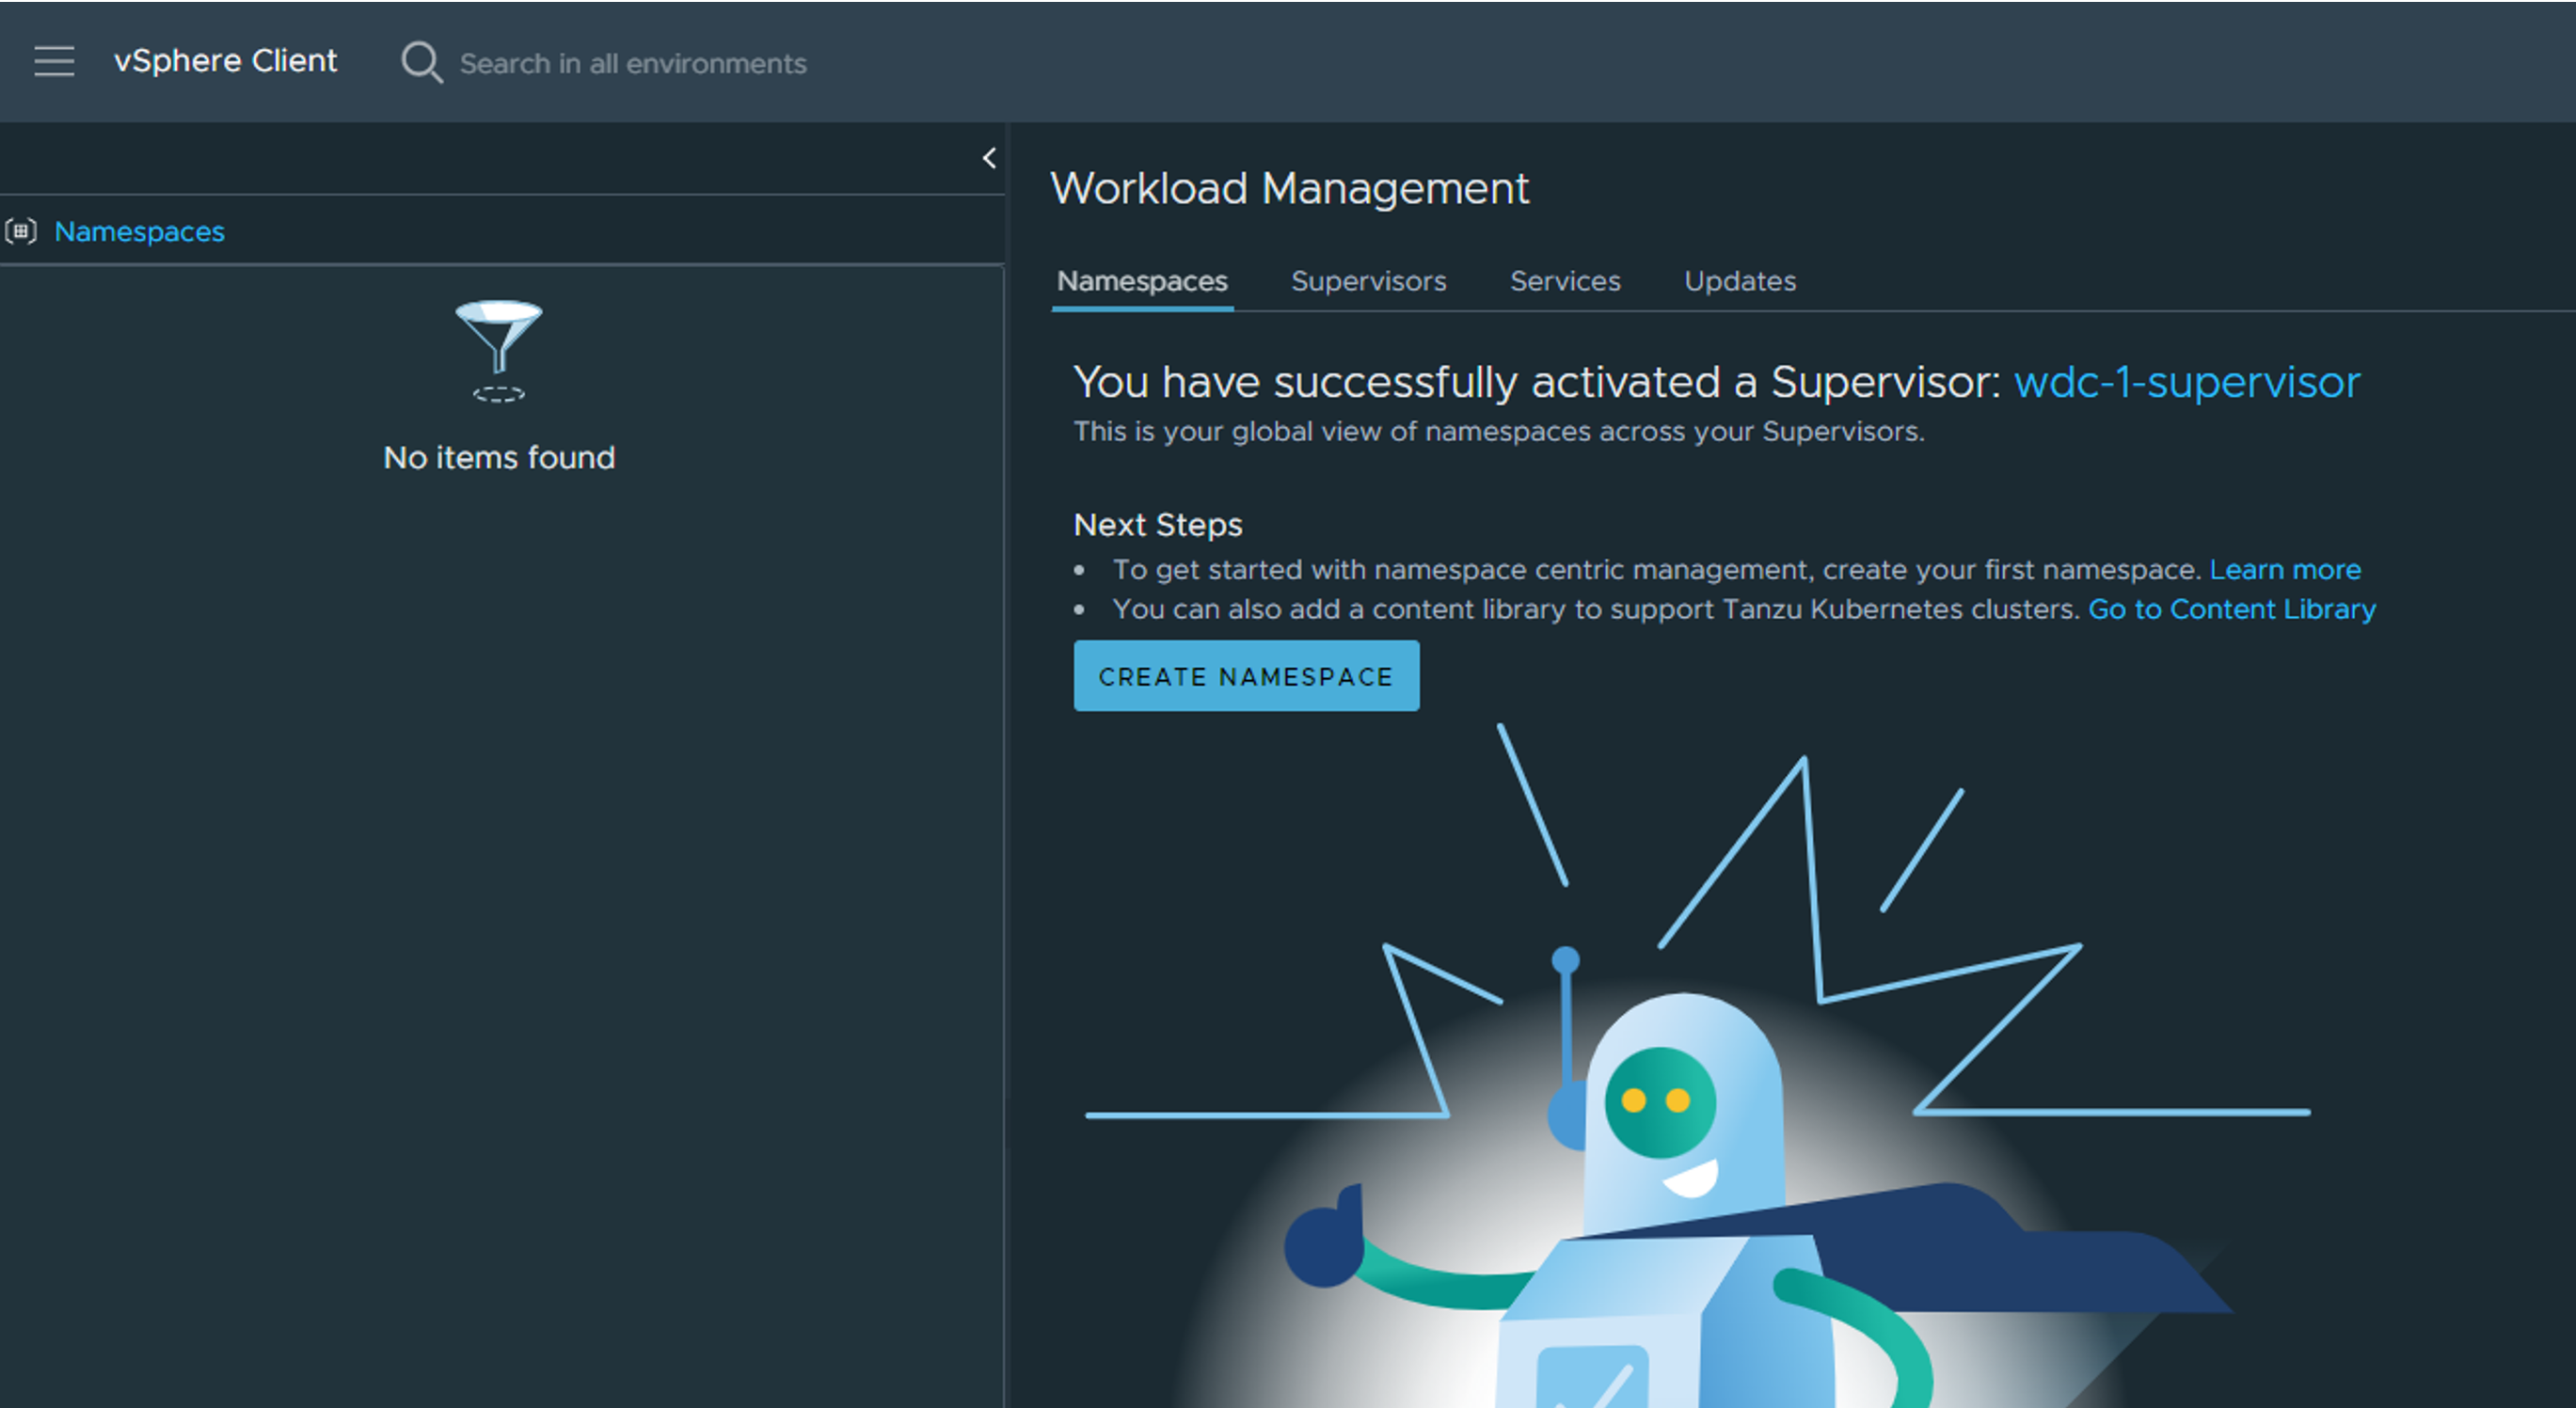
Now sit back and wait for the creation of the supervisor cluster, it can take a couple of minutes.

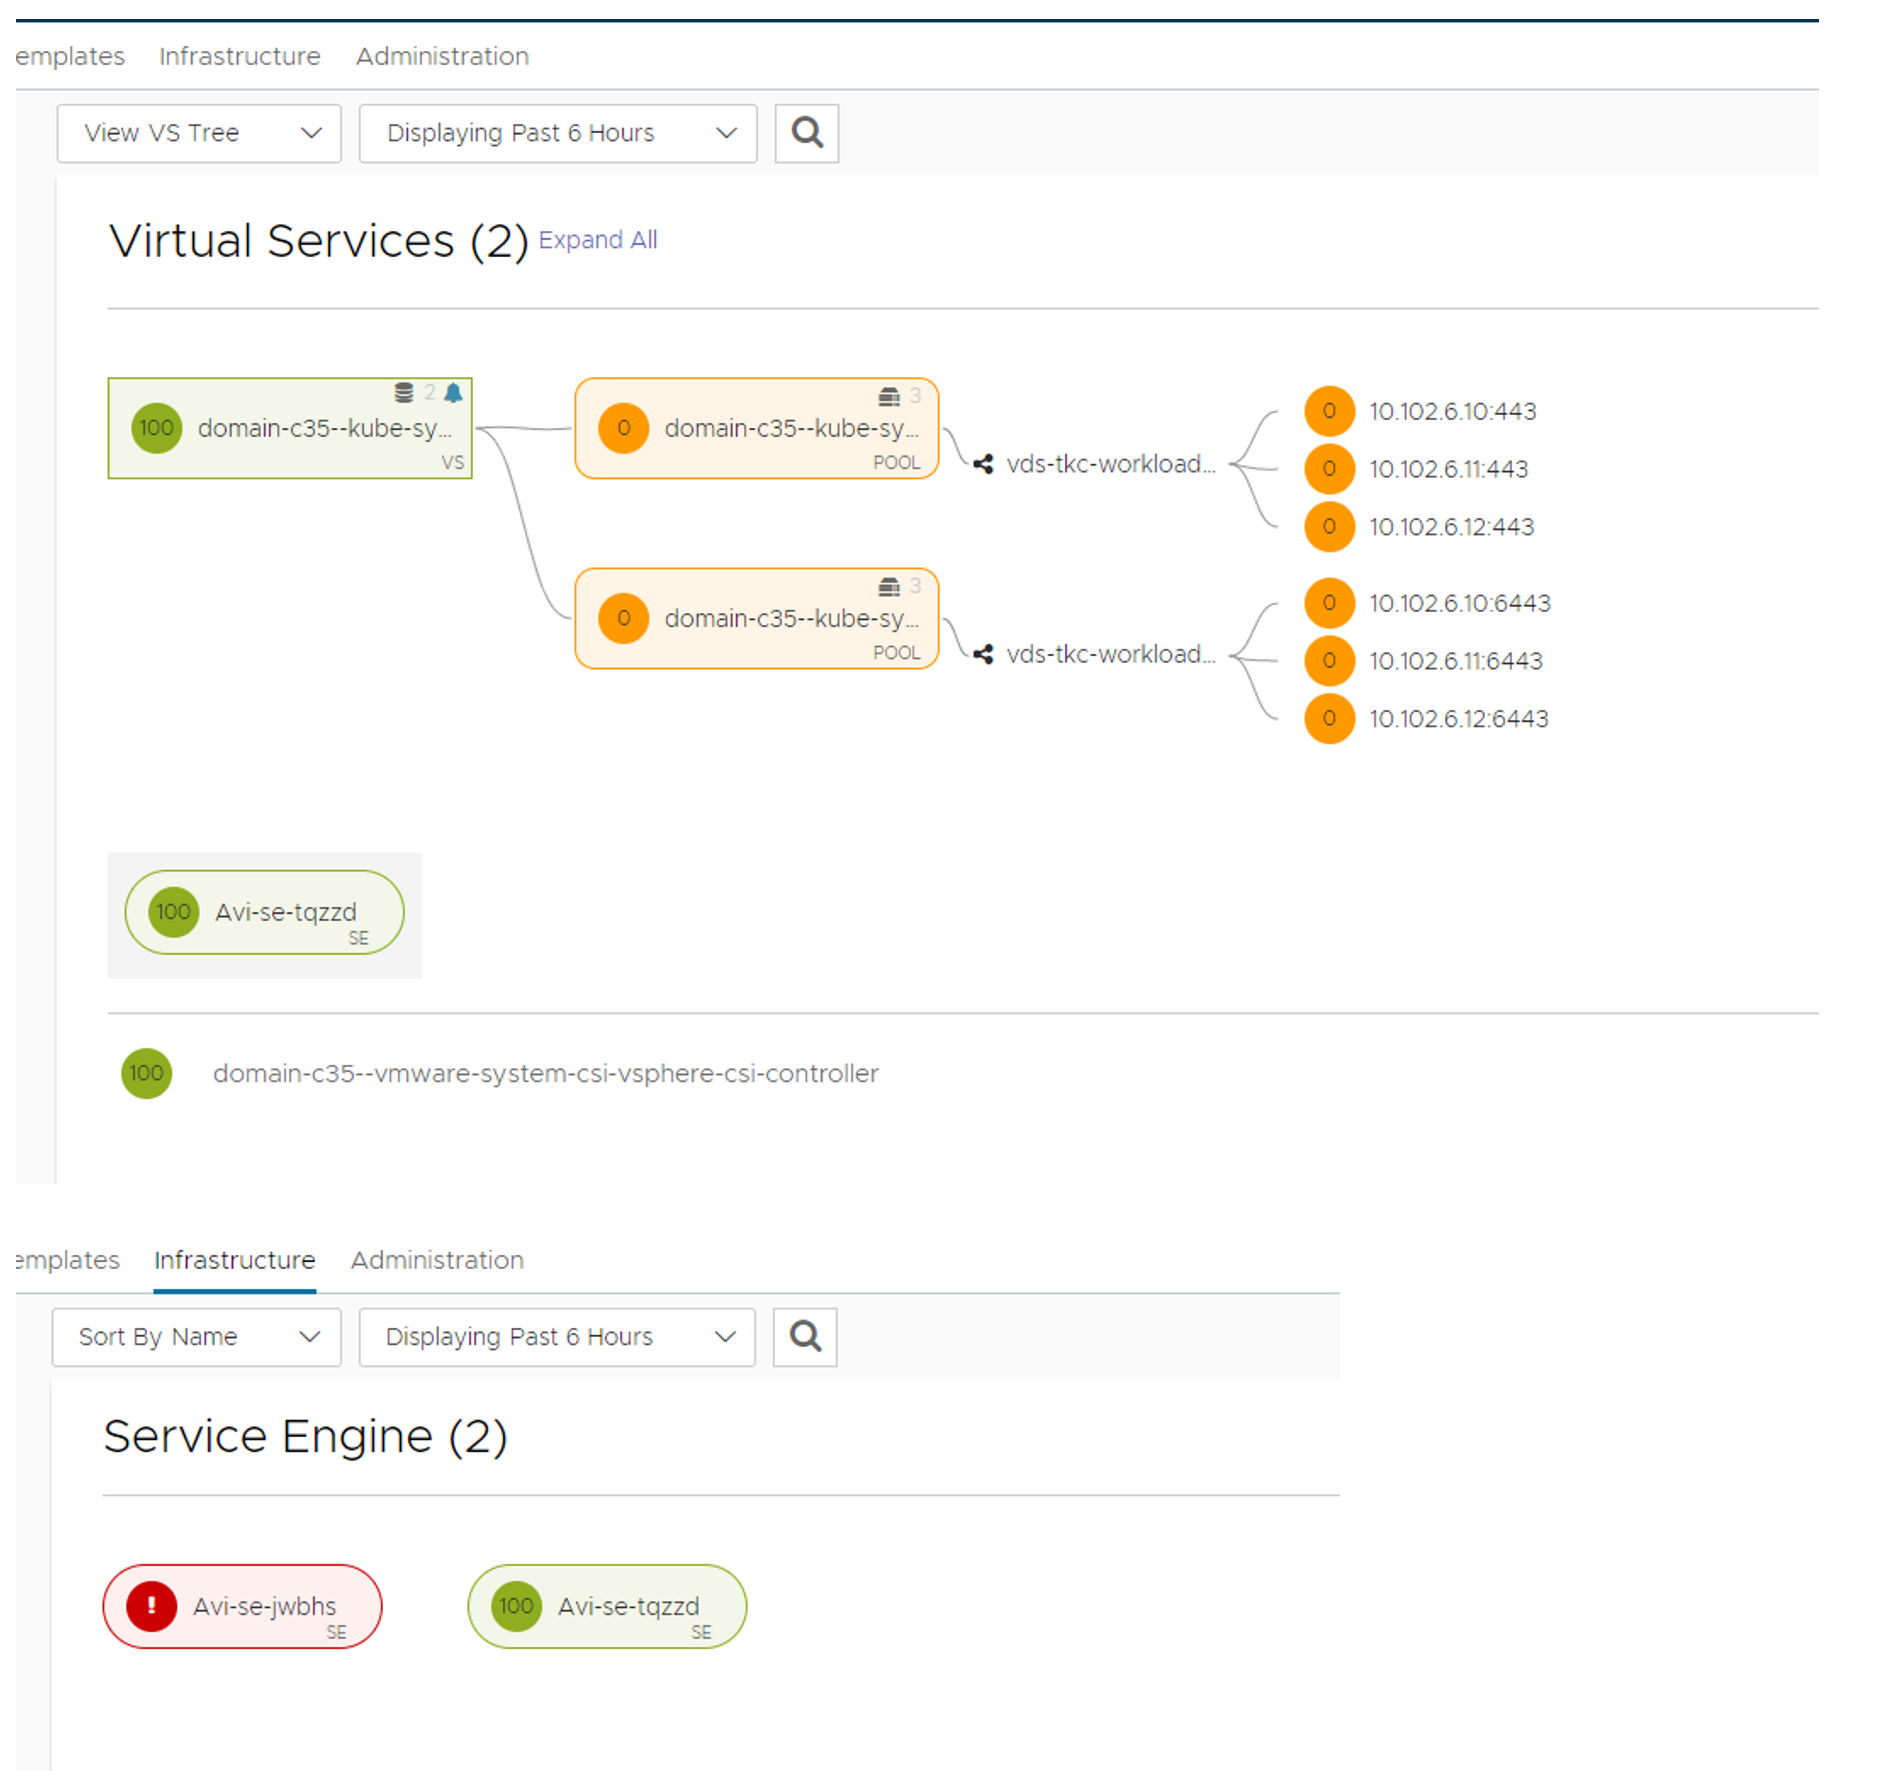
After a while you can take a look in your Avi controller under Applications and see if something is being created there;
You can monitor the process from the Workload management status view by clicking on the “Configuring (View) )”. You can continue work with your vCenter server and go back to this progress bar whenever you want by clicking the hamburger menu Workload management.
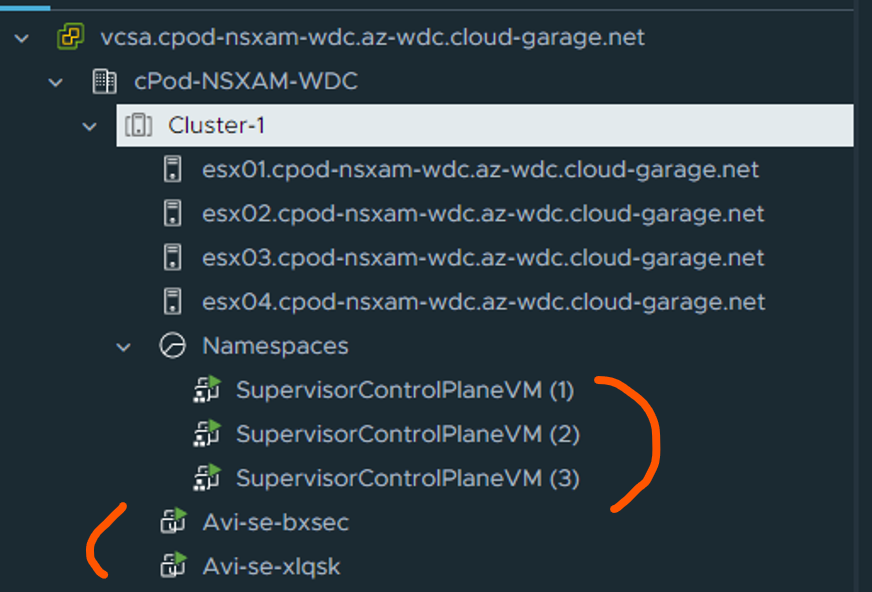
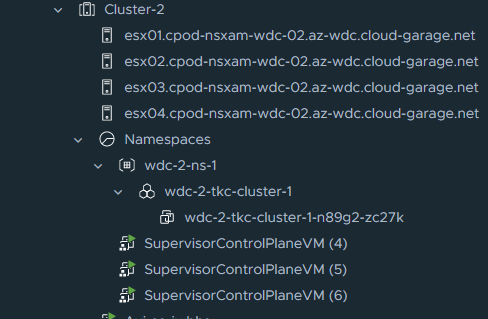
In your vCenter inventory you should also see the Supervisor VMs and Avi SE’s like this:
When its done deploying you will see the green status here:

Notice the Control Plane Node Address, this is our endpoint IP being served by Avi loadbalancer and the one we use to interact with the Supervisor cluster to create workloads etc..
Enter the IP in your browser with https://10.102.7.11 and you should see this page:
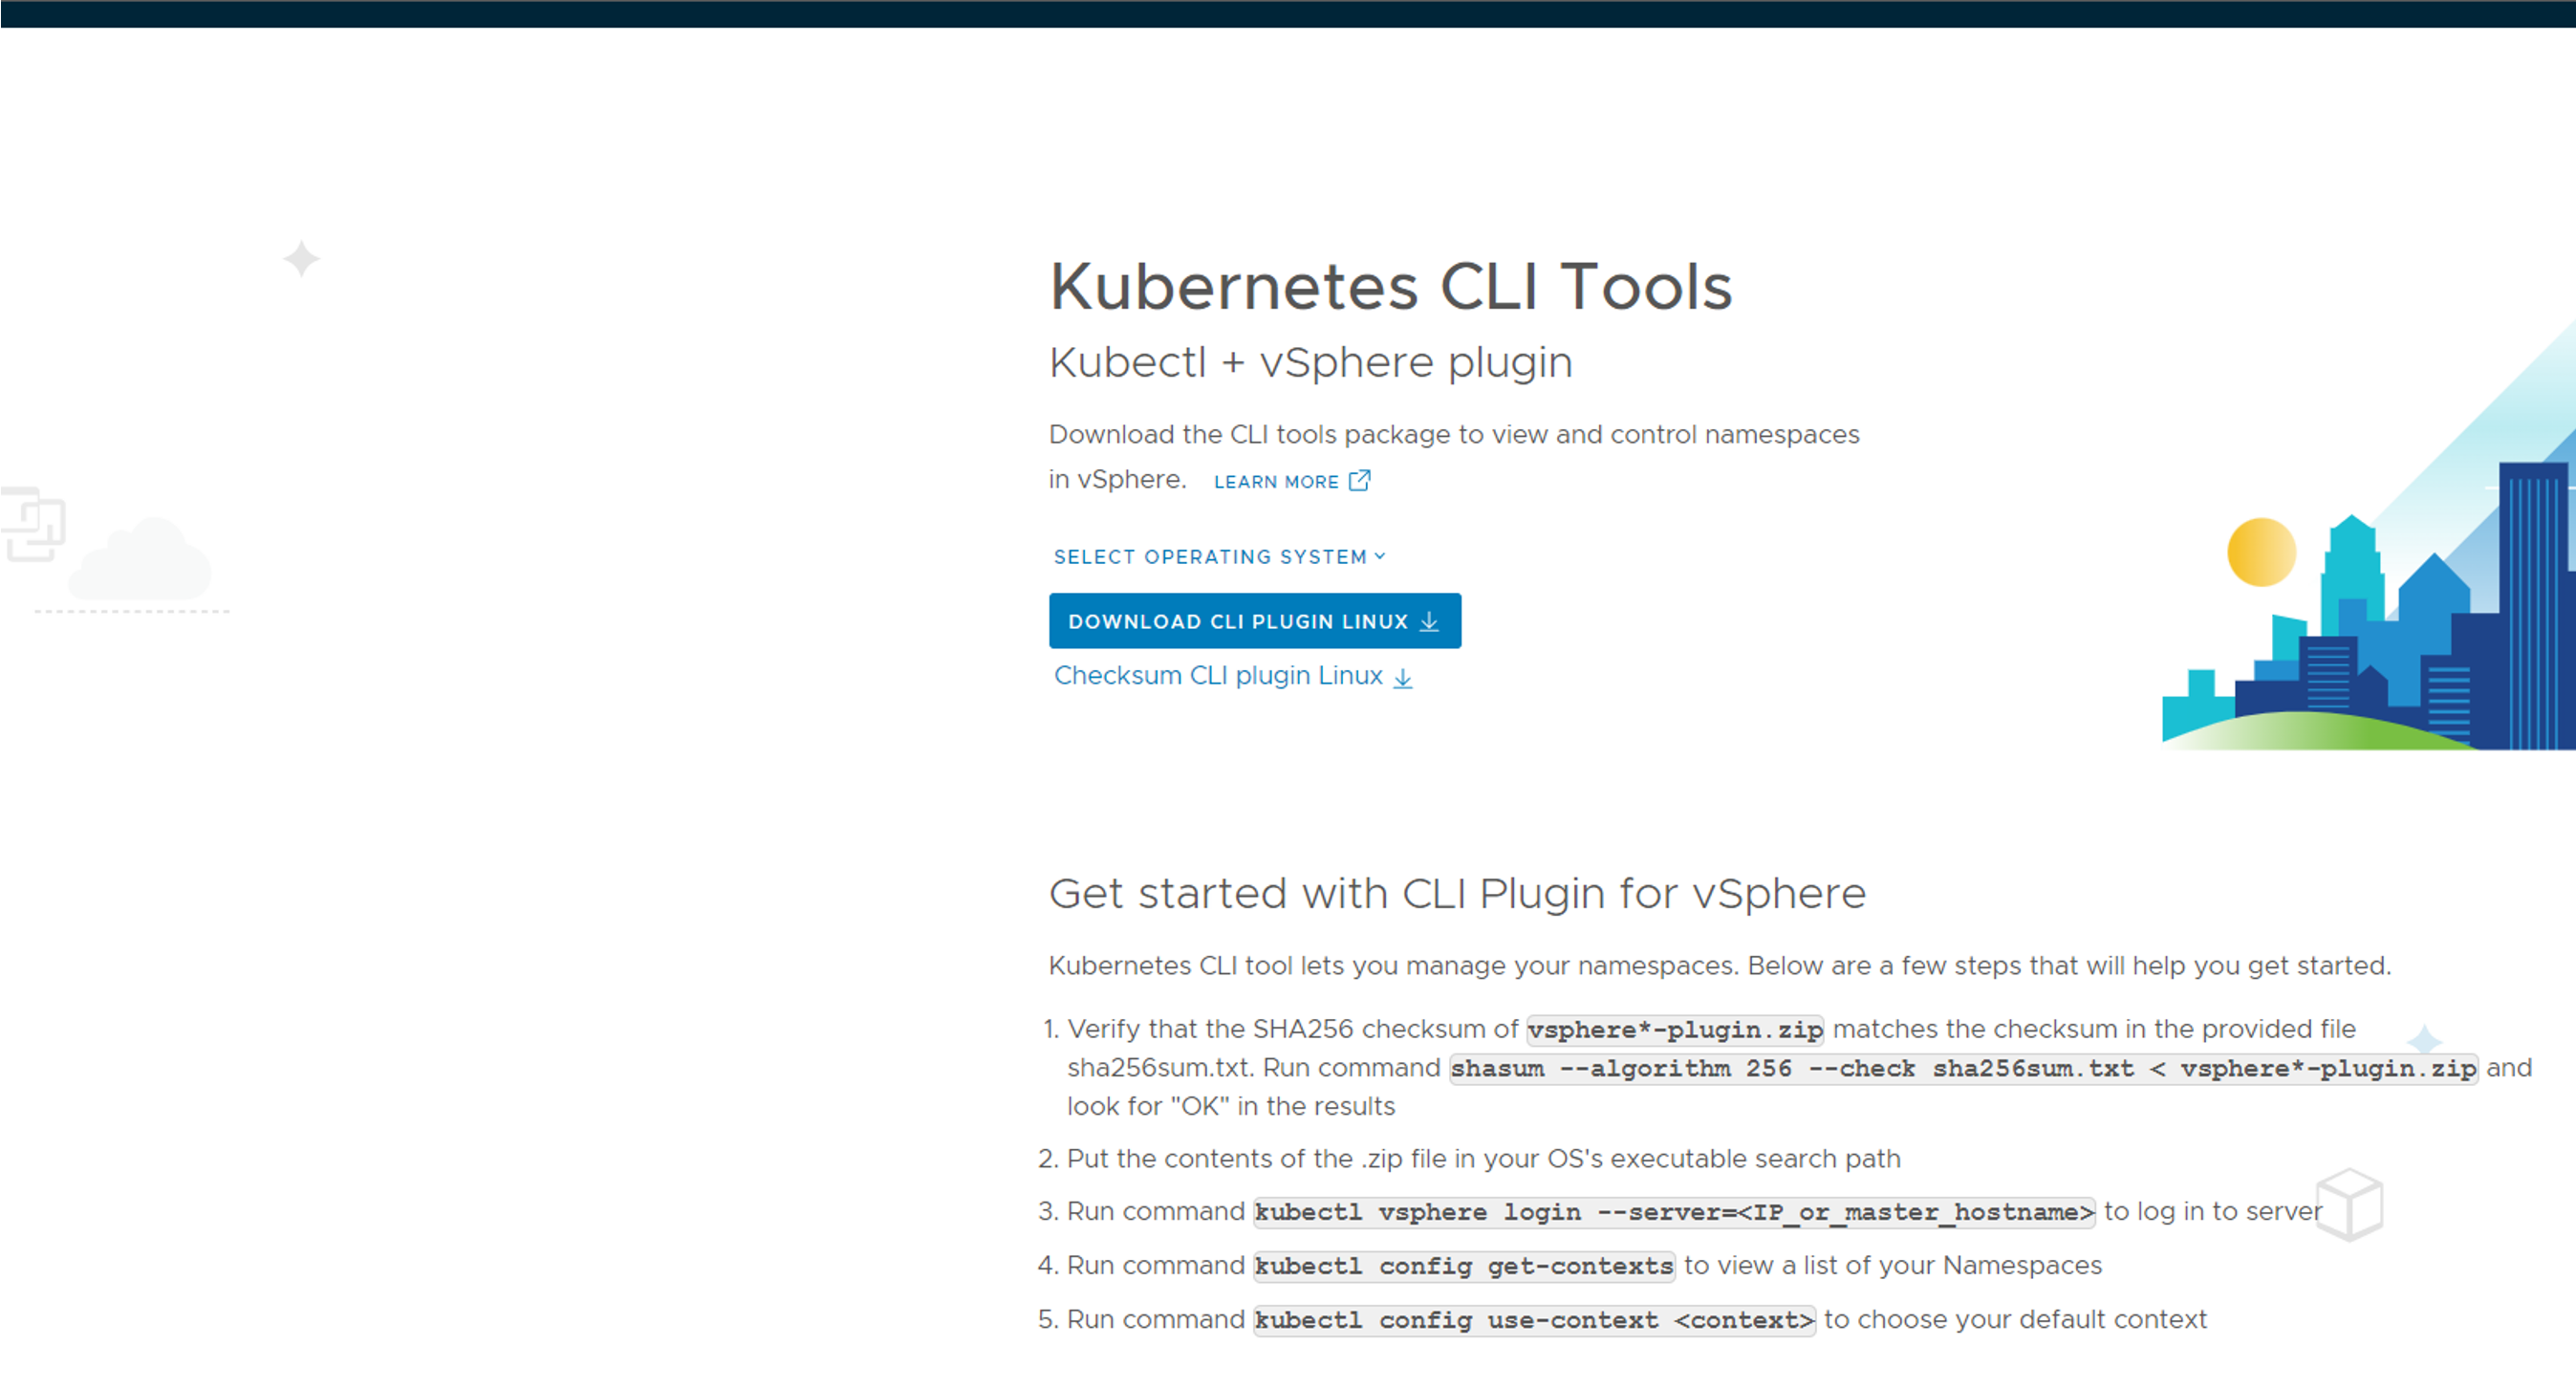
Download the cli tools for your operating system, deploy them so they are in your path. Will use both kubectl and kubectl-vsphere later on Next steps include creating namespace, deploy workload clusters. Lets dive into it.
vSphere Namespace #
vSphere with Tanzu workloads, including vSphere Pods, VMs, and Tanzu Kubernetes clusters, are deployed to a vSphere Namespace. You define a vSphere Namespace on a Supervisor and configure it with resource quota and user permissions. Depending on the DevOps needs and workloads they plan to run, you might also assign storage policies, VM classes, and content libraries for fetching the latest Tanzu Kubernetes releases and VM images. source
Create a vSphere namespace #
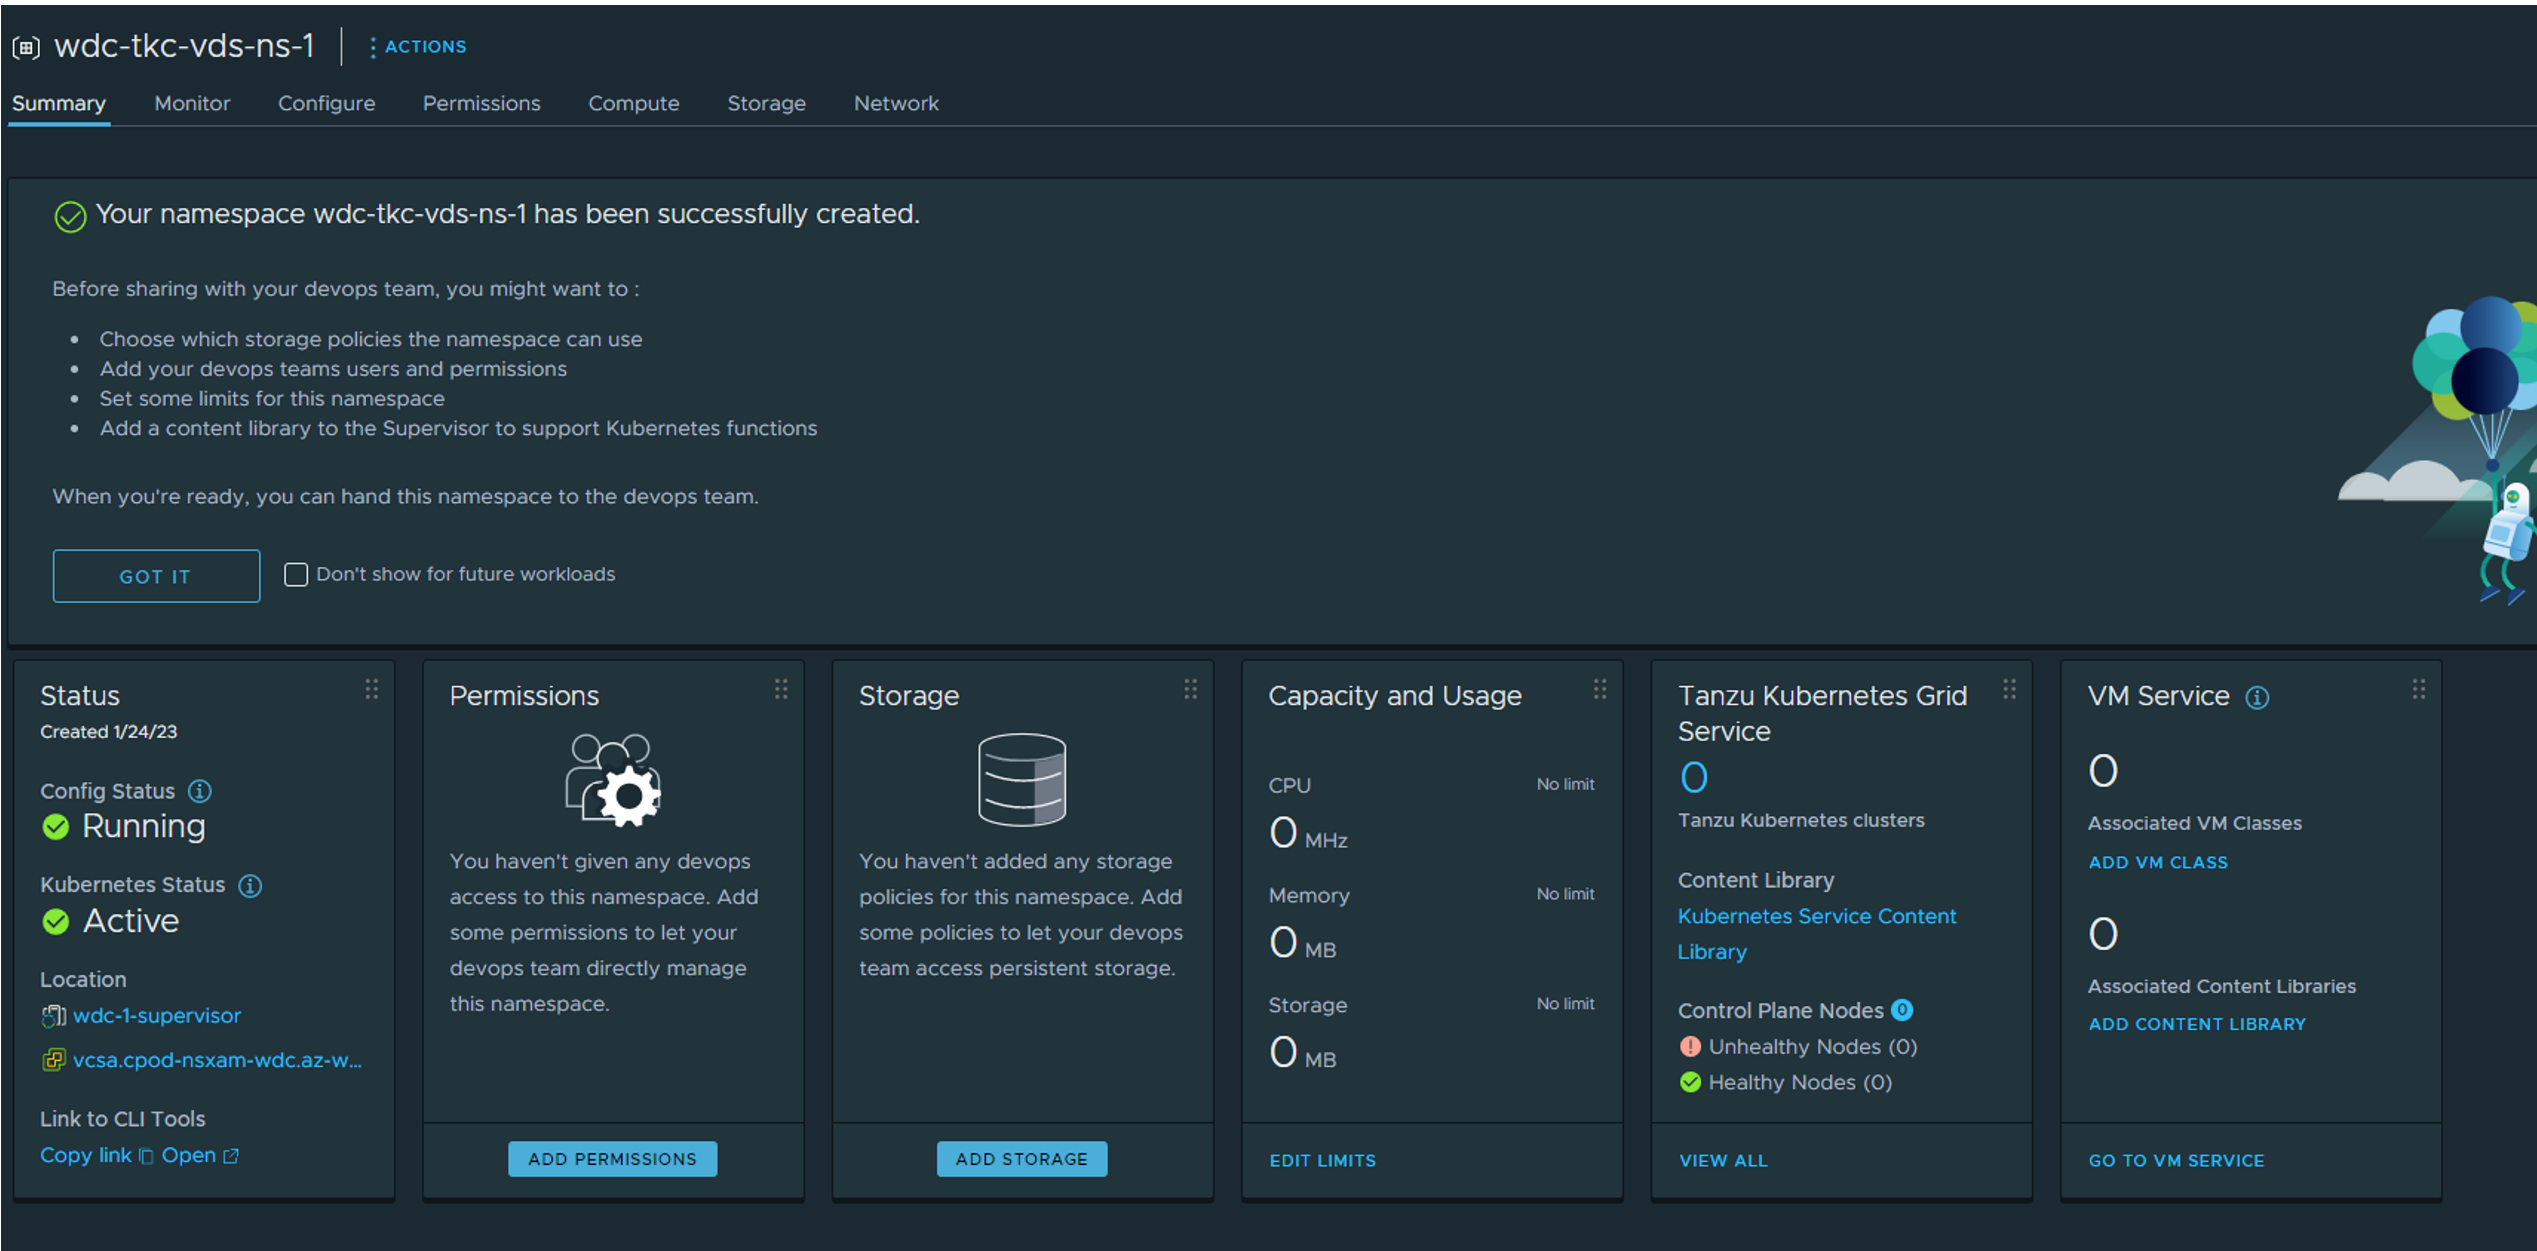
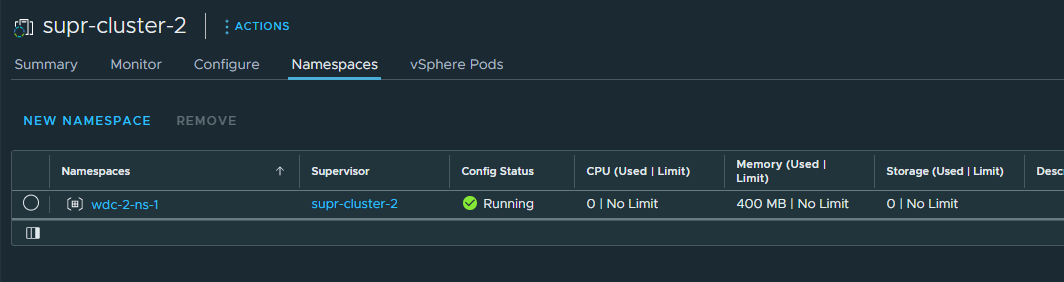
Now that the Supervisor cluster is ready and running head back to your vCenter and create a vSphere namespace.
Click create namespace (above) the select the supervisor to create the namespace on, and give your namespace a name then select the “workload network” you have defined for your workload placement.
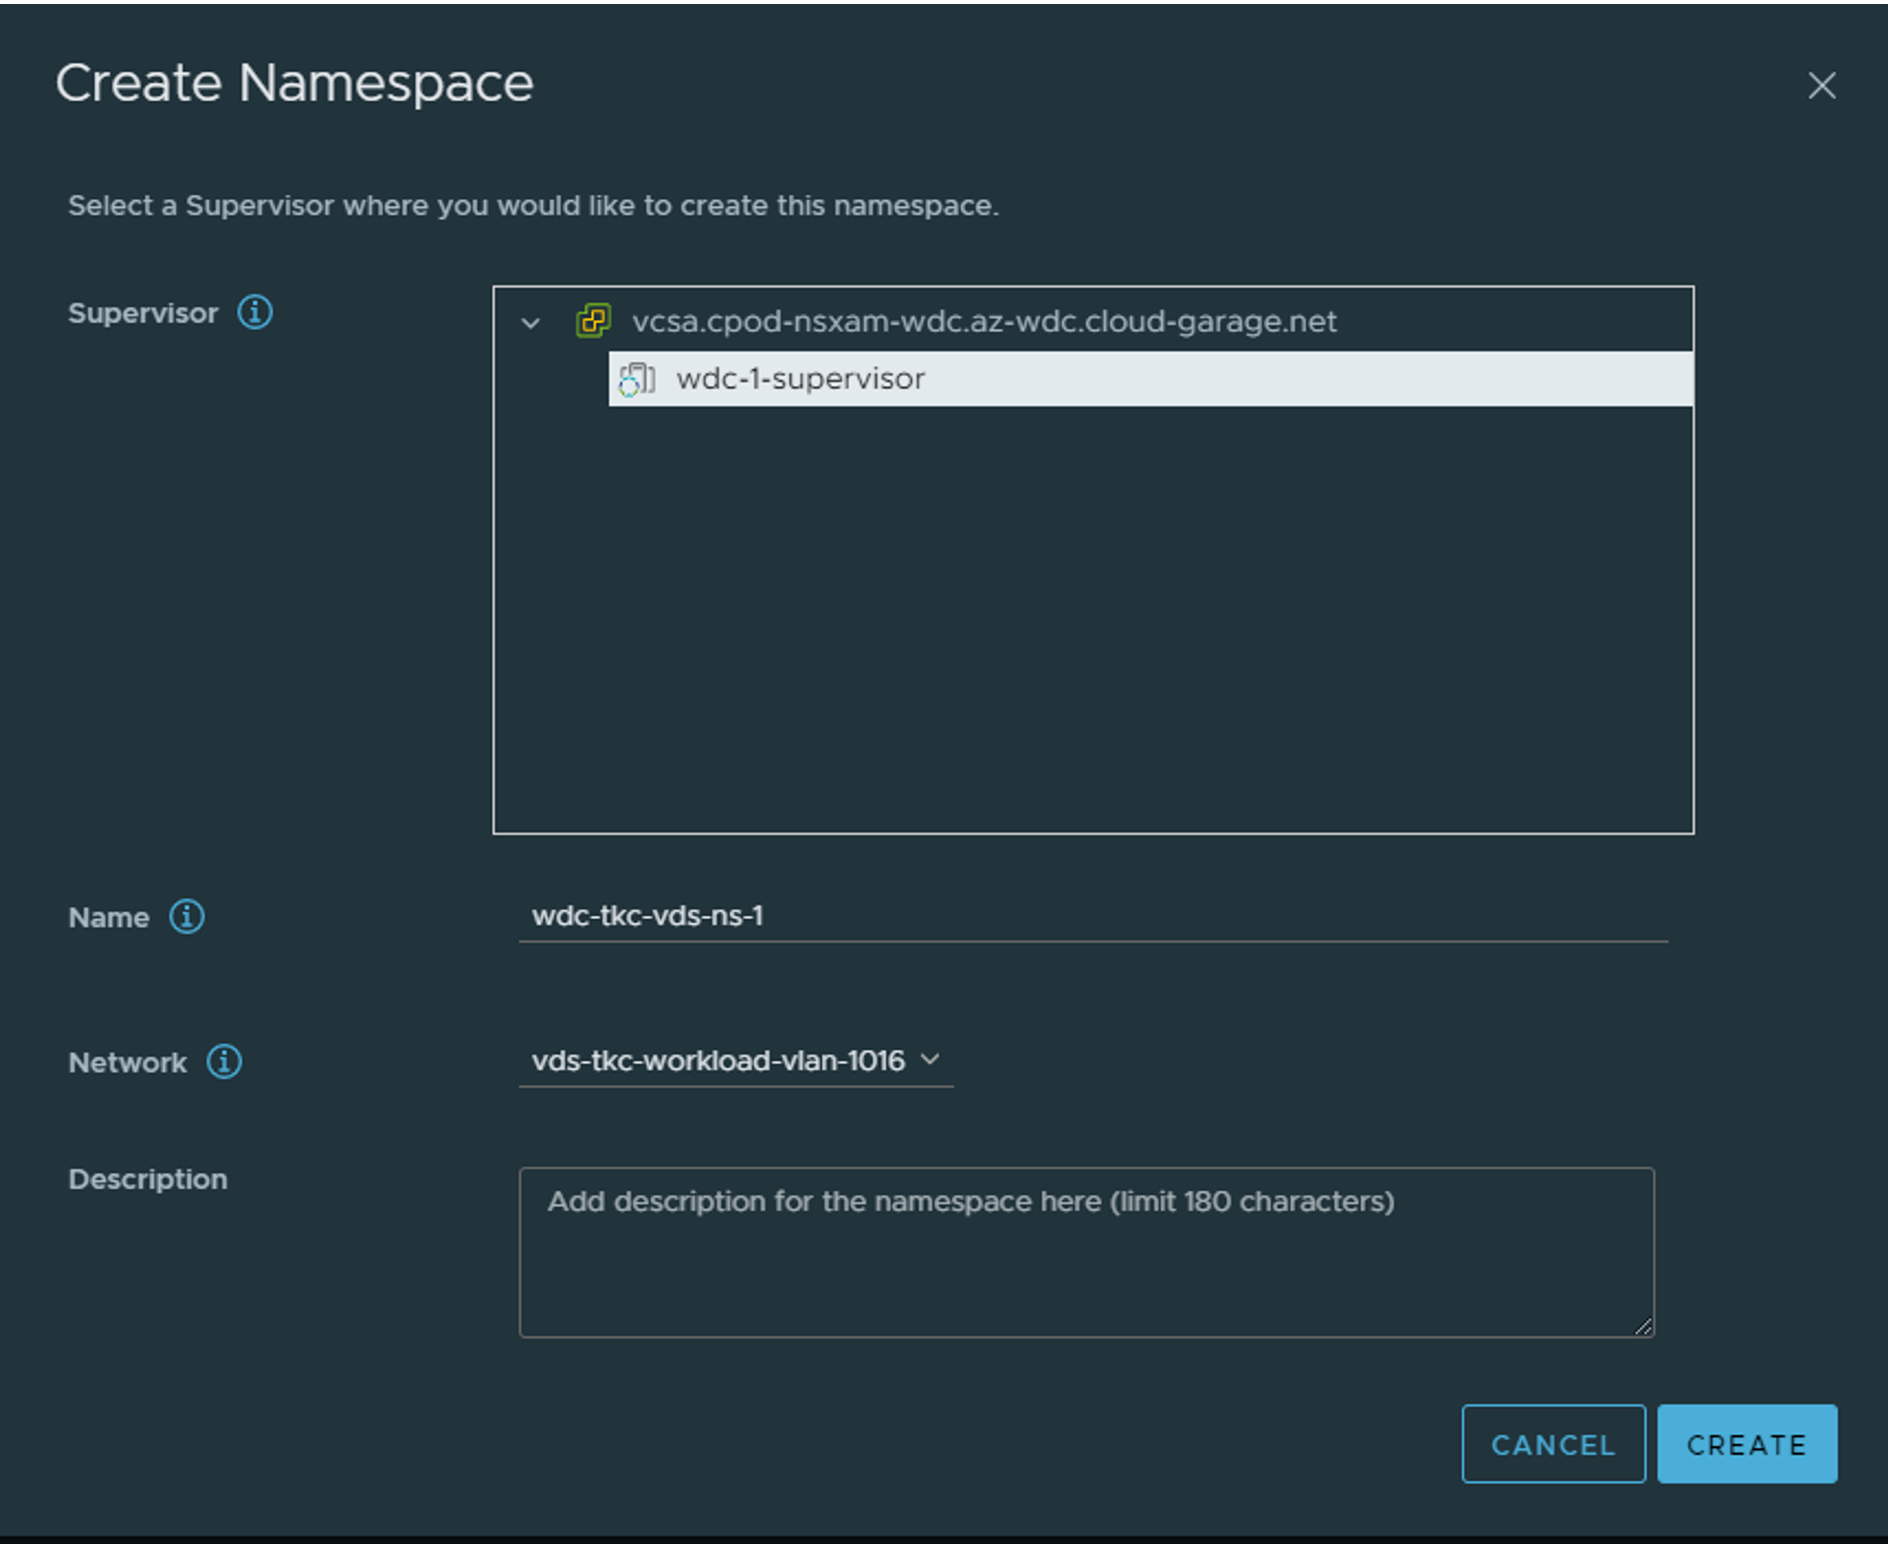
Now the namespace is being created.
Add additional workload networks #
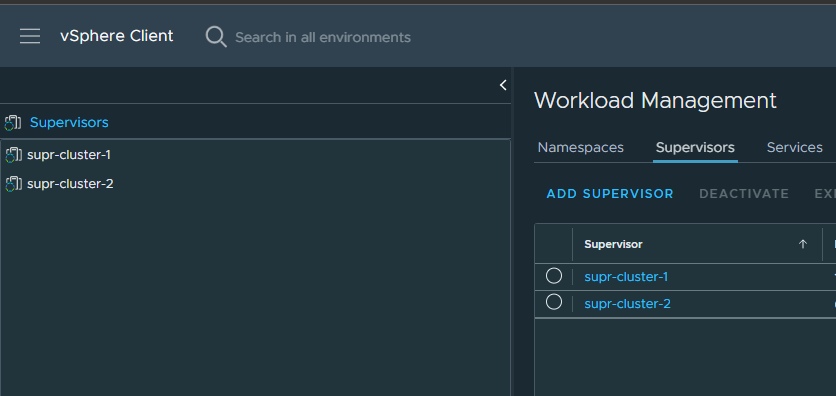
Sidenote there is also possible to add more “workload networks” after the Supervisor has been configured under Supervisor config if you want to add more “workload networks” for separation etc. To do that head over to Workload Management in vCenter:
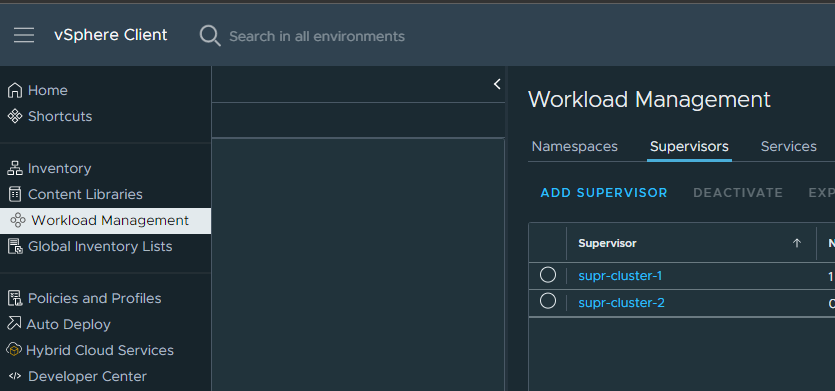
Then select the supervisor tab:
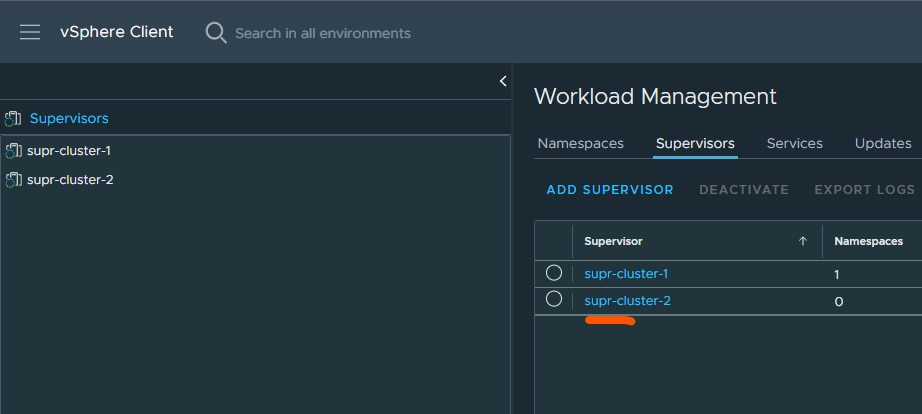
Click on your supervisor cluster here:
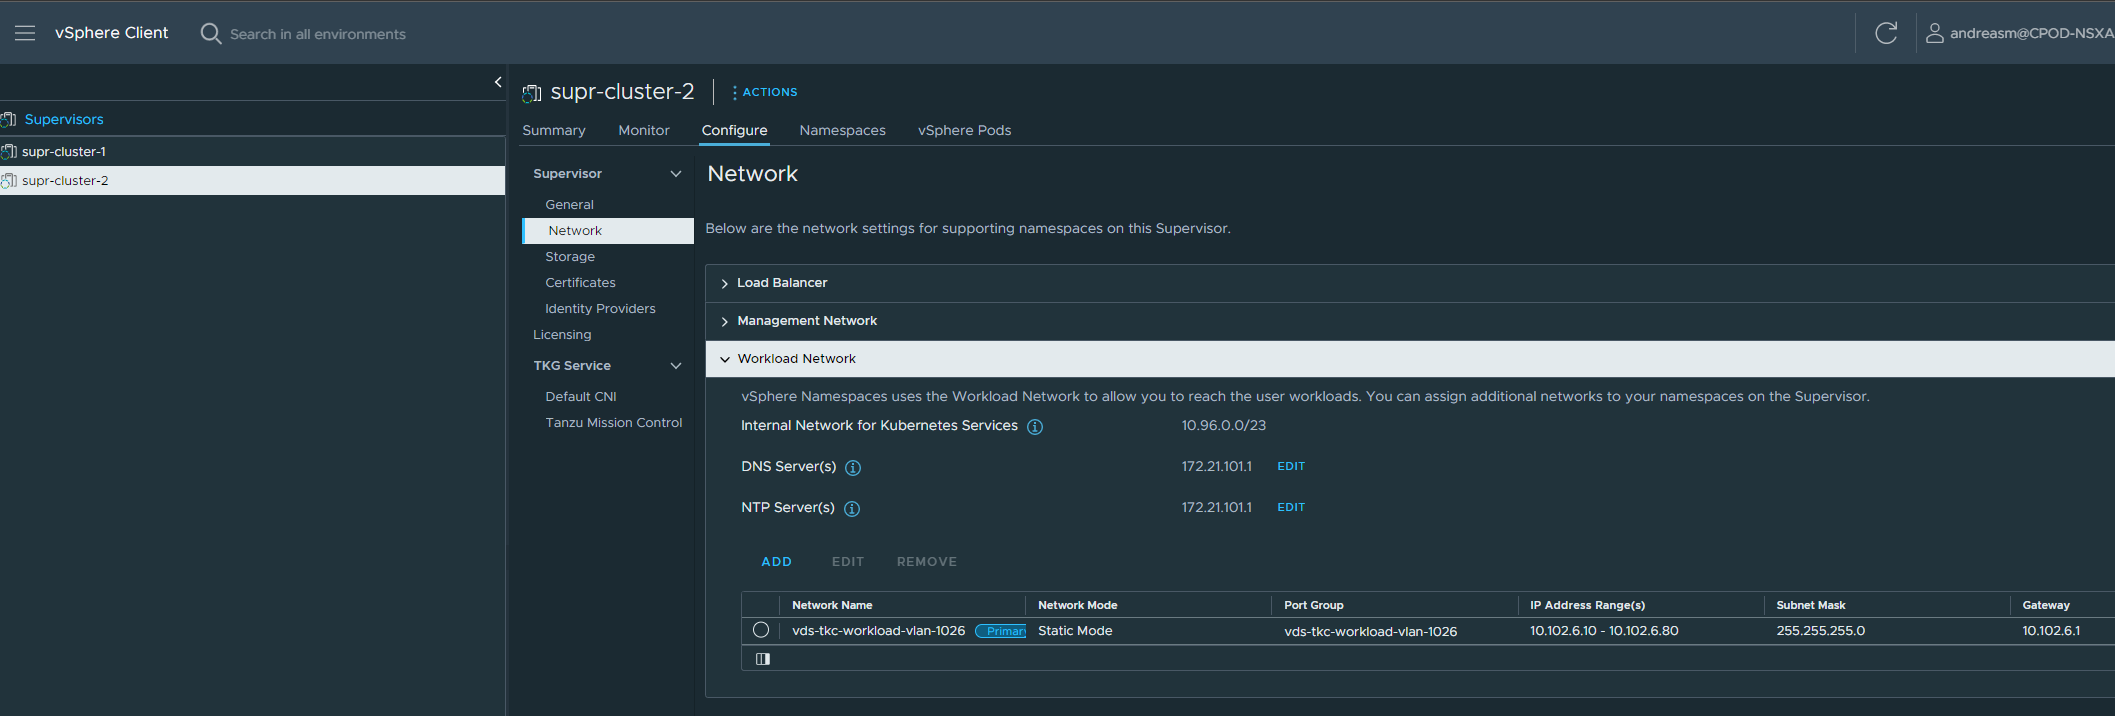
Then click the configure tab and go to network and add your additional workload network:
After your namespace has been created we need to configure it with access permissions, datastores, content library and vmclasses:
Create workload cluster #
Afte the vSphere Namespace has been configured its time to deploy a workload cluster/TKC cluster (Tanzu Kubernetes Cluster cluster 😄 ). From your workstation/jumphost where you downloaded the cli tools login in to the supervisor with access rights to the Supervisor API. (administrator@vsphere.local will have access).
Custom role in vCenter #
I created a specific role in my vCenter with these privileges:
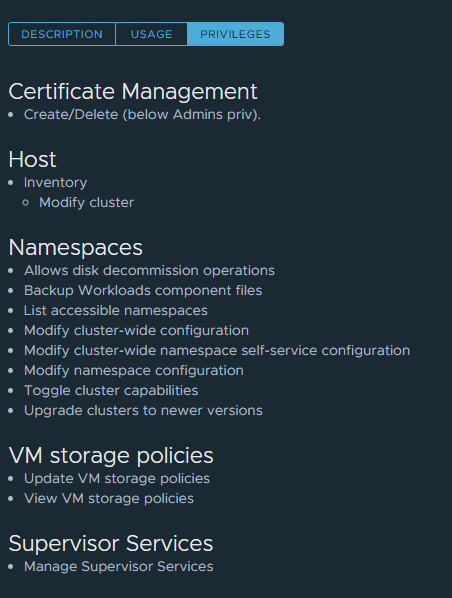
Added my “supervisor-manager” user in this role as global and in the top tree of my vCenter with inheritance. Also added it as “editor” in my wdc-2-ns-1 vSphere Namespace.
kubectl vsphere login --server=10.102.7.11 --insecure-skip-tls-verify --vsphere-username=supervisor-manager@cpod-nsxam-wdc.az-wdc.cloud-garage.net
When your are logged in it will give you this output and also put the kubernetes config in your ~/.kube/config file.
andreasm@linuxvm01:~$ kubectl vsphere login --server=10.102.7.11 --insecure-skip-tls-verify --vsphere-username=supervisor-manager@cpod-nsxam-wdc.az-wdc.cloud-garage.net


KUBECTL_VSPHERE_PASSWORD environment variable is not set. Please enter the password below
Password:
Logged in successfully.

You have access to the following contexts:
   10.102.7.11
   wdc-2-ns-1

If the context you wish to use is not in this list, you may need to try
logging in again later, or contact your cluster administrator.

To change context, use `kubectl config use-context <workload name>`
When you are logged in prepare your yaml for your first workload cluster and apply it with kubectl apply -f nameof.yaml
Example:
apiVersion: cluster.x-k8s.io/v1beta1
kind: Cluster
metadata:
  name: wdc-2-tkc-cluster-1  # give your tkc cluster a name
  namespace: wdc-2-ns-1 # remember to put it in your defined vSphere Namespace
spec:
  clusterNetwork:
    services:
      cidrBlocks: ["20.10.0.0/16"]
    pods:
      cidrBlocks: ["20.20.0.0/16"]
    serviceDomain: "cluster.local"
  topology:
    class: tanzukubernetescluster
    version: v1.23.8---vmware.2-tkg.2-zshippable
    controlPlane:
      replicas: 1
      metadata:
        annotations:
          run.tanzu.vmware.com/resolve-os-image: os-name=ubuntu
    workers:
      machineDeployments:
        - class: node-pool
          name: node-pool-01
          replicas: 3
          metadata:
            annotations:
              run.tanzu.vmware.com/resolve-os-image: os-name=ubuntu
    variables:
      - name: vmClass
        value: best-effort-medium
      - name: storageClass
        value: vsan-default-storage-policy
As soon as I apply the above yaml it will deploy the corresponding tkc cluster in your vsphere environment:
Sit back and enjoy while your tkc cluster is being created for you. We can check the status in the vCenter gui:
or via kubectl:
andreasm@linuxvm01:~/tkc-wdc-01-vds$ k get cluster -n wdc-2-ns-1
NAME                  PHASE         AGE   VERSION
wdc-2-tkc-cluster-1   Provisioned   12m   v1.23.8+vmware.2
It is ready, now we need to log into it:
andreasm@linuxvm01:~/tkc-wdc-01-vds$ kubectl vsphere login --server=10.102.7.11 --insecure-skip-tls-verify --vsphere-username=supervisor-manager@cpod-nsxam-wdc.az-wdc.cloud-garage.net --tanzu-kubernetes-cluster-name=wdc-2-tkc-cluster-1 --tanzu-kubernetes-cluster-namespace=wdc-2-ns-1


KUBECTL_VSPHERE_PASSWORD environment variable is not set. Please enter the password below
Password:
Logged in successfully.

You have access to the following contexts:
   10.102.7.11
   wdc-2-ns-1
   wdc-2-tkc-cluster-1

If the context you wish to use is not in this list, you may need to try
logging in again later, or contact your cluster administrator.

To change context, use `kubectl config use-context <workload name>`
Check if you are able to list ns and pods:
andreasm@linuxvm01:~/tkc-wdc-01-vds$ k get pods -A
NAMESPACE                      NAME                                                                      READY   STATUS    RESTARTS        AGE
kube-system                    antrea-agent-77drs                                                        2/2     Running   0               8m35s
kube-system                    antrea-agent-j482r                                                        2/2     Running   0               8m34s
kube-system                    antrea-agent-thh5b                                                        2/2     Running   0               8m35s
kube-system                    antrea-agent-tz4fb                                                        2/2     Running   0               8m35s
kube-system                    antrea-controller-575845467f-pqgll                                        1/1     Running   0               8m35s
kube-system                    coredns-7d8f74b498-ft7rf                                                  1/1     Running   0               10m
kube-system                    coredns-7d8f74b498-pqgp7                                                  1/1     Running   0               7m35s
kube-system                    docker-registry-wdc-2-tkc-cluster-1-n89g2-zc27k                           1/1     Running   0               11m
kube-system                    docker-registry-wdc-2-tkc-cluster-1-node-pool-01-4dql7-7b8b84fb4b-6cvz9   1/1     Running   0               8m46s
kube-system                    docker-registry-wdc-2-tkc-cluster-1-node-pool-01-4dql7-7b8b84fb4b-rgn29   1/1     Running   0               8m34s
kube-system                    docker-registry-wdc-2-tkc-cluster-1-node-pool-01-4dql7-7b8b84fb4b-rsmfw   1/1     Running   0               9m
kube-system                    etcd-wdc-2-tkc-cluster-1-n89g2-zc27k                                      1/1     Running   0               11m
kube-system                    kube-apiserver-wdc-2-tkc-cluster-1-n89g2-zc27k                            1/1     Running   0               11m
kube-system                    kube-controller-manager-wdc-2-tkc-cluster-1-n89g2-zc27k                   1/1     Running   0               11m
kube-system                    kube-proxy-67xjk                                                          1/1     Running   0               8m46s
kube-system                    kube-proxy-6fttt                                                          1/1     Running   0               8m35s
kube-system                    kube-proxy-m4wt8                                                          1/1     Running   0               11m
kube-system                    kube-proxy-rbsjw                                                          1/1     Running   0               9m1s
kube-system                    kube-scheduler-wdc-2-tkc-cluster-1-n89g2-zc27k                            1/1     Running   0               11m
kube-system                    metrics-server-6f7c489795-scmm6                                           1/1     Running   0               8m36s
secretgen-controller           secretgen-controller-6966677567-4hngd                                     1/1     Running   0               8m26s
tkg-system                     kapp-controller-55f9977c86-bqppj                                          2/2     Running   0               9m22s
tkg-system                     tanzu-capabilities-controller-manager-cb4bc7978-qh9s8                     1/1     Running   3 (87s ago)     7m54s
vmware-system-auth             guest-cluster-auth-svc-r4rk9                                              1/1     Running   0               7m48s
vmware-system-cloud-provider   guest-cluster-cloud-provider-859b8dc577-8jlth                             1/1     Running   0               8m48s
vmware-system-csi              vsphere-csi-controller-6db86b997-l5glc                                    6/6     Running   0               8m46s
vmware-system-csi              vsphere-csi-node-7bdpl                                                    3/3     Running   2 (7m34s ago)   8m34s
vmware-system-csi              vsphere-csi-node-q7zqr                                                    3/3     Running   3 (7m32s ago)   8m46s
vmware-system-csi              vsphere-csi-node-r8v2c                                                    3/3     Running   3 (7m34s ago)   8m44s
vmware-system-csi              vsphere-csi-node-zl4m2                                                    3/3     Running   3 (7m40s ago)   8m46s
andreasm@linuxvm01:~/tkc-wdc-01-vds$ k get ns
NAME                           STATUS   AGE
default                        Active   12m
kube-node-lease                Active   12m
kube-public                    Active   12m
kube-system                    Active   12m
secretgen-controller           Active   9m3s
tkg-system                     Active   9m55s
vmware-system-auth             Active   12m
vmware-system-cloud-provider   Active   10m
vmware-system-csi              Active   10m
vmware-system-tkg              Active   12m
By default we are not allowed to run anything on our newly created tkc cluster. We need to define some ClusterRoles. I will just apply a global clusterolres on my tkc cluster so I can do what I want with it like this: Apply the psp policy yaml:
apiVersion: rbac.authorization.k8s.io/v1
kind: ClusterRole
metadata:
  name: psp:privileged
rules:
- apiGroups: ['policy']
  resources: ['podsecuritypolicies']
  verbs:     ['use']
  resourceNames:
  - vmware-system-privileged
---
apiVersion: rbac.authorization.k8s.io/v1
kind: ClusterRoleBinding
metadata:
  name: all:psp:privileged
roleRef:
  kind: ClusterRole
  name: psp:privileged
  apiGroup: rbac.authorization.k8s.io
subjects:
- kind: Group
  name: system:serviceaccounts
  apiGroup: rbac.authorization.k8s.io
kubectl apply -f roles.yaml
clusterrole.rbac.authorization.k8s.io/psp:privileged created
clusterrolebinding.rbac.authorization.k8s.io/all:psp:privileged created
Now that I am allowed to deploy stuff I am ready to consume the newly cluster. But this blog was how to deploy Tanzu with VDS and Avi Loadbalancer. So far I have only covered the L4 part where Avi is providing me the K8s API endpoints, I will now jump over to the section where I configure both Avi and my tkc cluster to use Ingress (L7) also so I can publish/expose my applications with ingress. That means installing an additional component called AKO in my tkc cluster and configure Avi accordingly.
Configure Avi as Ingress controller (L7) #
For Avi Ingress we need to deploy a component in our TKC cluster called AKO. AKO stands for Avi Kubernetes Operator and introduces the ability to translate our k8s api to the Avi controller so we can make our Avi automatically create vs services for us as soon as we request them from our TKC cluster. To deploy AKO we use Helm. In short we need to add the AKO helm repository, get the ako values, edit them to fit our environment, then install it by using Helm. So let us go through this step-by-step (I have also covered it a while back in an Upstream k8s cluster) but let us do it again here.
Create the namespace for the ako pod:
k create ns avi-system
namespace/avi-system created
Then add the repo to Helm:
helm repo add ako https://projects.registry.vmware.com/chartrepo/ako
Check the repo:
andreasm@linuxvm01:~$ helm search repo
NAME            	CHART VERSION	APP VERSION	DESCRIPTION
ako/ako         	1.8.2        	1.8.2      	A helm chart for Avi Kubernetes Operator
ako/ako-operator	1.3.1        	1.3.1      	A Helm chart for Kubernetes AKO Operator
ako/amko        	1.8.2        	1.8.2      	A helm chart for Avi Kubernetes Operator
Get the values.yaml:
helm show values ako/ako --version 1.8.2 > values.yaml
Now its time to edit the value file. I will go through the values files, update it accordingly and adjust some configurations in Avi controller.
The values.yaml for ako chart:
# this file has been edited by me to easier reflect the changes I have done. So all default comments have been removed, and contains only my comments.
replicaCount: 1

image:
  repository: projects.registry.vmware.com/ako/ako
  pullPolicy: IfNotPresent


AKOSettings:
  primaryInstance: true
  enableEvents: 'true'
  logLevel: WARN
  fullSyncFrequency: '1800'
  apiServerPort: 8080
  deleteConfig: 'false'
  disableStaticRouteSync: 'false'
  clusterName: wdc-tkc-cluster-1   # Here we need to define a name for our specific TKC cluster. This must not be the exact names as the cluster itself, but why not, it MUST be unique across all your TKC clusters if you have multiple AKO enabled TKC/K8s clusters on same Avi controller
  cniPlugin: 'antrea' #This needs to be set to Antrea, the reason is that you would like to configure NodePortLocal.
  enableEVH: false
  layer7Only: true # This is very important to set to true as we already have an other AKO instance managing L4 for our k8s api endpoints. We will only configure this instance to use L7.

  namespaceSelector:
    labelKey: ''
    labelValue: ''
  servicesAPI: false
  vipPerNamespace: 'false'

NetworkSettings:
  nodeNetworkList:
  # nodeNetworkList:
    - networkName: "vds-tkc-workload-vlan-1026" # this is the VDS portgroup you have for your specific TKC cluster workers running in. In my case the defined portgroup name above. You can see this in vCenter
      cidrs:
      - 10.102.6.0/24 # this is the CIDR for your workers
  enableRHI: false
  nsxtT1LR: ''
  bgpPeerLabels: []
  # bgpPeerLabels:
  #   - peer1
  #   - peer2
  vipNetworkList:
    - networkName: "vds-tkc-frontend-vlan-1027" # This can be the same VIP network you have configured in previously for api endpint or it can be a completely new one. I am going the easy route using the same. It can be shared across multiple cluster (is using NodePortLocal), or can be specific for each tkc cluster.
      cidr: 10.102.7.0/24

L7Settings:
  defaultIngController: 'true' # Specify if this is the only Ingress controller you have or default if using several others.
  noPGForSNI: false
  serviceType: NodePortLocal # Here we select nodeportlocal - verify that Antrea is configured to use NodePortLocal
  shardVSSize: SMALL   # I am setting this to small so I can run more services using same IP.
  passthroughShardSize: SMALL
  enableMCI: 'false'

L4Settings:
  defaultDomain: ''
  autoFQDN: default


ControllerSettings:
  serviceEngineGroupName: Default-Group   # If you dont decide to use the same VIP as k8s api endpoint you could decide to create an additional ServiceEngineGroup for your L7 services (IP separation etc).
  controllerVersion: '22.1.1' # AKO version 1.8.2 supports Avi 22.1.3
  cloudName: Default-Cloud   # The configured cloud name on the Avi controller.
  controllerHost: '172.21.101.50' # IP address or Hostname of Avi Controller
  tenantName: admin

nodePortSelector:
  key: ''
  value: ''

resources:
  limits:
    cpu: 350m
    memory: 400Mi
  requests:
    cpu: 200m
    memory: 300Mi

podSecurityContext: {}

rbac:
  pspEnable: false


avicredentials:
  username: 'admin' # username for the Avi controller
  password: 'password' # password for the Avi controller
  authtoken:
  certificateAuthorityData:


persistentVolumeClaim: ''
mountPath: /log
logFile: avi.log
A word around the VIP network used for the L7/Ingress. As we deploy AKO as standalone we are not restricted to use only the components defined to support the install of Tanzu with vSphere, like service engine groups, vip networks etc. We could decide to create a separate VIP network by using a dedicated SE group for these networks. We could also decide to have the SE’s using a separate dataplane network than the VIP itself. If going this path there is some config steps that needs to be taken on the network side. Routing to the VIP addresses, either Avi can be configured by using BGP, or we create static routes in the physical routers. But as the VIPs are coming and going (applications are published, deleted, etc) these IPs change. So BGP would be the best option, or use an already defined VLAN as I am doing in this example. In my other post on using NSX and Avi with Tanzu I will show how to use NSX for BGP. Maybe I will update this post also by adding a section where I use BGP from Avi to my upstream router. But for now I will stick with using my VLAN I have called frontend which already have a gateway and a route defined. So all my VIPs will be reachable through this network.
Antrea NodePortLocal #
And another word around NodePortLocal. To be able to utilize NodePortLocal your Antrea config in the TKC cluster must be verified whether it is configured with NPL or not. So let us do instead of just assume something.
andreasm@linuxvm01:~/ako/ako_vds$ k get configmaps -n kube-system antrea-config-f5d8g47b88 -oyaml
apiVersion: v1
data:
  antrea-agent.conf: |
    featureGates:
      AntreaProxy: true
      EndpointSlice: true
      Traceflow: true
      NodePortLocal: false
      AntreaPolicy: true
      FlowExporter: false
      NetworkPolicyStats: false
      Egress: false
      AntreaIPAM: false
      Multicast: false
      ServiceExternalIP: false
    trafficEncapMode: encap
    noSNAT: false
    tunnelType: geneve
    trafficEncryptionMode: none
    wireGuard:
      port: 51820
    egress: {}
    serviceCIDR: 20.10.0.0/16
Well that was not good. So we need to enable it. Luckily, with Tanzu with vSphere its quite simple actually. Switch context to your vSphere Namespace, edit an antreaconfig, apply it.
andreasm@linuxvm01:~/antrea$ k config use-context wdc-2-ns-1
Switched to context "wdc-2-ns-1".
andreasm@linuxvm01:~/antrea$ k get cluster
NAME                  PHASE         AGE     VERSION
wdc-2-tkc-cluster-1   Provisioned   3h26m   v1.23.8+vmware.2
andreasm@linuxvm01:~/antrea$ k apply -f antreaconfig-wdc-2-nsx-1.yaml
Warning: resource antreaconfigs/wdc-2-tkc-cluster-1-antrea-package is missing the kubectl.kubernetes.io/last-applied-configuration annotation which is required by kubectl apply. kubectl apply should only be used on resources created declaratively by either kubectl create --save-config or kubectl apply. The missing annotation will be patched automatically.
antreaconfig.cni.tanzu.vmware.com/wdc-2-tkc-cluster-1-antrea-package configured
The antreaconfig I used:
apiVersion: cni.tanzu.vmware.com/v1alpha1
kind: AntreaConfig
metadata:
  name: wdc-2-tkc-cluster-1-antrea-package  # notice the naming-convention tkc cluster name-antrea-package
  namespace: wdc-2-ns-1 # your vSphere Namespace the TKC cluster is in.
spec:
  antrea:
    config:
      featureGates:
        AntreaProxy: true
        EndpointSlice: false
        AntreaPolicy: true
        FlowExporter: false
        Egress: true
        NodePortLocal: true # Set this to true
        AntreaTraceflow: true
        NetworkPolicyStats: true
Lets have a look at my Antrea config in my TKC cluster now:
andreasm@linuxvm01:~/antrea$ k config use-context
10.102.7.11          wdc-2-ns-1           wdc-2-tkc-cluster-1
andreasm@linuxvm01:~/antrea$ k config use-context wdc-2-tkc-cluster-1
Switched to context "wdc-2-tkc-cluster-1".
andreasm@linuxvm01:~/antrea$ k get configmaps -n kube-system antrea-config-f5d8g47b88 -oyaml
apiVersion: v1
data:
  antrea-agent.conf: |
    featureGates:
      AntreaProxy: true
      EndpointSlice: false
      Traceflow: true
      NodePortLocal: true # Yes, there it is
      AntreaPolicy: true
      FlowExporter: false
      NetworkPolicyStats: true
      Egress: true
      AntreaIPAM: false
      Multicast: false
      ServiceExternalIP: false
    trafficEncapMode: encap
    noSNAT: false
    tunnelType: geneve
    trafficEncryptionMode: none
    wireGuard:
      port: 51820
    egress:
      exceptCIDRs: []
    serviceCIDR: 20.10.0.0/16
But… Even though our cluster config has been updated we need to delete the Antrea pods so they can restart and read their new configmap again.
andreasm@linuxvm01:~/ako$ k delete pod -n kube-system antrea-controller-575845467f-pqgll
pod "antrea-controller-575845467f-pqgll" deleted
andreasm@linuxvm01:~/ako$ k delete pod -n kube-system antrea-agent-
antrea-agent-77drs  antrea-agent-j482r  antrea-agent-thh5b  antrea-agent-tz4fb
andreasm@linuxvm01:~/ako$ k delete pod -n kube-system antrea-agent-77drs
pod "antrea-agent-77drs" deleted
andreasm@linuxvm01:~/ako$ k delete pod -n kube-system antrea-agent-j482r
pod "antrea-agent-j482r" deleted
andreasm@linuxvm01:~/ako$ k delete pod -n kube-system antrea-agent-thh5b
pod "antrea-agent-thh5b" deleted
andreasm@linuxvm01:~/ako$ k delete pod -n kube-system antrea-agent-tz4fb
pod "antrea-agent-tz4fb" deleted
Configure Avi as Ingress controller (L7) - continue #
Now that we have assured NodePortLocal is configured, its time to deploy AKO. I have also verified that I have the VIP network configured in Avi as I am using the existing network that is already defined. So install AKO then 😄
helm install  ako/ako  --generate-name --version 1.8.2 -f ako.vds.wdc-2.values.yaml --namespace=avi-system
NAME: ako-1675511021
LAST DEPLOYED: Sat Feb  4 11:43:42 2023
NAMESPACE: avi-system
STATUS: deployed
REVISION: 1
TEST SUITE: None
Verify that the AKO pod is running:
andreasm@linuxvm01:~/ako/ako_vds$ k get pods -n avi-system
NAME    READY   STATUS    RESTARTS   AGE
ako-0   1/1     Running   0          57s
Check logs for some immediate messages that needs investigating before trying to deploy a test application.
andreasm@linuxvm01:~/ako/ako_vds$ k logs -n avi-system ako-0
2023-02-04T11:43:51.240Z	INFO	api/api.go:52	Setting route for GET /api/status
2023-02-04T11:43:51.241Z	INFO	ako-main/main.go:71	AKO is running with version: v1.8.2
2023-02-04T11:43:51.241Z	INFO	api/api.go:110	Starting API server at :8080
2023-02-04T11:43:51.242Z	INFO	ako-main/main.go:81	We are running inside kubernetes cluster. Won't use kubeconfig files.
2023-02-04T11:43:51.265Z	INFO	lib/control_config.go:198	ako.vmware.com/v1alpha1/AviInfraSetting enabled on cluster
2023-02-04T11:43:51.270Z	INFO	lib/control_config.go:207	ako.vmware.com/v1alpha1/HostRule enabled on cluster
2023-02-04T11:43:51.273Z	INFO	lib/control_config.go:216	ako.vmware.com/v1alpha1/HTTPRule enabled on cluster
2023-02-04T11:43:51.290Z	INFO	ako-main/main.go:150	Kubernetes cluster apiserver version 1.23
2023-02-04T11:43:51.296Z	INFO	utils/utils.go:168	Initializing configmap informer in avi-system
2023-02-04T11:43:51.296Z	INFO	lib/dynamic_client.go:118	Skipped initializing dynamic informers antrea
2023-02-04T11:43:51.445Z	INFO	k8s/ako_init.go:455	Successfully connected to AVI controller using existing AKO secret
2023-02-04T11:43:51.446Z	INFO	ako-main/main.go:261	Valid Avi Secret found, continuing ..
2023-02-04T11:43:51.866Z	INFO	cache/avi_ctrl_clients.go:71	Setting the client version to 22.1.1
2023-02-04T11:43:51.866Z	INFO	ako-main/main.go:279	SEgroup name found, continuing ..
2023-02-04T11:43:53.015Z	INFO	cache/controller_obj_cache.go:2340	Avi cluster state is CLUSTER_UP_NO_HA
2023-02-04T11:43:53.176Z	INFO	cache/controller_obj_cache.go:2901	Setting cloud vType: CLOUD_VCENTER
2023-02-04T11:43:53.176Z	INFO	cache/controller_obj_cache.go:2904	Setting cloud uuid: cloud-ae84c777-ebf8-4b07-878b-880be6b201b5
2023-02-04T11:43:53.176Z	INFO	lib/lib.go:291	Setting AKOUser: ako-wdc-2-tkc-cluster-1 for Avi Objects
2023-02-04T11:43:53.177Z	INFO	cache/controller_obj_cache.go:2646	Skipping the check for SE group labels
2023-02-04T11:43:53.332Z	INFO	cache/controller_obj_cache.go:3204	Setting VRF global found from network vds-tkc-frontend-vlan-1027
2023-02-04T11:43:53.332Z	INFO	record/event.go:282	Event(v1.ObjectReference{Kind:"Pod", Namespace:"avi-system", Name:"ako-0", UID:"4b0ee7bf-e5f5-4987-b226-7687c5759b4a", APIVersion:"v1", ResourceVersion:"41019", FieldPath:""}): type: 'Normal' reason: 'ValidatedUserInput' User input validation completed.
2023-02-04T11:43:53.336Z	INFO	lib/lib.go:230	Setting Disable Sync to: false
2023-02-04T11:43:53.338Z	INFO	k8s/ako_init.go:310	avi k8s configmap created
Looks good, let us try do deploy an application and expose it with Ingress
I have two demo applications, banana and apple. Yaml comes below. I deploy them
andreasm@linuxvm01:~/ako$ k create ns fruit
namespace/fruit created
andreasm@linuxvm01:~/ako$ k apply -f apple.yaml -f banana.yaml
pod/apple-app created
service/apple-service created
pod/banana-app created
service/banana-service created
yaml for banana and fruit
kind: Pod
apiVersion: v1
metadata:
  name: banana-app
  labels:
    app: banana
  namespace: fruit
spec:
  containers:
    - name: banana-app
      image: hashicorp/http-echo
      args:
        - "-text=banana"

---

kind: Service
apiVersion: v1
metadata:
  name: banana-service
  namespace: fruit
spec:
  selector:
    app: banana
  ports:
    - port: 5678 # Default port for image
kind: Pod
apiVersion: v1
metadata:
  name: apple-app
  labels:
    app: apple
  namespace: fruit
spec:
  containers:
    - name: apple-app
      image: hashicorp/http-echo
      args:
        - "-text=apple"

---

kind: Service
apiVersion: v1
metadata:
  name: apple-service
  namespace: fruit
spec:
  selector:
    app: apple
  ports:
    - port: 5678 # Default port for image
Then I apply the Ingress:
apiVersion: networking.k8s.io/v1
kind: Ingress
metadata:
  name: ingress-example
  namespace: fruit
#  annotations:
#    ako.vmware.com/enable-tls: "true"

spec:
  ingressClassName: avi-lb
  rules:
    - host: fruit-tkgs.you-have.your-domain.here
      http:
        paths:
        - path: /apple
          pathType: Prefix
          backend:
            service:
              name: apple-service
              port:
                number: 5678
        - path: /banana
          pathType: Prefix
          backend:
            service:
              name: banana-service
              port:
                number: 5678
k apply -f ingress-example.yaml
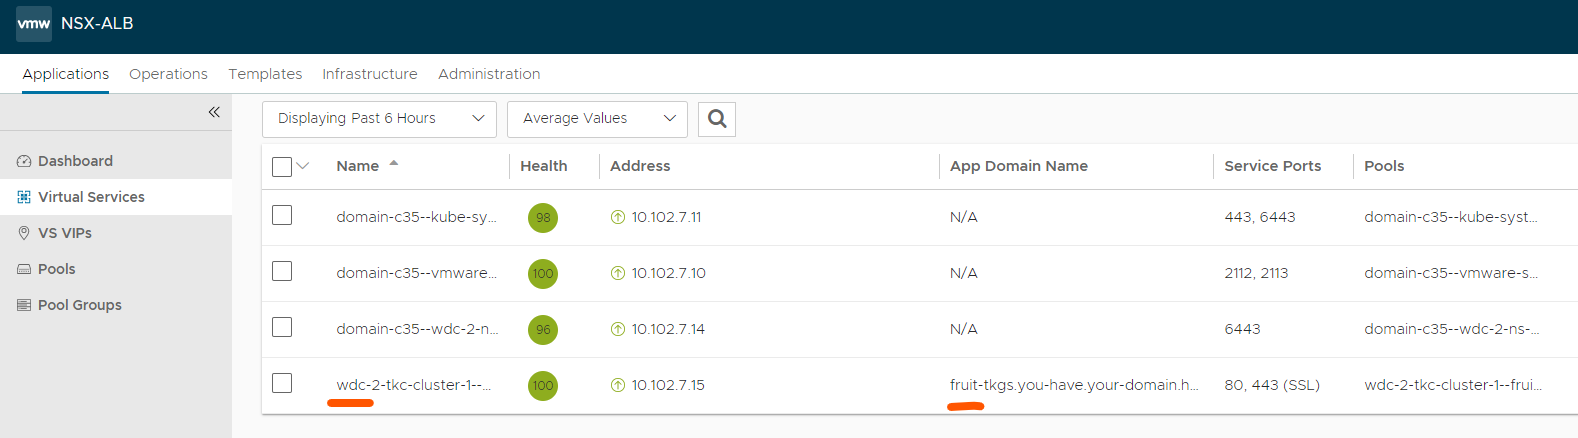
You should more or less instantly notice a new virtual service in your Avi controller:
And let us check the ingress in k8s:
andreasm@linuxvm01:~/ako$ k get ingress -n fruit
NAME              CLASS    HOSTS                                  ADDRESS       PORTS   AGE
ingress-example   avi-lb   fruit-tkgs.you-have.your-domain.here   10.102.7.15   80      2m49s
There it is, with the actual VIP it gets from Avi.
Heres is the view of the application from the Dashboard view in Avi:
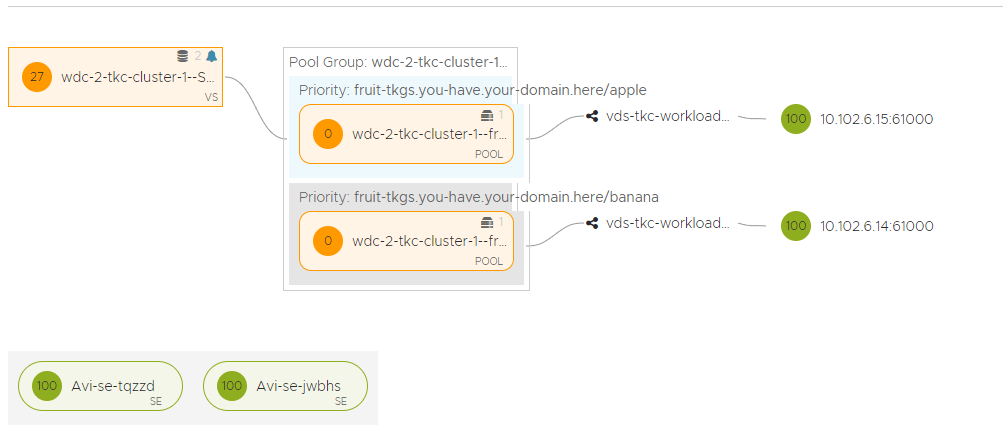
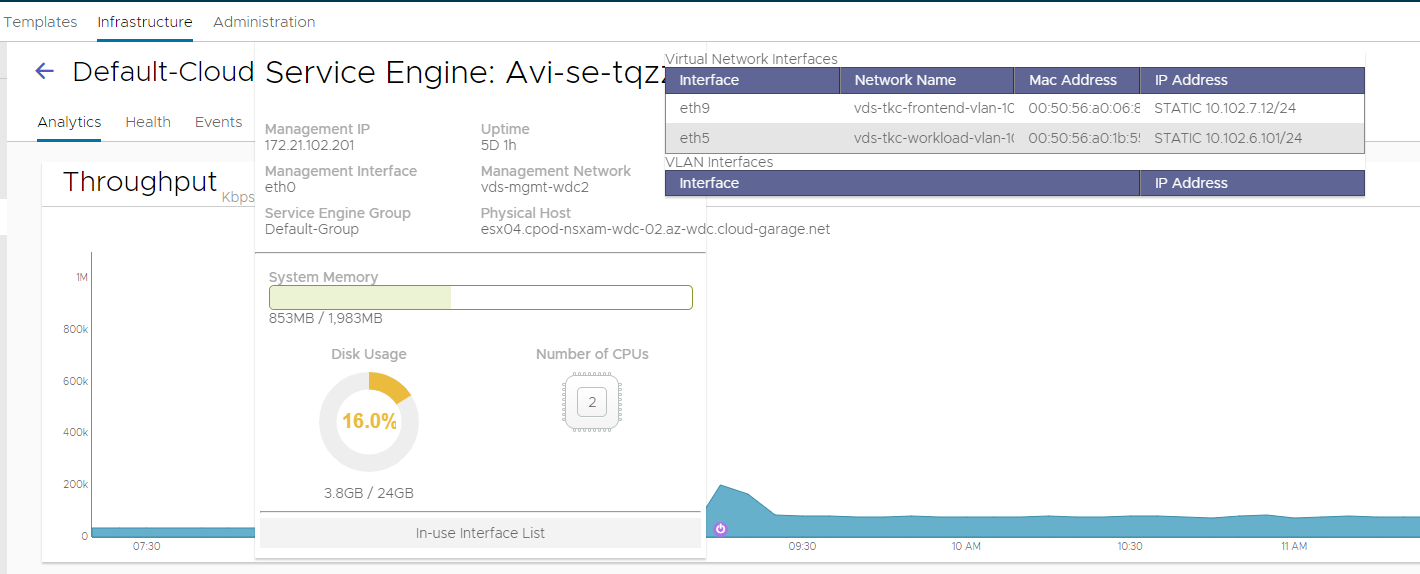
Also notice that the SE’s now also places itself in the same network as the worker nodes, but still creates the VIP in the frontend-network.
Meaning our network diagram will now look like this:
Now, AKO comes with its own CRDs that one can work with. I will go through these in a separate post.