

This article will quickly go through how to create wildcard certificates and automatically renew them with Lets Encrypt and Cert-Manager
Cert-Manager #
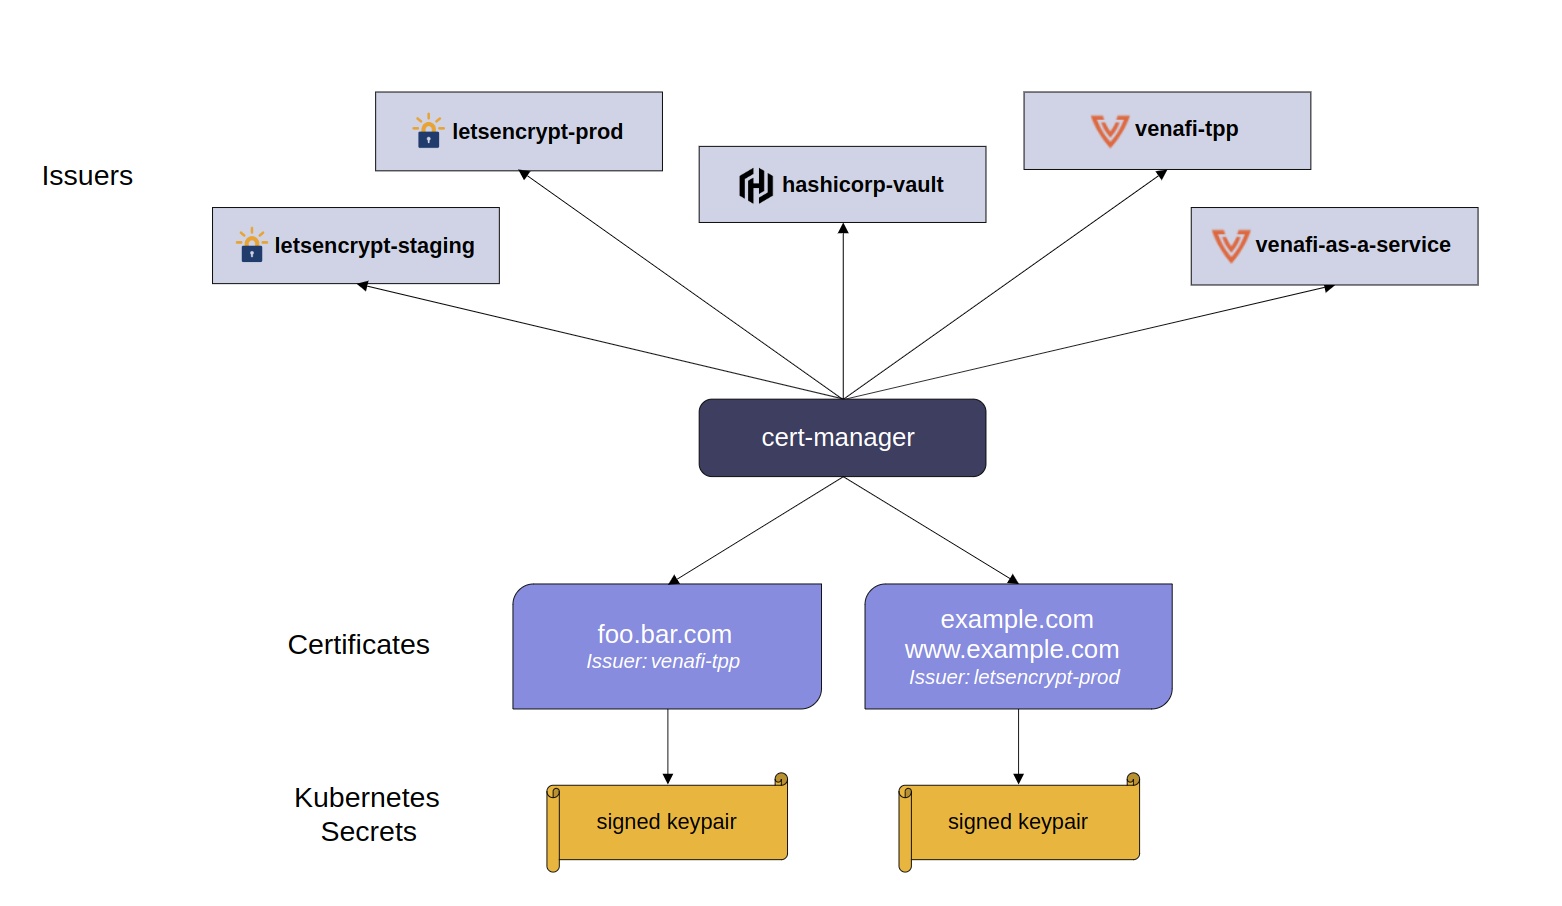
cert-manager adds certificates and certificate issuers as resource types in Kubernetes clusters, and simplifies the process of obtaining, renewing and using those certificates.
It can issue certificates from a variety of supported sources, including Let’s Encrypt, HashiCorp Vault, and Venafi as well as private PKI.
It will ensure certificates are valid and up to date, and attempt to renew certificates at a configured time before expiry. link
Install Cert-Manager #
I prefer the Helm way so lets add the cert-manager helm chart:
helm repo add jetstack https://charts.jetstack.io
helm repo update
Then we need to deploy cert-manager. This can be done out-of-the-box with the commands given from the official docs (this also installed the necessary CRDs):
helm install \
  cert-manager jetstack/cert-manager \
  --namespace cert-manager \
  --create-namespace \
  --version v1.9.1 \
  --set installCRDs=true
Or if you need to customize some settings, as I needed to do, I used this command:
helm install -f /path/to/cert-manager.values.yaml cert-manager jetstack/cert-manager --namespace cert-manager --version v1.9.1 --set installCRDs=true --set 'extraArgs={--dns01-recursive-nameservers-only,--dns01-recursive-nameservers=xx.xx.xx.xx:53\,xx.xx.xx:53}'
The above command takes care of the cert-manager installation including the necessary CRDs, but it will also adjust the DNS servers Cert-Manager will use to verify the ownership of my domain.
DNS01 - Wildcard certificate #
In this post I will go with wildcard certificate creation. I find it easier to use instead of having a separate cert for everthing I do, as long as they are within the same subdomain. So if I have my services in *.example.com they can use the same certificate. But if I have services in *.int.example.com I can not use the same certificate as LetsEncrypt certificates dont support that. Then you need to create a separate wildcard cert for each subdomain. But Cert-manager will handle that for you very easy.
The offiicial Cert-Manager supported DNS01 providers are:
There is also an option to use Webhooks. I did try that as my previous DNS registrar were not on the DNS01 supported list. I did not succeed with using the webhook approach. It could be an issue with the specific webhooks I used or even with my registrar so I decided to migrate over to CloudFlare which is on the supported list, “out of the box”.
Issuer - CloudFlare and LetsEncrypt #
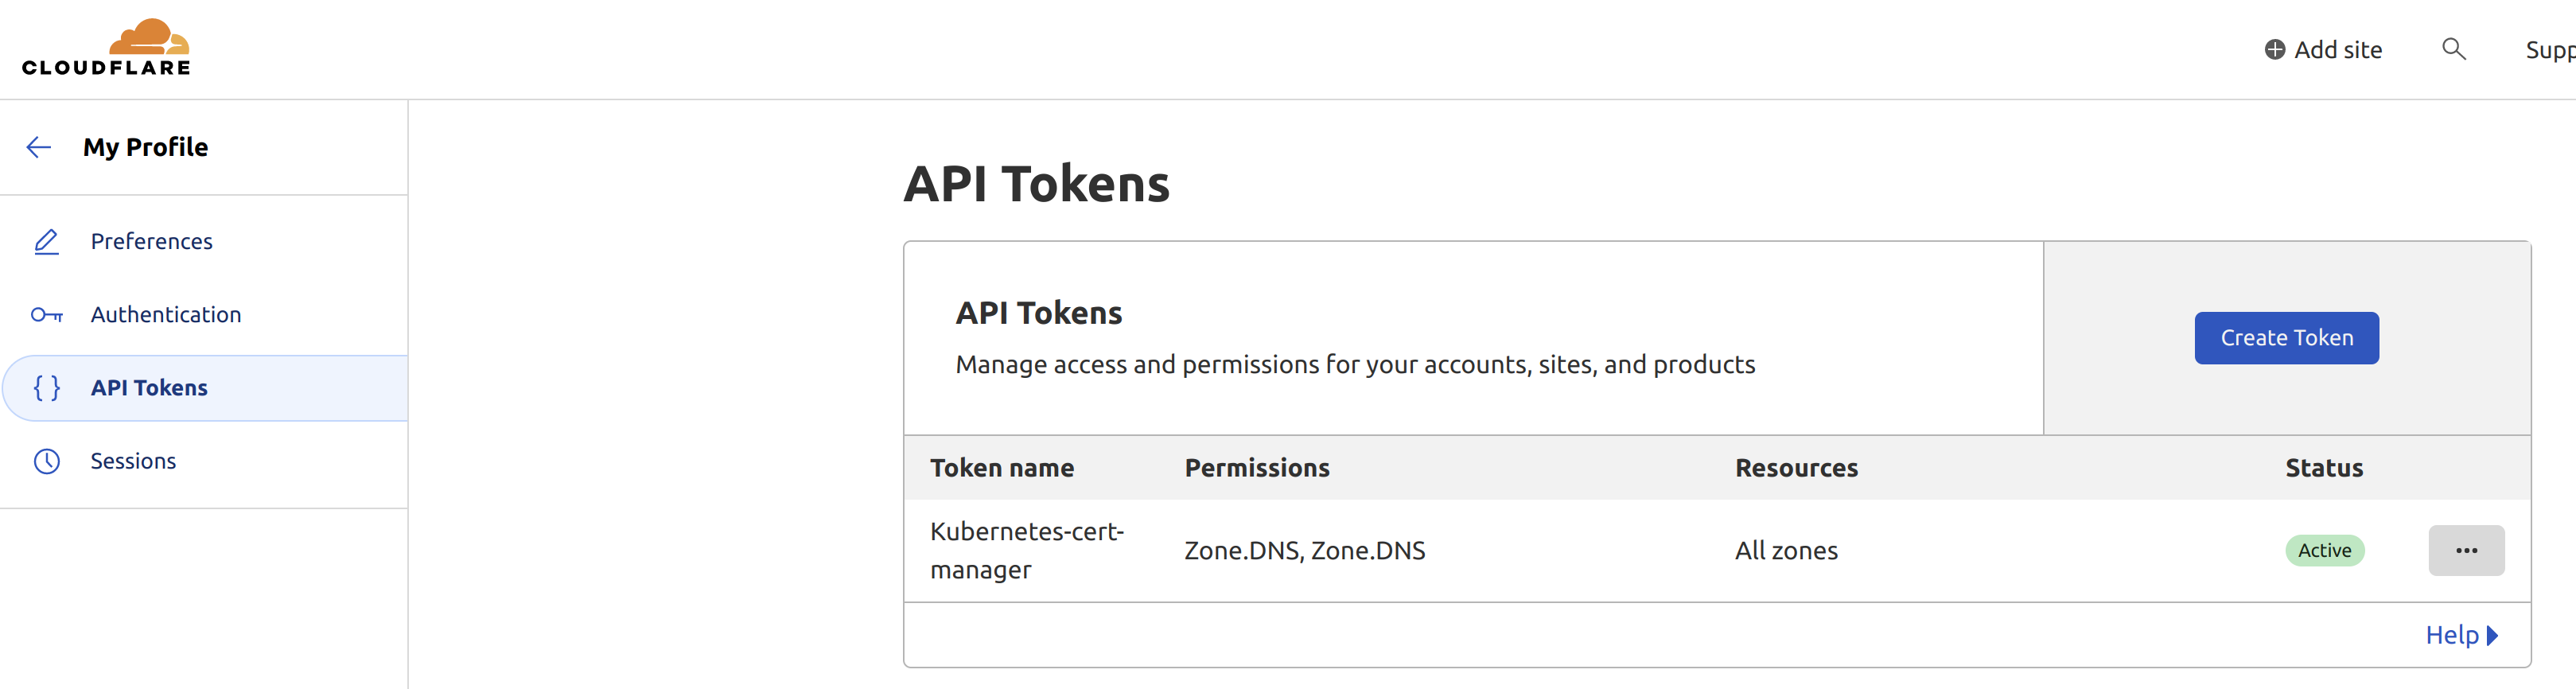
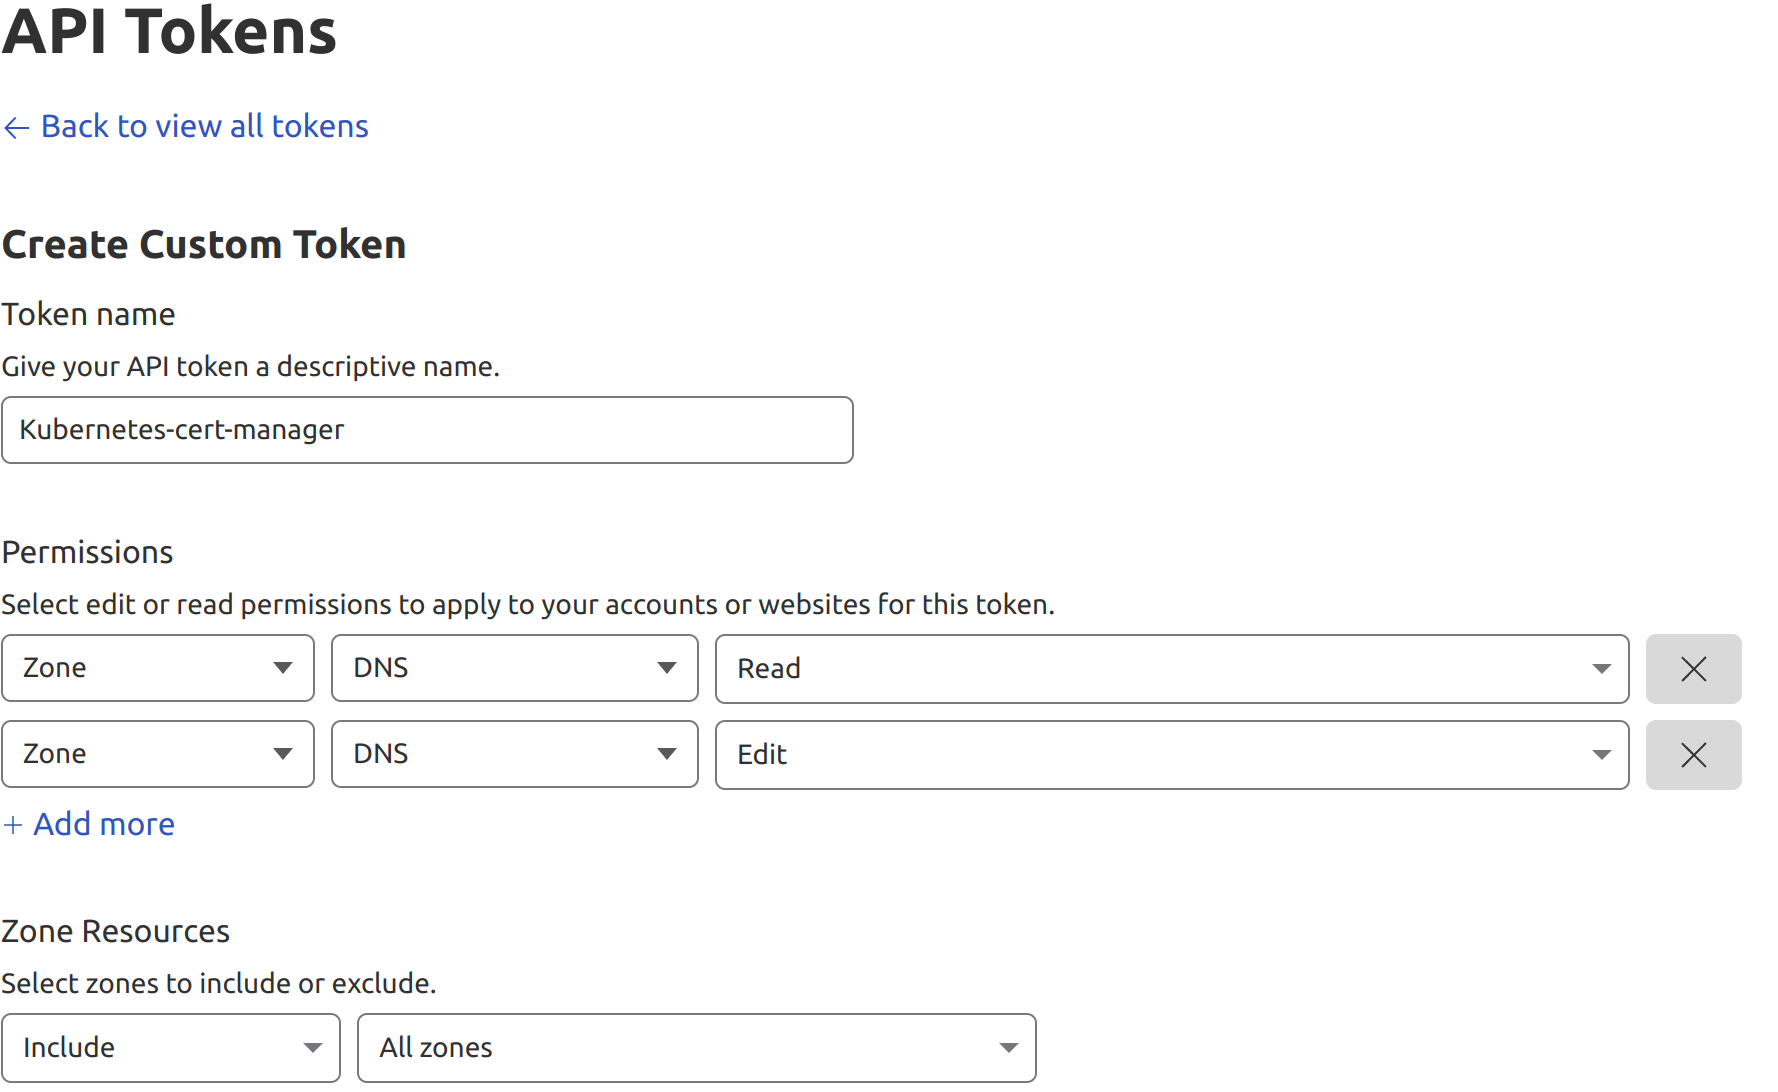
The first we need to do is to create a secret for Cert-Manager to use when “interacting” with CloudFlare. I went with API Token. So head over to your CloudFlare control panel and create a token for Cert Manager like this:
Here is the permissions:
Now use the tokens to create your secret:
apiVersion: v1
kind: Secret
metadata:
  name: cloudflare-api-token-secret
  namespace: cert-manager
type: Opaque
stringData:
  api-token:
Apply it kubect apply -f name.of.yaml
Now create your issuer. LetsEncrypt have two repos, one called staging and one production. Start out with staging until everything works so you dont hit the LetsEncrypt limit. In regards to this I created two issuers, one for staging and one for production. When everything was working and I have verified the certificates etc I deployed the certs using the prod-issuer.
Issuer-staging:
apiVersion: cert-manager.io/v1
kind: ClusterIssuer
metadata:
  name: letsencrypt-staging
spec:
  acme:
    # ACME Server
    # prod : https://acme-v02.api.letsencrypt.org/directory
    # staging : https://acme-staging-v02.api.letsencrypt.org/directory
    server: https://acme-staging-v02.api.letsencrypt.org/directory
    # ACME Email address
    email: xxx.xxx@xxx.xxx
    privateKeySecretRef:
      name: letsencrypt-key-staging # staging or production
    solvers:
    - dns01:
        cloudflare:
          apiTokenSecretRef:
            name: cloudflare-api-token-secret ## created and applied above
            key: api-token
Issuer-production:
apiVersion: cert-manager.io/v1
kind: ClusterIssuer
metadata:
  name: letsencrypt-prod
  namespace: cert-manager
spec:
  acme:
    # ACME Server
    # prod : https://acme-v02.api.letsencrypt.org/directory
    # staging : https://acme-staging-v02.api.letsencrypt.org/directory
    server: https://acme-v02.api.letsencrypt.org/directory
    # ACME Email address
    email: xxx.xxx@xxx.xxx
    privateKeySecretRef:
      name: letsencrypt-key-prod # staging or production
    solvers:
    - dns01:
        cloudflare:
          apiTokenSecretRef:
            name: cloudflare-api-token-secret # created and applied above
            key: api-token
Request certificate #
Now that the groundwork for cert-manager has been setup, its time to “print” some certificates. Prepare your yamls for both the staging key and production key.
Wildcard-staging:
apiVersion: cert-manager.io/v1
kind: Certificate
metadata:
  name: name-tls-test
  namespace: namespace-you-want-the-cert-in
spec:
  secretName: name-tls-staging
  issuerRef:
    name: letsencrypt-staging
    kind: ClusterIssuer
  duration: 2160h # 90d
  renewBefore: 720h # 30d before SSL will expire, renew it
  dnsNames:
    - "*.example.com"
Wildcard-production:
apiVersion: cert-manager.io/v1
kind: Certificate
metadata:
  name: name-tls-production
  namespace: namespace-you-want-the-cert-in
spec:
  secretName: name-tls-prod
  issuerRef:
    name: letsencrypt-prod
    kind: ClusterIssuer
  duration: 2160h # 90d
  renewBefore: 720h # 30d before SSL will expire, renew it
  dnsNames:
    - "*.example.com"
Apply the staging request first. Check your certificate status with this command:
$ kubectl get certificate -n namespace-you-wrote
NAME               READY   SECRET                AGE
name-tls-staging   True    name-tls-staging      8d
Please note that it can take a couple of minutes before the certificate is ready. This applies for production also.
If everything went well, delete your staging certificate and apply your production certificate with the production yaml. Thats it. Now Cert-Manager will take care of updating your certificate for your, sit back and enjoy your applications with your always up to date certificates.
Troubleshooting tips, commands #
If something should fail there is a couple of commands you can use to figure out whats going on.
$ kubectl get issuer
$ kubectl get clusterissuer
$ kubectl describe issuer
$ kubectl describe clusterissuer
$ kubectl describe certificaterequest
$ kubectl describe order
$ kubectl get challenges
$ kubectl describe challenges
For more detailed explanation go here